
You love your garden and your neighborhood park, but there are times you must spend indoors. Maybe you’ve wished you could bring more of nature inside with you, but you’ve felt hesitant because of kids, pets, and other concerns. Which indoor plants are safe to grow? And which ones will actually fare well, apart from their natural environments?
Air garden. One option is an air garden. These plants don’t even need soil to thrive, so you don’t need to worry about your cat or kids making a mess with dirt. You can keep air plants in small terrariums or in hanging globes, and they require very little care.
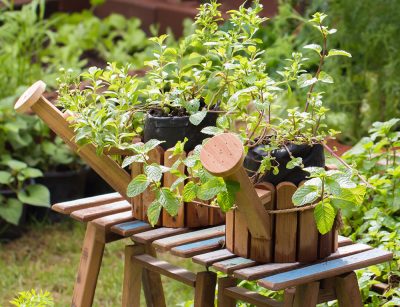
Herb garden. Your kitchen windowsill might provide the perfect spot for a small indoor herb garden. Most common cooking herbs will grow well in a sunny window, and they’re obviously not poisonous since we use them in food.
Bathroom plants. If you’ve experienced trouble growing indoor plants in the past, it might be due to the environment. Some tropical plants prefer low light, high humidity, and warmth… All of which we can provide in the bathroom! Orchids, spider plants, bromeliads, some types of ferns, and many others will fare quite well in the bathroom. These can be places on high shelves or shower caddies, out of reach of children and pets.
Ferns. Many varieties of ferns are safe, and easy to grow just about anywhere. Their full lushness makes them a terrific accent for any room of the house. The following ferns are known to be safe for children, although you might want to double check with your veterinarian about specific pets: maidenhair fern, Boston fern, staghorn fern, holly fern, and bird’s nest fern.
Plants to avoid. There are more than 700 types of plants that can be toxic to children and pets when ingested. Often these plants won’t do serious harm unless a large amount is eaten, but it’s a good idea to simply avoid the risk. We can’t list all 700 of them, but here are some of the most common toxic plants to avoid:
• asparagus fern
• corn plant (also known as dragon tree, dracaena, or ribbon plant)
• dieffenbachia (dumb cane, tropic snow, or exotica)
• elephant ear
• lilies
• cyclamen
• heartleaf philodendron
• jade plant
• aloe
• satin pothos
If you do want to grow one of the above plants (such as aloe, because it really can be a helpful one to have handy), just grow it in a place where pets and kids can’t reach it. Hanging planters can be good options, depending upon your situation.
For more information on plants that will grow well indoors, and for help choosing non-toxic ones that are safe in a home with children or pets, give us a call. We’ll be happy to offer our expertise and help you select plants that meet your needs.
How much time do you spend indoors? If you’re like most people, you spend the majority of your days in an office, inside your home, and even in your car. You rarely set foot outside, except for the times you spend walking from your car into your office or a store. In fact, the Environmental Protection Agency studied this exact issue, and found that the average American spends 87 percent of their time indoors and 6 percent inside a vehicle. That leaves only 7 percent of our time that is spent outdoors!
If you live in an urban environment, what little time you spend outside probably does not involve fresh air and the peaceful sounds of nature. Why does this matter? Many studies have demonstrated that spending time outside is linked to lower stress, better memory, and positive feelings about oneself and one’s life. You could even craft a reasonable argument linking the excessive amount of time we spend indoors with the high numbers of people suffering from conditions like anxiety, depression, and chronic stress (although that is unlikely to be the only cause).
This realization has led many of us to become followers of the Japanese practice of shinrin-yoku, or “forest bathing”. Literally translated, shinrin-yoku means “taking in the forest atmosphere”, or soaking in the sights, sounds, and smells of a natural outdoor setting.
To practice forest bathing, the most obvious method might involve getting yourself to a national forest or state park to spend time outdoors. Walking or biking along a path is the most common form of practicing shinrin-yoku. But of course, most of us can’t do that every day. But that doesn’t mean you can’t reap the benefits of forest bathing on a daily basis. There are other options.
You can create your own woodland space in your backyard, by planting trees and shrubs to envelope you in soothing greenery. A stone footpath, weaving throughout the yard, can give you a place to linger and enjoy nature. Water features such as a fountain, waterfall, or koi pond provide the tranquility of bubbling water. Remember, also, to provide yourself with a place to sit, so that you can rest and soak in the atmosphere via all of your senses.
Give us a call if you’re ready to renovate your backyard retreat. We can help you design a soothing, park-like atmosphere so that the medicine of nature is always close at hand.
When you think of gardening, you might picture yourself heading to your favorite nursery in the spring, nurturing your chosen plants throughout the summer… And accepting their inevitable dormant period throughout winter. You just endure a few months of stark, empty, and bland landscape until you can enjoy gardening once again in the spring.
Well, say goodbye to that pattern! One trend we have recently observed is that more gardeners are carefully considering their winter landscapes, and discovering options to add beauty to their yards year-round.
Of course, that’s easier to accomplish here in Southern California. We don’t exactly have to worry about a blizzard gusting through and ruining our gardens. But still, things can get a bit dreary for us in the winter. And they don’t have to!
First of all, gardening isn’t all about flowers. Many plants provide gorgeous, colorful foliage to rival any bloom. A Japanese maple tree will provide a brilliant crimson shade throughout autumn and into early winter. Or, you could choose holly bushes that produce bright red berries. Cotoneaster works as a terrific groundcover, and produces brilliant green leaves accented by and abundance of red berries.
Ornamental grasses are another great option, especially for our climate. They’re lush and interesting, and require very little specialized care.
You can even utilize cabbage and kale in your garden; the texture is unique, the colors are vibrant, and you can grab a few leaves for a quick, healthy salad any time!
However, you don’t have to give up on flowers. Many varieties do bloom in winter, providing a burst of color when you need it most. Camellias are a great choice, and they’re drought-resistant as an added bonus. Also look for winter jasmine, witch hazel, lenten roses, pansies, snapdragons, snowdrops, and star magnolias, just to name a few.
Is your barren winter landscape currently boring or depressing you a bit? Come visit our nursery to view a wide array of brilliant foliage and bright blooms. We can help you add a bit of color and life to your yard so that you can enjoy it year-round.

Do you prefer straight lines, perfect, polished surfaces, sleek technology, and absolute symmetry? Or, do those things feel cold, impersonal, and unnatural to you? If you find most modern design to be overly rigid, and prefer a more wild, natural design theme, you might be a fan of the Japanese philosophy of wabi-sabi… Without even knowing it!
Wabi-sabi is difficult to define or explain to Westerners, because it is more than a single art form. It’s more a way of thinking about or seeing the world, and finding beauty in the imperfections. The wabi-sabi mindset favors earthiness, weathered materials, muted beauty, and the natural aging process. It is genuine and organic, in direct opposition to the shiny, plastic, artificial, perfectly uncluttered design so common these days.
Clearly, it would be simple to adopt a wabi-sabi mindset with regard to your landscaping. This is great news for more hands-off gardeners, and those who don’t want to spend hours per day obsessing over each leaf and every blade of grass!
Since the philosophy embraces the natural cycle of growth, death, decay, and rebirth, those with a wabi-sabi view of the world will enjoy observing all stages of life in their gardens. This doesn’t mean that you completely “let it all go”; rather, that you choose your plantings thoughtfully, provide for their water and soil needs, and then relax to enjoy the process. Wabi-sabi is the perfect balance of nature and nurture.
Take a moment to survey your garden right now. Are a few perennials overgrown, perhaps in a state that makes you want to cut them back? “Enthusiastic” and “abundant” would be another way to view them. They’re beautiful that way!
Is moss growing over your stone walkway? Perhaps leave it alone and let nature blur those once-strict edges.
Rusted iron gates, a weathered pot or two, a vine climbing happily throughout your shrubs…. These are all nature’s whimsical, magical gifts. They don’t need to be thrown away or replaced; their rustic beauty represents the full cycle of life.
Perhaps the best part of wabi-sabi is that it encourages you to let go of control, to let go of perfection, and to be at peace with yourself and your surroundings. Embrace it, and perhaps you will see your landscape with new eyes.
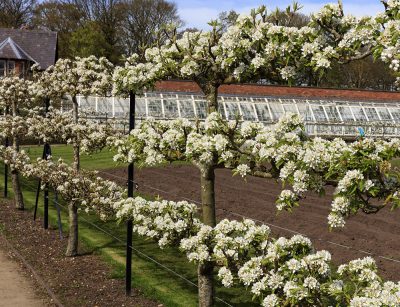
Do you wish you could grow your own fruit, but you think it’s not possible in your small yard? Or perhaps you’ve always dreamed of owning an orchard, but that seems out of reach at the moment. Learning about espaliered fruit trees might come as a happy surprise.
Many people have never heard of espalier, but the art has been around for hundreds of years or longer. Essentially the goal is to train and prune fruit trees so that they grow into a certain shape. Usually, this means that they hug walls or fences, or otherwise fit into a small space. You can even grow espaliered trees that have been grafted to include several types of fruit on one trunk!
Not only can you provide your family with homegrown fruit from your own yard; these trees are highly unique and ornamental as well.
You can espalier any smaller variety of fruit tree, but apples, pears, plums, peaches, cherries, and figs are especially popular choices. Look for “dwarf” in the name of your tree, as this indicates a smaller tree.
Next, choose the correct place for your tree. Obviously, you will be growing the tree along a wall or fence of some type, but it also needs to be a very sunny spot.
Now, consider the shape you envision for your espaliered tree. Most fall into one of five categories:
• Cordon – branches are trained to grow straight out to the sides
• Fan – branches are trained to fan upward and to the side
• Candelabra – branches are trained to grow in the cordon shape, but then turn upward at a right angle to form a candelabra shape
• Lattice – multiple trees are grown with their branches crossing one another
• Y shape – branches are trained in an upward “Y” shape
Look for a young tree that already has a good basic shape. Remove any branches that are growing in the wrong direction before planting. Then, using a wire or ribbon, tie the branches to your structure in the shape you desire. Remember that this is a project that will evolve over time, and you’re “encouraging” the branches to grow in a certain direction, rather than forcing them.
Don’t tie your branches too tightly, and continue to re-tie them in the correct direction as they grow. You will prune the tree lightly each month during the growing season, just enough to maintain the desired shape.
The best time to start an espaliered fruit tree is during its dormant state (winter or early spring). So, come see us at our nursery, and let’s get you started on a fascinating and productive new hobby!
Each year, The Pantone Color Institute chooses a “color of the year”, a reflection of current trends in the design world and pop culture at large. For 2018, Pantone has chosen Ultra Violet, a vivid purple hue, as their color of the year. Execute Director Leatrice Eiseman explains the choice:
“We are living in a time that requires inventiveness and imagination. It is this kind of creative inspiration that is indigenous to Pantone 18-3838 Ultra Violet, a blue-based purple that takes our awareness and potential to a higher level. From exploring new technologies and the greater galaxy, to artistic expression and spiritual reflection, intuitive Ultra Violet lights the way to what is yet to come”.
Those of you who are longtime lovers of purple are no doubt pleased with this news! And even if you’ve never considered yourself a “purple fan”, you might be wondering how to incorporate this year’s trending color into your landscape.
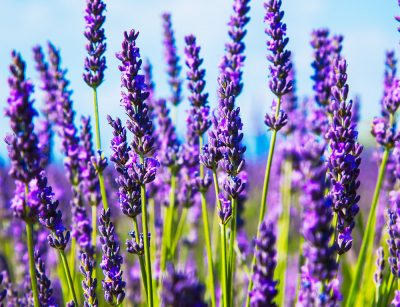
Plants. We carry many varieties of flowering plants that will add a burst of vibrant purple to your gardens. Remember to consider several varieties that bloom at different times, to keep the theme going all year. Come visit our nursery, and we’ll help you choose from varieties of Verbena, Clematis, Iris, Salvia, Violets, and more.
Edible plants. Lavender not only smells delicious, but can also be used in a variety of applications around the home (teas, baked goods, sachets, homemade soaps, and more). Thyme is another handy herb, and it produces beautiful purple flowers. And of course, there is always purple cabbage, which can be used in vegetable beds and even as an ornamental border.
A quick and easy burst of color. If you’re feeling impatient, you don’t have to wait for your new purple-hued plants to sprout. Ultra Violet is sure to take over the home décor world this year, so look for new cushions and throw pillows for your patio furniture.
Remember, we’re here to offer advice on any new plants you might be considering. Just stop by our nursery and we’ll be happy to help you choose the perfect purple flowers and foliage for your yard.
As New Year’s Day rapidly approaches, most of us are thinking about our resolutions for 2018. For some reason, we often set goals regarding food. Either we want to eat healthier fare, or we’re trying to shed post-holiday pounds. Some of us simply want to become better cooks, so that we can create meals that excite our families.
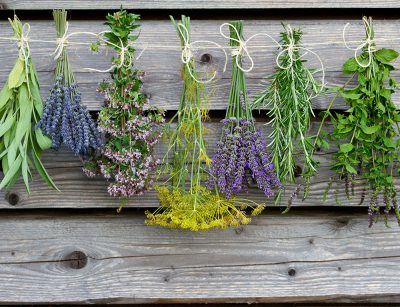
Whatever your reasoning, if food is involved in your New Year’s resolutions in any way, consider the impact that home-grown herbs and spices can have in the kitchen. Fresh flavorings add greater appeal to any dish, and can help you enjoy healthy dishes as you renovate your lifestyle. Many herbs and spices even carry health benefits of their own!
Herbs. You might have specific herbs in mind already, if you’re growing them for their health benefits. Otherwise, consider these common kitchen herbs for their taste alone: Parsley, oregano, basil, rosemary, cilantro, thyme, dill, mint, tarragon, and sage.
Spices. Many spices are derived from the ground seeds of herb plants. For example, cilantro provides delicious leaves, but the ground-up seeds of the plant are known as coriander. Laves of the fennel plant can be eaten in salads and other dishes, but it’s the seeds that we commonly utilize for their sharper taste.
Ginger and turmeric are derived from the rhizomes of their respective plants, and offer potent health benefits. The rhizomes are boiled, dried, and then ground into powder to create the forms most used in cooking.
Don’t forget other flavors. Green onions and garlic are easy to grow, and can be included in almost any garden setting. Shallots are another excellent choice, as they can lend a subtle flavor to many dishes and even salad dressings. Small peppers can be grown in hanging pots or right in the soil, and offer spicy flavor as well as the health benefits of capsicum within their seeds.
While ginger and turmeric could pose a challenge, most other herbs and spices can be grown indoors. Choose a sunny location near a window, and remember to water your plants when the soil feels dry to the touch. They will also do well in pots on a patio, or simply outside in your garden. Come visit our nursery for more advice, and we can help you select the right plants for your needs.
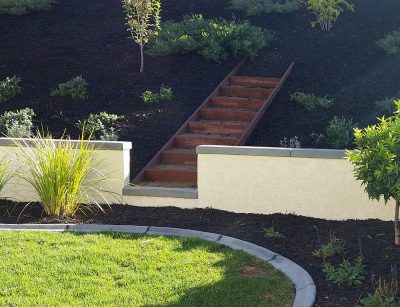
You’ve created a lovely landscape in your yard, and you look forward to years of enjoyment. And of course, you will be spending some time outdoors maintaining that landscape as well. If your lawn includes any slopes or hills, you might find yourself wearing a path up and down that area, as you lug equipment or children run and play. Building steps on a slope isn’t an easy job, but it can be an important one!
Slopes can prevent a bit of a challenge. Not only can they be inconvenient when working; you risk falling and hurting yourself as you try to scramble up or down hills carrying gardening tools. Steps are the obvious answer to this dilemma, but which type? And how do you build them?
Build from the bottom up. Steps must be constructed upon stable, compacted base material. You will remove vegetation, excavate down to the subsoil, and then cut the shape of the steps directly into the earth. But of course, your exact installation methods will depend upon the materials you select.
Wood. Wood materials, such as landscaping timbers, natural logs, or steps built from lumber, generally require less time to build. They can also be easier and less expensive. However, the lifespan of your steps will also be much shorter.
Masonry. Options like pavers, bricks, and blocks make long-lasting, beautiful designs. You can select from a wide range of materials that fit your design theme. However, the downside is that these materials can be more expensive, and usually require more time to install. Precise, professional installation is usually necessary to ensure a stable structure that will last for years.
Natural stone. Natural stone steps can be a lovely addition to your yard, and aren’t difficult to install. Simply shop for wide, flat stones, and (working from the bottom of the hill) excavate flat areas into the slope where you will place your stones. This option is best for decorative stairways. Due to the fact that natural stones are rarely perfectly flat, it could be a bit dangerous to use them on a very steep or high slope, or in areas where you anticipate hauling equipment.
How much math do you want to perform? In order to install some step designs, you will need to calculate the vertical slope of the hill, and then formulate a plan involving step height and width. This is less of an issue when you select natural landscaping methods, such as logs or natural stones, but more precise calculations are required when you opt for pavers or blocks.
We can help with that last part. Give us a call, and we can quote you a price on materials and labor for your hillside project.
Does the country life appeal to you? Perhaps you enjoy nostalgic memories of visiting your grandparents’ farm, or you dream of a peaceful, rural lifestyle. Whether you’re actually living in the country, or just want to imbue that type of ambiance in your own yard, a farmhouse landscape might be the right design theme for you.
But just what does a “farmhouse” theme entail? It could vary depending on your tastes, but these tips can help you brainstorm ideas.
Consider color. Thumb through a country lifestyle magazine, and you will notice a lot of light neutrals like tan and white, with an occasional burst of bright red or blue. The color palette for farmhouse décor tends to be quite clean and simple. Consider patterns like gingham or plaid for items like cushions and throw pillows.
Plant an edible landscape. The word “farmhouse” certainly seems to imply that there is a farm nearby! Try incorporating edible plants into your landscape, such as lettuces in your flower garden or a row of tomato plants used as a border. Fruit and vegetable-bearing plants provide pops of color just like flowers do. Plus, you can enjoy fresh, organic produce right from your own yard.
Don’t forget flowers. Avoid neat, tidy rows of flowers, and design beds that allow for lush growth instead. Hanging baskets and window boxes should be overflowing with flowers. Consider potted varieties for your porch and front steps.
Hang a swing. What says “country life” more than a porch swing?
Use white picket fencing for borders or accents. Picket fencing can be a bit pricey, but you don’t have to fence in your entire yard. A few sections of fence here and there can provide a lovely accent or define the space, especially when paired with flowers and other plantings.
Consider cast iron furniture. These seating options provide a decorate vintage appeal that has stood the test of time.
Try recycled lawn ornaments. You can find a myriad of ideas on a Pinterest page, but the general idea is to look for vintage items that can be re-purposed. Old wagon wheels or ladders, gardening tools, distressed barn wood, birdhouses, and weather vanes are popular choices.
Light it up. String lights in trees, around your porch, or on your tool shed for a festive, whimsical look at night.
For more farmhouse landscaping ideas, come walk through our nursery. We can help you select plants that work with your space and light specifications, and that fit into your overall design theme.

Your backyard can serve a variety of purposes, from hosting play dates for children to entertaining your friends with cocktails and barbecue. However, many of us need outdoor time that is soothing and peaceful. You can accomplish more than one goal in your backyard, of course, but setting aside a “sacred space” is ideal for those who seek refuge in nature. You can then utilize this space to meditate, practice yoga, or simply kick back and enjoy a good book.
Utilize natural materials.
Materials such as plastic don’t feel very “sacred”, do they? Search for materials that feel “elemental” to you, and are unaltered from their natural state. Stone and wood are popular choices for sacred spaces. It’s even better if you can find, re-purpose, or recycle materials. That way, building your sacred space won’t leave a carbon footprint.
Consider circular structures.
There is something intrinsically magical about circles. These shapes speak to our instincts. A stone circle can define your space while lending a spiritual ambiance.
Plant lush grass.
If you intend to use your space for outdoor yoga sessions, a lush grass will provide cushioning for headstands and other difficult poses. Artificial turf can be great for these spaces as bugs, mud, and other less than ideal natural elements are not included.
Include a seating area or hammock.
These will encourage you to spend more leisure time outdoors. Having an inviting seating area ready to go at a moment’s notice makes it more likely to be utilized.
Block excess noise.
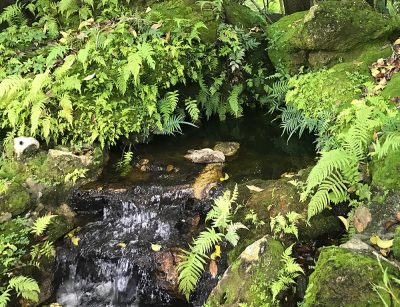
It would be difficult to create peace and quiet with excess noise intruding upon your space. Consider noise buffers for your backyard, such as fencing, hedges, or a living wall. A water feature such as a fountain would make an excellent choice, both for the noise-reducing aspects as well as the soothing sound of trickling or rushing water.
Consider a fire pit.
If you hope to use your sacred space for nighttime meditations, a fire pit would provide warmth and the perfect, magical atmosphere.
Listen to your intuition.
Your sacred space should simply “feel right” to you. Therefore, your intuition will be a guiding force in your design. If certain plants or materials appeal to you, include them!
On that note, come visit our nursery to see what nature might inspire. Sometimes the best way to design an outdoor space is to experience various plants and materials up close so that you can choose the ones that really “speak” to you.
Last week, we blogged about the lush, overflowing abundance of Victorian landscapes. If that style seems too ornate or just somehow “too much” for you, perhaps a modern landscape is more your style.
Contrary to what you might think, a modern landscape is not necessarily all about straight lines or minimalism. It doesn’t mean you can’t get creative, or utilize unique elements. The difference is how you incorporate those elements.
Hardscape. Typically, a modern landscape design begins with hardscape spaces. This is good news for those of you who already have large patios or other hardscape areas, or who want to switch over to a less-grass, lower-maintenance landscape. All other elements are incorporated as a complement to those hardscape areas.
It is important to remember that hardscape materials can, and usually should, be varied. Modern design is not about throwing down some plain concrete and walking away! Variations between several different materials can add a subtle richness to the overall design. The inclusion of black, smooth Mexican river rock in grey concrete spaces can create a powerful contrast.
Wood. Wood elements make a nice contrast to hardscape areas so that the overall concept does not come off as “cold”. Integrate wood touches where you can. Natural wood grains (even when stained) are important to keep the space feeling warm.
Add a water or fire feature. A fountain and/or fire pit can make a nice addition to hardscape and wood. The inclusion of natural elements enhances the design and increases the utility of the space.
Clean lines. It probably doesn’t surprise you to learn that a modern landscape will include clean lines. Keep this in mind when choosing plants, so that you can select those that are easily controlled and kept “in line.” A controlled, low hedge makes a great border for your overall concept, or you might wish to include plant elements that are tall, narrow, and not overly branching. Species that are more wildly branching and loose can look out of place.
Grass can be ornamental. Due to the use of extensive hardscape, modern landscapes tend not to include overly large and time-consuming lawns. But grass can be used as an ornamental accent. Taller, more lush varieties soften hard edges and ease the transition from one “hard” element to another.
These are just some of the basic principles of modern landscape design. For more information, or to view various elements in person, give us a call. We can help you decide if a modern landscape design is the right choice for your aesthetic senses and needs.
Some of us love plants so much, we just want to put them everywhere! If you have a pathway or patio, there is no reason to settle for an expanse of plain, lifeless concrete. You can include plenty of plant life in those spaces, too.
Potted plants. Obviously, the easiest way to incorporate plants into a hardscape area is to simply place potted plants wherever you want a lively pop of color. Important to keep in mind with this strategy is that pots can understandably limit the growth of some plants, so careful species selection is important.
Plant the walkway or patio itself. Another option is to simply include some plant life in the cracks or spaces between your hardscape. If you choose flagstone or pavers, you can allow for small spaces in between them. Then you can help plant life to flourish in those cracks, creating a lusher environment.
As we all know, many weeds will thrive in cracks and small spaces. But we don’t want weeds! Planting something you actually want to grow in that space is actually a clever way to help discourage some amount of weeds (although they will still appear). It’s not a good idea to allow just anything to grow in these spaces, obviously, because before you know it you might realize you have a young tree on your hands. Anything that grows overly large will force your hardscape apart and damage it.
So, which type of plants grow well in these small spaces? Choose something small, that will spread, but without a damaging root system. Something like Kurapia, Dymondia, or Dichondra would be perfect for patio or walkway planting. Creeping Thyme does not thrive as well in Southern California as it does in other areas. It looks great in magazines but isn’t an ideal choice for us.
What’s the advantage? Obviously, you might just like the look of planting your patios and walkways. It’s a unique look and feels more “natural” to many people. On the other hand, the maintenance can be a bit time consuming, so weigh your decision carefully.
On that note, give us a call or stop by our nursery. We can help you explore your hardscape options, and give you tips on planting and more.
Does a classic English garden, mixed with ornate embellishments and a few touches of whimsy, sound appealing to you? If so, a Victorian style garden might be a good fit for your aesthetic tastes. Contrary to common belief, Victorians weren’t completely stuffy and old-fashioned. Their landscapes were a wonderful blend of refined English sensibility, exotic plants, and even amusing finishing touches.
Consider these ideas for a Victorian styled landscape.
Evaluate your space. Various smaller sections allow for experimentation with different plants, depending upon their needs for light and space. This might also allow for sitting nooks or other spaces with specific purposes. If you require a border of some type, a manicured hedge adds a classic English touch.
Connect the garden areas. A finely textured gravel is good for walkways because you want the focus on abundant plantings.
It’s not all about the plantings. Victorian style incorporates ornate touches such as fountains, bird baths, wrought iron furniture, trellises, and arbors. Paint wood areas, like porch railings or trellises, for a refined look.
Remember to use vertical space. Victorian gardens are lush and abundant, so include hanging planters or pots on pedestals to take advantage of vertical space. These can be placed on porches and patios as well.
Consider color. When choosing plants and other elements for your Victorian landscape, remember that modern designs in colors like silver, black, or orange will likely clash with the look you’re trying to accomplish. Consider your color palette carefully, and choose hues reminiscent of old Victorian paintings.
Utilize structure. While Victorian style does tend to focus on abundance, this does not have to equal design chaos. Balance the landscape as you otherwise would, with consideration of plant size, color, and so on.
Branch out. Victorian style isn’t as stuffy as many people believe. Experiment with a few exotic species such as a weeping tree or unusual ferns. The Victorians loved the challenge of incorporating new and interesting elements into more old-world design.
On that last note, stop by our nursery as you continue to explore ideas for a Victorian garden. You might find yourself inspired by something new and novel!
What happens if you’re unable to breathe? We all know the answer to that question. But here’s the thing: Your lawn, and the soil underneath need to breathe, too!
Over time, a loose layer of dead and living organic matter builds up between the soil and your grass. It’s called thatch, and it’s mostly composed of plant parts that don’t quickly decompose, like roots, stem nodes, and other fibers.
Depending upon the amount present, thatch can either benefit or harm your lawn. A thin layer can protect against extreme temperatures and dehydration. But if your lawn has more than about an inch of thatch, it can cause problems and essentially “suffocate” the grass. Your grass can begin to die, leaving unsightly “dead” patches, and prompting you to perform more labor in the yard.
Lawn aeration can solve these problems, by breaking up the thatch and helping your lawn breathe. As with anything else, it is easier to take regular preventive measures than to fix more extensive problems.
For milder cases, “spiking” can be effective. With “spiking,” we essentially just poke holes in the soil at intervals. However, more serious cases of thicker thatch will require core aeration. This method actually pulls two- to three-inch plugs (or cores) of soil out of the ground. These cores are pulled out at intervals of about three inches, breaking up the thatch and allowing water and fertilizer to reach the roots of your grass.
Either form of aeration can be performed in the spring and fall, with heavily trafficked areas requiring more frequent aeration.
Some homeowners choose to perform spiking themselves, and that might work well if your thatch problem is thin and your lawn has not yet been damaged. Those with thicker (¾ of an inch, or more) thatch, and suffocating lawns, need specialized equipment to perform core aeration. This process is better performed by a professional, who already has the equipment to perform the job correctly. Experience and expertise can prevent damage to your lawn.
Often, it is also a good idea to seed the lawn during aeration. We will be happy to evaluate your lawn’s health for you and offer recommendations for aeration and seeding as needed.
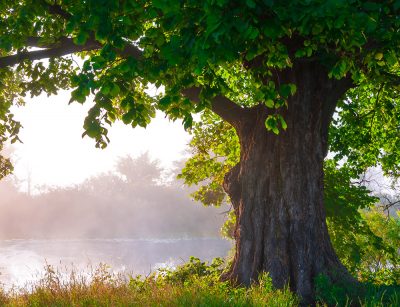
We all have our reasons for loving trees. You might enjoy the shade they provide on a hot day, and how they keep your home cooler. You might love to witness their beauty as leaves change color in the fall, or happily munch on the fruit they provide. Then, of course, trees also offer ecological benefits. Even our government acknowledges the importance of trees, and urges us all to get out and plant a tree on Arbor Day.
Clean air. Trees act as enormous, natural air filters. Imagine the amount of carbon dioxide your car produces in one year, if you drive the average of 26,000 miles annually. Hint: it’s a lot. Now imagine that one acres of mature trees can absorb all of that carbon dioxide, essentially cleaning our air for us. That’s the truth! Trees filter out carbon dioxide, along with other harmful gases like ozone, ammonia, nitrogen oxides, and sulfur dioxides.
Oxygen. Trees, like all plants, produce oxygen as a waste product. Of course, one tree’s “trash” is another man’s treasure – literally, in this case! In one year, an acre of mature trees provides enough oxygen for 18 people to breathe.
Water filters. Along with filtering our air, trees also act as nature’s water filters. During a rainstorm, water runs down tree trunks and into the ground, reducing runoff. If that water contains pollutants, this action prevents a lot of it from reaching the ocean. During those rainstorms, a tree’s roots also help to prevent erosion and landslides. When mulched, trees act as a filter and help to boost clean groundwater supplies.
Energy conservation. Mature trees, planted strategically around your home, can reduce summer air conditioning expenses by up to 50 percent! Not only do you save money on your power bill; you also reduce demand from power plants, and therefore pollution emissions.
Reduced noise pollution. Trees even help to break up sound waves, reducing the amount of noise pollution in crowded neighborhoods and cities.
Real estate value. Because trees are beautiful and lend a feeling of serenity, they can boost your property value.
We’ve offered plenty of reasons to plant trees, or take care of the ones you have. If you’re thinking about adding a tree to your existing landscape, stop by our nursery and we can help you choose one. Remember to follow planting and care instructions carefully, and one day your children or grandchildren could be enjoying (literally, in some cases) the fruits of your labor.
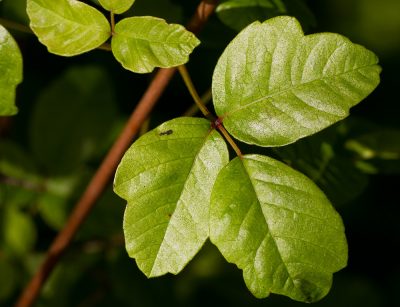
We’ve all heard at least one amusing anecdote about poison oak. Your friend’s brother’s neighbor’s cousin went camping, used the bathroom in an unfortunate spot in the woods, and earned himself an itchy rash in an unfortunate place. These stories can make for a bit of entertainment, until you’re the one suffering from an itchy, oozing rash. Then, it’s not so funny anymore! If you want to know how to protect yourself from poison oak and avoid all the itching, read on!
Contact with poison oak almost always happens because someone wasn’t watching out for the plant, or didn’t know what it looks like. Therefore, taking a few moments to learn about the plant can protect you on your next outdoor adventure.
What does poison oak look like? You might have heard the old saying, “Leaves of three, let it be”. Because poison oak leaves often grow in clusters of three, this is the easiest way to identify a possibly poisonous shrub. However, this rule isn’t set in stone. Some varieties of poison oak grow leaves in clusters of five or seven, complicating the matter when you try to identify it. The plant often bears greenish yellow or white berries, so be on the lookout for those as well.
Where it grows. Poison oak typically grows in shady wooded locations, so you don’t usually have to worry about it growing in a sunny yard or in an open field.
How to protect yourself. Viewing pictures of poison oak and learning to identify it is the best way to protect yourself. But, as anecdotes often reveal, contact often happens when someone isn’t paying close attention to their surroundings. If you go camping, remember to take a flashlight. Wear clothes that offer full coverage when hiking in the woods, and don’t touch anything if you don’t have to.
It’s unlikely that you will find it growing in your yard, but it does happen. If you suspect its presence in your yard, don’t try to collect the “evidence”. Take a photo with your smart phone, and come visit our nursery. If you do indeed have poison oak in your yard, we can help you get rid of it.

Ladybugs. Organic gardeners actually attract ladybugs to their yards on purpose, because they help to control pests such as aphids and mites. Since ladybugs eat both insects pests and pollen, attracting them means you might need to add the type of pollens they prefer. They tend to be attracted to flat, white or yellow flowers, which can be found on the following plants: sweet alyssum, yarrow, calendula, cilantro, marigold, dill, and chives, just to name a few.
Ladybugs aren’t the only insect that preys on common garden pests. You might also wish to attract (or purchase) green lacewings braconid wasps, ground beetles, or aphid midges. These can keep pests under control so that you don’t need to use chemicals on your plants.
Grasshoppers. No one wants to attract more grasshoppers to their garden, since they can do major damage to crops. On the other hand, we definitely wouldn’t want to eradicate them entirely. Grasshoppers play a vital role in fertilizing soil, and they are a primary food source for many other animals such as birds and lizards. If you spot them in your garden, there is no need to reach for the insecticides just yet. One rule is that you shouldn’t worry unless you spot more than about eight grasshoppers per square yard of crop area.
Bees. Without bees, our fruits and vegetables would likely be unable to pollinate, and we would find it difficult to grow many crops. In fact, many ecologists have expressed significant worries about our future food supply due to the dwindling bee population. Luckily, backyard bee keeping has grown in popularity as a hobby, and efforts are boosting the number of bees in the wild as well. Plant flowers in your garden to attract bees, and avoid the use of insecticides when you can. Check out our blog on bees to learn more about these fascinating insects.

We always say that putting together a detailed plan is the first step to a successful landscaping project, but those plans don’t come out of thin air, do they? First you need inspiration. You need to know exactly what you want to accomplish, before you can measure, draw up a plan, consult with experts, or purchase supplies.
One of the main reasons we publish these weekly blogs on our website is to inspire and challenge you to get creative with your landscaping. But of course, we aren’t the only source of information out there. So how else can you find inspiration? Use several of the following methods until you decide upon a plan that feels “just right”.
Visit other neighborhoods. Simply driving through a lovely neighborhood can help you identify landscaping ideas that appeal to you. In particular, look for homes that are similar to yours, or that share common characteristics with your yard. Try to avoid getting too attached to plant types when traveling to other climates. Many of “their” plants won’t grow here unless you happen to be in Italy at the time.
Read landscape or home design magazines. You might feel a bit strange taking a photo of a random person’s house, but tearing out photos from magazines will feel perfectly acceptable. Photos allow you to compare different ideas side-by-side. They’re also super handy when you need to communicate your ideas to a landscape designer or contractor.
Pinterest. If you’re online reading this blog right now, then you can also access Pinterest. In fact, starting your own Pinterest board of landscaping ideas is a great way to keep track of everything that appeals to you.
Other websites. Houzz.com is a great source of inspiration, and there are several other similar websites out there. Start by googling “landscaping ideas” or more specifically, search for elements that appeal to you such as “low water landscaping” or “tropical landscapes” and so on.
Visit a nursery. Simply walking through a nursery is a terrific way to get gather some ideas. You can get a feel for which types of plants appeal to you, and talk to a gardening expert to discover which ones will work best in your yard. Come visit our nursery, and we’ll be happy to offer our opinions and experienced guidance.

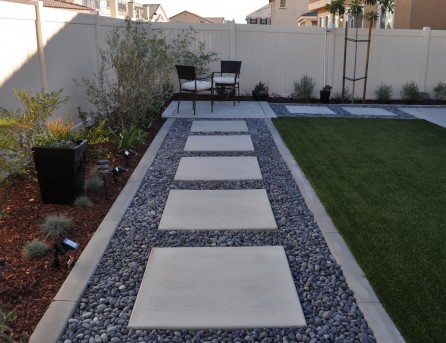
Forgetting to plan a pathway is one of the most common, and surprisingly obvious, landscaping mistakes that we see. It’s typical for property owners to focus on various features in their yards, whether swimming pools, patios, gazebos, or garden spaces, and completely forget to connect them in some way. Sure, you could just walk across the grass, but as we all know that leads to unsightly downtrodden bare spots in the yard.
So, the answer is often a pathway. Not only will a pathway help you avoid unattractive “high traffic” patches in your yard; it can become a thing of beauty itself.
Before building a path, some common considerations include:
• How much traffic do you expect? Is this a casual, meandering garden path, or a way for your kids and their dozen neighborhood friends to traipse back and forth to the pool?
• What type of material is best suited to your needs? Do you need durable concrete? Would pebbles or stepping stones suffice?
• What are your aesthetic needs? Concrete doesn’t have to be plain and ugly. We can color it, stamp it, or mix in aggregate that create a visually stunning masterpiece.
• How wide should the walkway be? A simple meandering garden path can be narrow, but you will probably need a wider path leading to a swimming pool or play area.
• How much maintenance are you ready to perform? Some walkway options are more prone to weed invasions and other problems.
• Do you need lighting? If so, what kind?
• Do you want to landscape along the path, and what kind of border materials should you use to keep the pathway free of debris?
These are just some of the more common questions to get you started. As you plan your project, give us a call and we’ll be happy to answer your questions about landscaping, materials, and more. With a little forethought, a walkway can be a lot more than just way to get from Point A to Point B. It can add beauty and enjoyment to your outdoor space for years to come.
Forgetting to plan a walkway is one of the most common, and surprisingly obvious, landscaping mistakes that we see. It’s typical for property owners to focus on various features in their yards, whether swimming pools, patios, gazebos, or garden spaces, and completely forget to connect them in some way. Sure, you could just walk across the grass, but as we all know that leads to unsightly downtrodden bare spots in the yard.
So, the answer is often a pathway. Not only will a walkway help you avoid unattractive “high traffic” patches in your yard; it can become a thing of beauty itself.
Before building a path, some common considerations include:
• How much traffic do you expect? Is this a casual, meandering garden path, or a way for your kids and their dozen neighborhood friends to traipse back and forth to the pool?
• What type of material is best suited to your needs? Do you need durable concrete? Would pebbles or stepping stones suffice?
• What are your aesthetic needs? Concrete doesn’t have to be plain and ugly. We can color it, stamp it, or mix in aggregate that create a visually stunning masterpiece.
• How wide should the walkway be? A simple meandering garden path can be narrow, but you will probably need a wider path leading to a swimming pool or play area.
• How much maintenance are you ready to perform? Some walkway options are more prone to weed invasions and other problems.
• Do you need lighting? If so, what kind?
• Do you want to landscape along the path, and what kind of border materials should you use to keep the walkway free of debris?
These are just some of the more common questions to get you started. As you plan your project, give us a call and we’ll be happy to answer your questions about landscaping, materials, and more. With a little forethought, a pathway can be a lot more than just way to get from Point A to Point B. It can add beauty and enjoyment to your outdoor space for years to come.

Your outdoor space can serve many functions, from quiet relaxation to boisterous social gatherings. One element that can complement just about any mood and setting is fire. If you’re thinking about adding an outdoor fireplace or a fire pit, you might be weighing your options. Which one is right for you?
As with many choices, there is no right or wrong here. The answer depends upon your personal preferences, and how you plan to use your fire feature.
Fire pits. There are two main advantages to a fire pit. First, a store-bought fire pit is portable. So, if you want to rearrange your patio or move the fire pit to a different spot in the yard, redecorating is a breeze. Of course, this option is not available if you decide to build a permanent fire pit, which brings us to our second point.
Fire pits also offer 360-degree access, so you can use them as a conversational centerpiece. Arrange your furniture around the pit, and everyone can roast their own marshmallows. When placed in a sand area, a beachy adult entertainment space can be created.
Are there any disadvantages to a fire pit? If you have small children, keep in mind that it’s much more difficult to block their access to a fire pit. And of course, a portable fire pit won’t serve as a valuable addition to your space the way a permanent structure would. The heat output from a fire pit is not as great as a fireplace. If warmth is your true goal, a fire pit may not be the best choice for you.
Outdoor fireplaces. The obvious advantage of an outdoor fireplace is that it’s a permanent structure. It could add appeal and resale value to your home, in the event that you want to sell it one day, and you might find it to be a more attractive feature overall.
Fireplaces are also protected from the wind, and smoke will be directed upward. Additionally, they can provide privacy in a way that few other landscape elements can. With proper design and placement, fireplaces make for good locations on which to mount a television. It is best to shelter those areas with patio covers and choose furnishings wisely.
You can have an outdoor fireplace designed and constructed according to your preferences. Of course, its permanence could also be a potential downside, so choose your location carefully. For more information on outdoor fireplaces or fire pits, give us a call. We can help you decide which type of feature is right for your needs.

When you’re planning a hardscape project, such as a patio or walkway, you don’t have to settle for simple broomed concrete. Your project should suit your aesthetic preferences, add beauty to your home’s exterior, and of course, suit your budget. You might be pleased to learn that you can choose from several options, such as stamped concrete, brushed concrete, or exposed aggregate concrete.
Today we’ll focus just on exposed aggregate concrete: What is it, why should you consider it, and what are the benefits and drawbacks?
Exposed aggregate concrete is a method for creating a textured surface, by either mixing an aggregate into the cement or pressing it into the top of the wet surface. The result is an appearance similar to marble or granite, but of course it’s much friendlier for your budget.
Exposed aggregate is not only pleasing to the eye; it’s also durable as any concrete would be. Your exposed aggregate surface or wall will hold up nicely to traffic and all weather conditions. Plus, the texture offers skid resistance, making it an especially appealing option for poolside patios or any location that might get wet.
People who choose exposed aggregate often do so because it’s a low-maintenance option. Other than occasional cleaning and sealing, you won’t spend hours of time on your hardscape.
Perhaps the best feature of exposed aggregate concrete is its design versatility. You can choose from a huge variety of aggregates to add to your concrete, meaning color, texture, and shape can be customized to suit your desires. The most common aggregates are natural stones such as granite, quartz, limestone, or basalt. However, some people have used recycled colored glass, and even objects like seashells.
If you’re planning any type of hardscape project, from patios to walkways and even walls, give us a call to learn more about exposed aggregate concrete. We’ll help you explore your options, and choose something that suits your aesthetic preferences and budget.
Check out our Concrete portfolio page for more samples and ideas.
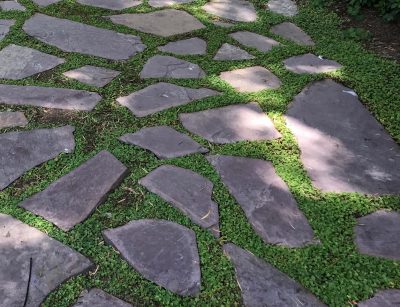
If you’re interested in unique, lush, and yet surprisingly simple landscaping options, moss might interest you. Moss offers a beautiful green backdrop or accent to other plants, and it’s so low-maintenance that just about anyone can cultivate it.
A green carpet of moss makes an excellent backdrop for walkways and stepping stones, since it doesn’t grow high like grass, and it’s also a terrific option for shady areas of your yard where other plants might struggle. If living walls interest you, you’ll be happy to know that moss can be used there as well. Really, you can use moss just about anywhere, provided you place it out of direct sunlight.
If you’re interested in moss, here are a few basics you need to know.
Choose a shady, clean spot. Moss grows best in the shade. It’s not too picky, other than needing a spot clear of debris such as leaf litter.
Test your soil. Moss prefers acidic soil, between 4.5 and 5.5 on the pH scale. If your soil is to alkaline, use sulfur powder to lower the pH before planting your moss.
You have two planting options. In most cases, moss is shipped as a dried “carpet” that you simply unroll into place. However, a less expensive option is to break the moss into clumps and let it gradually fill in the space you have selected. Some people choose this option to save money, but keep in mind that it will take some time for your moss to spread.
Water your moss. After planting your moss, water it well. Keep the area free of debris, and it will spread quite naturally on its own.
Moss is available in different types and colors. Several of these planted together can actually become a living work of art! Stop by our nursery and chat with our specialists, and we can help you decide on a variety of moss that works best for your landscaping project.

Gardening could become a bit boring if we never tried new plants in our yards. Plus, with many varieties carrying so many benefits, learning about new plants can enrich our lives. That’s why we make an effort to introduce you to new plant species periodically. This month, we’re shining the spotlight on Lemongrass.
Lemongrass carries many health benefits, due to its numerous antioxidants, flavonoids, and phenolic compounds. It is also a powerful anti-fungal agent. Lemongrass can be used to:
• lower cholesterol
• detox the body, cleaning the liver and kidneys
• possibly prevent cancer – studies have targeted skin and breast cancer, specifically
• treat staphylococcus aureus (staph) infection
• relieve a variety of stomach disorders
• help to induce sleep in those who suffer from insomnia
• lower fever
• treat a variety of mild respiratory problems
• cure fungal infections like athlete’s foot and ringworm
• possibly help prevent type 2 diabetes
• combat aches and pains
• calm anxiety and alleviate stress
• clean skin
• protect cells from free radicals and clean the blood
• treat edema (water retention)
• aid in weight loss
• repel lice, ticks, and mosquitoes
• manage body odor
• promote lactation
• stimulate menstrual flow and reduce cramping
That’s quite a lot of benefits for one plant to provide! It’s easy to see why herbalists love lemongrass so much. But you might also appreciate its lush, grassy appearance in your garden, or the fact that it is remarkably easy to grow. Gardeners also love lemongrass for its insect repellent qualities.
To grow lemongrass, you need a warm, sunny location such as our climate. Plant your herbs in rich, well-drained soil. Soil that is heavy in clay often kills lemongrass quickly, because it retains too much moisture.
Space your lemongrass plants about two feet apart, because they do spread a bit. Fertilize them with a plant food every few weeks during the growing season, and water regularly without saturating.
To harvest your lemongrass, pull up entire stalks. The best part (containing the most nutrients) is the wide part at the bottom, but you can use the entire leaf. Add lemongrass to soups or salads, or process it into your own homemade medicines.
Just a note of caution: It’s rare, but lemongrass allergies do exist. Use caution the first time you use your lemongrass harvest. And as always, consult with your physician if you’re using natural methods to prevent or treat any diseases. While plant medicine can be powerful and effective, you want to ensure that you’re using your concoctions safely, and that there are no contraindications with any medicines you currently use.
Come visit our nursery, and we’ll help you select a few lemongrass plants for your garden.
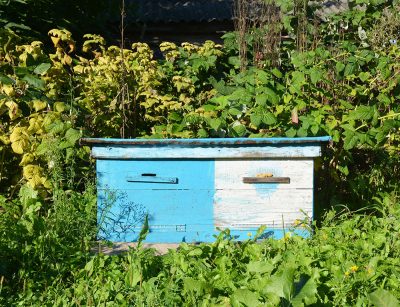
Last week, we reviewed some of the most common benefits of backyard beekeeping. It’s not just a fun and unique hobby; you would be helping your community and the environment! So, let’s say you’re sold on the idea of beekeeping, or at least very interested. Now what?
Beekeeping can become a fairly complex hobby, but you can start off with just the basics to see if you enjoy it. Our basic guide can get you started.
Learn about your bees. The first rule to successfully managing any plant or animal species is to learn as much as you can about it. So search online, or visit the library, for information about bees. After choosing a type of bee to keep in your yard, you can move onto building a home for them.
Choose the right time. It’s best to work with bee behavior and habits, rather than against them. So that means starting your hive at the most beneficial time of year. Here in Southern California, we begin to see flowering plants bloom as early as March and April, so early spring would be the perfect time to begin. You’ll be preparing your “hive” over the winter months to get it ready.
Buy or build. It’s best to construct a box type structure for your bees, with a hinged door or lid that allows you to access the hive (and the honey). You can purchase a pre-built bee box, or build your own that suits your preferences. Just make sure to choose wood that is treated for outdoor use, so it will hold up for years to come.
Choose the right spot. You can keep a bee box pretty much anywhere in your yard. But if you have small children, you might want to place the hive far away from their play areas. Some beekeepers report problems with animals breaking into the hive to access the honey, so locking mechanisms or placing the hive somewhere high might be good ideas. Otherwise, you just want to be sure your yard contains plenty of flowering plants that bees love.
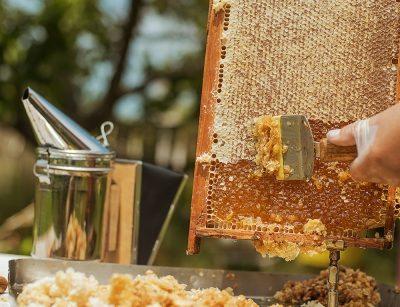
Get the right equipment. You will need protective gear for yourself, so that you can gather honey without getting stung. You might opt for just gloves and a veil for your face, or a full one-piece suit. A smoker calms the bees so that you can more safely harvest honey, and beekeeping supply stores sell various tools to help you extract honey from the combs.
Order your bees. You can order “package bees,” which are basically a bunch of bees, or a “nucleus colony.” A nucleus colony is probably the better bet, because it’s an established colony with a queen that has already begun to produce brood (babies). Once your bees arrive, simply introduce them to their new home.
For more information on backyard beekeeping, contact the Beekeepers Association of Southern California. They are a welcoming organization and will be happy to assist you with your new hobby.
At first, you might wonder why anyone would choose bee keeping as their hobby. Don’t we normally run far away from anything that flies and stings? However, there are some distinct benefits to bee keeping that might surprise you!
The most obvious benefit is the honey produced by bees. Yes, you can buy honey at the grocery store, but it’s often inferior quality, can contain questionable ingredients, and usually isn’t local. And that brings us to our next benefit of keeping bees…
Local honey is made from local nectar and pollen and can act as a sort of “immunization” against allergies. Many people who suffer from seasonal allergies report that their symptoms subsided once they began eating local honey!
Now, let’s talk about that pollen that your bees will be using to make their honey. Bees are one of the biggest pollinators of flowering plants, meaning they fly from plant to plant collecting pollen and spreading it. This helps your flowering plants to propagate, so if you have fruit trees or grow vegetables in your yard, keeping bees can increase your plants’ production.
Along with the gallons of honey that you can harvest from your bee hive each year, you can also collect propolis. Propolis is the sticky gunk that bees use to build their hives, and it just happens to be a powerful natural antibiotic with a variety of uses. So, if you’re into natural medicines, propolis from your own backyard makes a powerful addition to your arsenal of herbal remedies.
With bees dying in alarming numbers, backyard beekeeping might even become a bit of a heroic endeavor. Thirty percent of the world’s most common food crops are pollinated by bees, along with many of our favorite ornamental flowers. By choosing to keep bees and help them thrive, you would be benefiting not only yourself, but also the community.
Check out our blog next week for a basic guide to getting started with beekeeping. Or, if you just want to attract more bees to your yard, stop by our nursery. We can assist you in picking out flowering plants that local bees will love.