

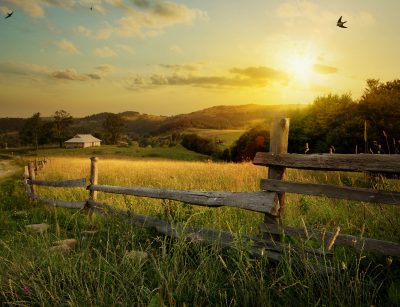
Whether you attend the games in person or watch from the comfort of your living room, you might have noticed something about Dodger Stadium and other Major League Baseball fields: They’re really lush and green.
Okay, so maybe that’s not your first thought when enjoying America’s favorite pastime. But you can’t deny it; you’ve wondered how they get their grass looking so perfect. You might even be coveting that look for your own yard.
The first thing we should tell you is that the Dodgers spend about one hundred thousand dollars, re-sodding their field every few years. But, of course, it is an enormous field. The average homeowner doesn’t quite need to go to such lengths in order to achieve a similar look for their own yard.
When it’s time to revamp their field (about every five years), the Dodgers’ maintenance crew pulls out the existing grass. Then they install a new layer of sand (about 400 tons, to be exact). On top of that, crews mix in a layer of Gypsum, to keep the soil from clumping. Then finally, 100,000 square feet of new sod tops the surface.
Now it’s time to begin seeding. And here’s the answer to your biggest question: One grass used in Dodger stadium is a Bermuda hybrid, bred in Palm Desert. The other, which is overseeded on top of the Bermuda, is rye.
Why use two different types of grass? Simply put, rye grass fares better in early spring, and then Bermuda takes over during the heat of summer. This way, you can always enjoy a lush expanse of vivid green grass.
Of course, irrigation provides the final piece of the puzzle. Dodger Stadium incorporates a state-of-the-art underground watering system that provides the field with the precise amount of rain needed for optimal health of the grass.
You’re not playing Major League Baseball on your front lawn, but you can achieve a similar look. Give us a call, and we’ll be happy to offer our advice on a professional grass installation, irrigation system, or both.
No matter our age or ability level, outdoor time is good for us. Our bodies generate vitamin D in response to sunlight exposure, and natural light helps to regulate our sleeping patterns. And of course, if you’re outdoors you’re more likely to be active. We all know exercise is important for both physical and mental health.
But sometimes it can be difficult to break away from your routine (and your smartphone). It might help if you plan a project to transform your backyard into a fun outdoor recreation space. Consider these ideas, and feel free to comment and share your own!
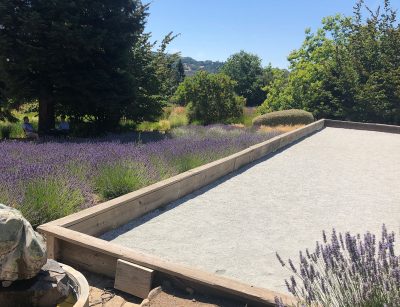
Bocce ball court
Horse shoe pit
Badminton court
Sand volleyball court (it can double as a giant sandbox for little ones)
Putting green
Basketball court
Splash pad
Race car or bike tracks
Fairy village (think of an outdoor dollhouse/play area)
Zip-line
Obstacle course
Chalkboard drawing area
Outdoor theatre with inflatable movie screen
Play house/Club house/She Shed
Things to consider. As with any landscaping project, what worked for your neighbor might not be the ideal project for your own yard. Ask yourself the following questions before deciding on a backyard recreation project:
Do I have space? This seems obvious, but you might be surprised at how often homeowners overestimate their available space. Take measurements before beginning a project, and consider how much yard you’d prefer to have “left over” for future projects.
What will the kids enjoy most? If you have kids or grandkids, this is likely to be your biggest consideration. This is a great topic for your next family meeting.
How versatile is the space? A sand volleyball court can double as a play area for young tots. A basketball court also provides space for hopscotch and chalk drawings (they wash off easily). Unless you’re incredibly enthusiastic about your chosen outdoor activity, it might be best to create a recreation space that provides for multiple interests.
Do I need help? Some projects are easier than others. If you need help with a professional installation, contact us and we’ll provide you with advice and a quote.
Imagine relaxing on your porch or patio, admiring the beautiful blooms and sensuous scents of your garden… at night! Yes, there are plenty of flowers that bloom only at night, offering you the chance to create a unique landscape that even night owls will enjoy.
Typically, we think of flowers blooming during the day, but why? Many pollinators can only fly during the day, because they require a minimum temperature to even begin moving about. Additionally, these insects might prefer to be active in the daytime in order to avoid certain predators. Therefore, many flowers evolved to bloom during the day, when their primary pollinators are able to do their work.
By contrast, some pollinators are only active at night. So some species of flowers learned to match their blooming times to these patterns, to help themselves propagate.
And it’s not all about the blooms! Some flowers also release their scents at night, to help their preferred pollinators locate them. They might even produce more nectar during these times, too. So, while you enjoy flowers by moonlight, you will also appreciate the lovely aromas of these night bloomers.
Just what are these nocturnal pollinators, anyway? Various species of insects and animals flit about in the dark, such as…
Moths (particularly hawk and sphinx moths)
Squash bees (who rise just before dawn and finish their work when the sun rises)
Some types of beetles
Bats, who prefer cactus
As we mentioned, bats really enjoy a fleshy, juicy cactus. In fact, the landscape of the western side of the US would look drastically different if not for bats! They are the primary reason cacti get pollinated and reproduce.
As for your flower garden, in order to enjoy nighttime blooms you would choose moonflowers, evening primrose, four o’clocks, night gladiolus, and night-bloom water lilies, centrum (night blooming jasmine) among others. If you’d like some input on planning a garden that provides plenty of night blooms and aromas, please give us a call. We’ll be happy to help you with your new landscape addition.

Now that your grapes and berries are ripe and ready to pick, what can you do with them? Sure, a handful of sweet, juicy berries makes a great summer treat, but it can get old after a while. Try these ideas to include your homegrown crops into meals, snacks, and drinks.
Infuse your water. We all need to drink eight glasses of water each day, but that can get boring sometimes. Infuse your water with grape or berry flavors for a fun twist on a hot day. Use sparkling water if you prefer a bubbly beverage.
Add berries to lemonade. Ever try raspberry or blackberry lemonade? You might discover a new favorite treat!
Toss berries into a salad. Strawberries, spinach, and goat cheese crumbles make a delicious combo. Experiment with your own combinations to see what you can come up with.
Bake homemade blueberry muffins. Most people don’t realize that many packaged muffin mixes only include “imitation” berries. Bake up a batch of homemade muffins and you’ll be amazed at the difference.
Make your own preserves and jellies. With homemade preserves and jellies, you can avoid preservatives and control the amount of sugar you consume. Plus, canning is a fun family project.
Pair with cheese. Experiment with unique flavor combinations to create exciting cheese boards. You can use your preserves and jellies, or just the fruit itself. Hint: Keep your crackers or bread plain, so the flavors won’t compete with your fruit and cheese.
Make popsicles. Mix the berries of your choice with plain yogurt, pour into popsicle molds, and freeze until solid. The kids will love these healthy summer treats.
Blackberry balsamic pork loin. Rub a pork loin with salt, pepper, rosemary, and a touch of sage. Place it in a crock pot, set to low heat, and add a jar of your blackberry jelly along with ¼ cup of honey and a few tablespoons of red wine such as Cabernet. Cook for four hours or until done, and top with more blackberries if you wish.
Blackberry basil margarita. Muddle ¼ cup blackberries with two ounces of tequila and a few fresh basil leaves. Add a squirt of fresh lime juice and two teaspoons of sugar, pour over ice, and garnish with blackberries and a sprig of basil if desired.
Experiment with your own berry flavored combinations to create more unique cocktails.
For information on including berry bushes or grape vines into your landscaping, give us a call. We can show you how to create an edible landscape that is also visually appealing.
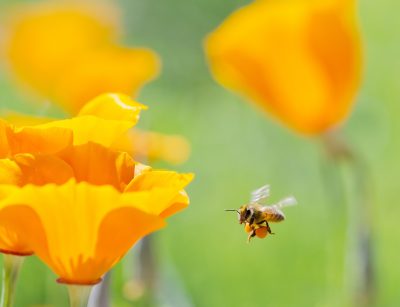
You might be wondering what an article on bees is doing on a landscaping blog. The reason is simple: Bees are a key part of our ecosystem, and are critical to the health and beauty of both flower and vegetable gardens.
When you first think of bees, you might be picturing a flying, stinging insect that you’d prefer not to encounter. But the truth is that there are over 1,600 different species of bee in California, and they generally aren’t out to attack you. They just want to build their hives, mate, eat, and live their lives in peace (much as we do). Yes, most bees will sting, but do it as a defensive measure.
Obviously we can’t cover all 1,600 species of bee individually, but most fall into these categories.
Honey bees. As the name implies, these are the bees that produce honey. It might surprise you to learn that only a specific type of bee makes honey; all the rest fall into one of the other categories.
Yellow-faced bumble bees. You might spot these hairy, chunky bees moving slowly about your flower garden as they gather pollen. And yes, their faces are yellow.
Wood carder bee. This non-native bee was introduced by European settlers, and collects hairs from plants to build their nests. They appear to prefer salvia plants, so be on guard for these guys if you plant salvia in your garden. Look for striped bands that don’t quite meet in the middle of their abdomens, and somewhat territorial, aggressive behavior.
Sweat bees. These small to medium dark bees sport bands of pale hair at the ends of their abdomens. You might notice them because they land on you to lap up moisture and salt from your sweat.
Long-horned bees. As you might suspect, these medium to large bees are identifiable by their long “horns”, which are actually just antennae (only present in the males). The females spend their days collecting pollen from flowers, while the males are often spotted nearby, competing for their attention.
Mining bees. You’ll spot these extra small to medium-sized bees early in spring, as they are the first to emerge from their nests in the soil. Many are metallic colored, and are recognized by unique grooves down the sides of their faces.
Leafcutter bees. If you spot a bee carrying leaf debris, it’s a variety of leaf cutter. They cut small sections of leaves to use in their nests, which they build inside holes in wood structures.
Carpenter bees. These guys also nest in wood, and they can be quite destructive! If you spot piles of wood shavings, along with large, shiny black bees (the females) or stout, hairy golden bees (the males), you might have a bit of a problem. They nest in untreated lumber and can wreak a bit of havoc due to this habit. However, they don’t sting, so at least they won’t harm you.
Mason bees. These metallic green or blue bees have round abdomens and heads, and come in a range of sizes. They also nest in wood, but typically only in pre-existing holes.
Digger bees. True to their names, these bees dig their nests in loose soil. They prefer mint and daisies, so plant a few of these in your garden to encourage these pollinators to move in.
If bees are ever a problem for you, we encourage you to use “green” methods of discouraging their presence around your home. Use treated lumber, and avoid planting their favorite flowers if you don’t want them hanging around. But please, don’t use pesticides on them; without bees, much of our landscapes and food supplies would suffer tremendously.

How is your summer going? If you’re like a lot of people lately, you might be frustrated by high water bills, tired of watering your lawn, and maybe a bit sick of mowing it, too. What if we told you that you could address all of those problems with one simple step, by replacing your lawn with low-water landscaping? Even better, what if you could get paid to do so?
Through Metropolitan Water District’s Turf Replacement Program, you could receive a rebate when you replace your lawn with drought resistant, California friendly landscaping. The rebates are available to both residential and commercial customers, at a rate of two dollars per square foot (capped at $10,000 for residential and $50,000 for commercial projects).
Before beginning their projects, property owners must apply to reserve rebate funds. Then you must complete your renovation, including removal of your lawn and installation of your new landscaping, within 180 days. Then you will simply submit a request for your rebate, up to the above described limits.
Each turf replacement project should adhere to guidelines, and will include:
A stormwater retention feature
Permeable hardscape only (no other hardscape)
Replacement or modification of overhead spray sprinklers
Three plants per 100 square feet
These requirements serve to ensure that each renovation project will serve as a multi-pronged approach to water utilization and conservation. Additional rebates might be available for certain devices such as soil moisture sensors, weather based irrigation controllers, rotating nozzles, and rain barrels or cisterns.
For more information, visit the SoCal Water Smart page . And be sure to give us a call to consult on your new low-water landscaping project. We’re familiar with the rebate program requirements, and can help you design and install a money-saving new landscape.
Like any parent, you want to give your child the best. With doctors and child development experts sounding the alarm on kids getting too much screen time, along with too little exercise, building an outdoor play space could be the perfect solution. The right play structure should provide exercise and an outlet for sensory experiences, while also encouraging children to utilize their imaginations.
Sure, you could pick up a swing-set kit, assemble it in your backyard, and your kids would likely be quite happy with it. But if you want to go a step beyond that, you could transform your backyard with some of these innovative elements to create an outdoor play space that becomes the envy of the neighborhood:
Sandpit
Seesaw
Climbing wall or net
Water slide
Obstacle course
Tree house
Zip line
Hopscotch
Trampoline – traditional or “in ground”
Bike path
Children’s garden area
Playhouse, pirate ship, castle, etc
Homemade roller coaster
Blackboard
Splash pad
These are just some ideas to get you started; if you spend time conducting a bit of research (check Pinterest), you might be surprised at some of the creative ideas other parents have utilized!
As you design your children’s play space, remember that kids can be far more creative than adults! You might want to choose elements that provide for a variety of experiences; trust that your kids will take care of that part! You will be surprised at the different ways they will use a single piece of equipment. But you can certainly involve them in the design process, to get a feel for the elements they will use the most.
And of course, safety is key. Build your play space on a surface that provides cushion for falls, such as sand, mulch, or rubber mulch, and make sure you’ve installed that surface to the correct depth. We can help with that part. Give us a call, and we will walk you through the most common playground surfaces and help you choose the right materials for the job.
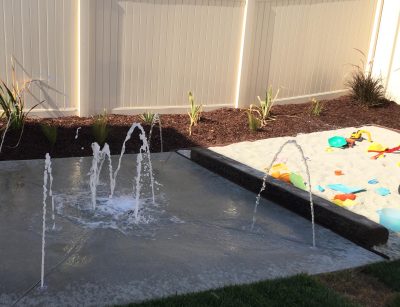
Splash pads are the latest, greatest thing for young children at resorts and parks. So it might surprise you to learn that homeowners have picked up on the trend, and are now installing backyard splash pads for their youngsters to enjoy. But it makes sense, because splash pads provide endless water entertainment without the dangers or fuss of a pool. Plus, they aren’t terribly difficult to install.
If you’re intrigued by the idea of installing your own backyard water park, read on for step-by-step instructions.
Choose a surface. Pavers, rubber, or textured concrete are common options for non-slip splash pad surfaces. Your own choice will depend upon budget, safety concerns, and aesthetics. Consider, also, the size of your space and the number of water jets you wish to include.
Select your features. This is the fun part. You can select a kit, or design your own splash pad from an array of options. If you go the custom route, you can really go wild with numerous “mushrooms”, “trees”, squirting jets, sprinklers, buckets that fill and dump, and much more.
Check on building codes and restrictions. Before you get started, check to see whether you need a construction permit for this project, or if any other rules will apply. You might be required to utilize the services of a professional electrician, for example.
Prepare the space. First you will mark the space, including the location of the pump, filter, holding tank, and so on. Then you will remove about 18 inches of soil, along with trenches for the placement of pipes and electrical lines. Remember that your drain needs to be located at least six inches above the holding tank, and you will need a deep hole for that.
Plan, also, for a structure to hold your pump. If the pump is not protected, your whole splash pad won’t function properly. Pumps are quite costly to replace.
Install wiring and pipes. All of the functional components of your splash pad will be installed first, paying attention to where the spray heads and drain will eventually end up. You want the spray heads above ground, of course, and the drain should be located at the lowest spot on your splash pad. For every nine feet from the drain, your structure needs two inches of elevation.
Backfill and complete. Now you will backfill the area to about ten inches from where the surface should be. Add about six inches of clear aggregate on top of that, and then about four inches of concrete if you’ve chosen a concrete surface. For pavers, you will instead add a layer of sand first.
Your final steps will include connecting the main electric line, and performing a test run of the system. Remember that this is just a general guide, and that installing a splash pad will require quite a bit of research and (potentially) some heavy equipment. If you would prefer to have your splash pad professionally designed and installed, please give us a call. We’ll be happy to help you with an estimate for that service.
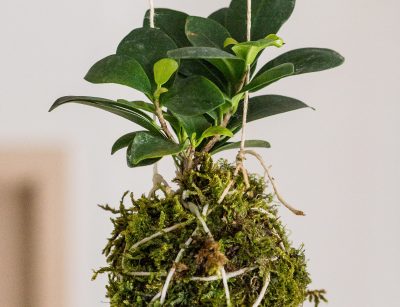
Plants bring life and beauty into your home, but you don’t have to stick to the typical pots and vases. Those who are looking for something a bit more unique and fun might be intrigued by the idea of Kokedama, or Japanese moss ball planters. This art form makes an interesting gift, or a lovely conversation starter in your own home.
Essentially, Kokedama utilizes a moss ball as the base for a plant, rather than a pot or a vase. Once created, you can affix your moss ball planter to a platform such as driftwood, display them in a clear glass container, or suspend them on strings. Several of these living planters strung together is called a string garden.
To create your own Kokedama, you will need:
A special soil called akadama, or mix your own with clay and 15 percent Japanese peat moss
Water
Scissors
String
Gloves
A bucket or large bowl
Spray bottle
A tarp, or something else to protect your work surface (if needed)
The plant of your choice – select something that tolerates very wet soil, such as ferns, ivy, or lucky bamboo
Dry floral moss, or some other type of moss if you prefer
Next, just follow these steps.
If you’re using dried moss, soak it in water for one hour
Gradually add water to your akadama mixture until you can form it into a ball
Gently break apart the root ball of your plant
Make a hole in your soil ball, and insert the root ends of your plant
Continue spraying the ball with water to keep it moist during this process
Push the clay around the roots of the plant and secure at the base of the stem
Press the moss around the clay ball until the entire surface is covered
Wrap the ball with twine or string several times to secure moss
Affix your moss ball to a surface, place in a container, or suspend from string
As you might imagine, making Kokedama provides a fun family project that even little kids can enjoy. Continue to experiment with different plants and moss types, and try displaying your kokedama in unusual ways around the house. This art form is all about fun!
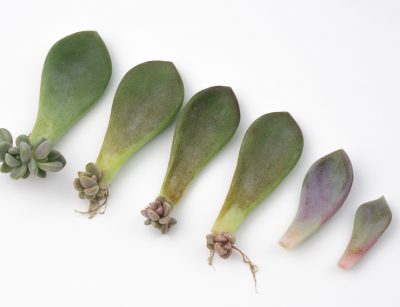
Succulent gardens are a hot trend right now, and for good reason. They’re low-maintenance, low water, and super attractive and exotic-looking! Once you start succulent gardening, you might find that the hobby becomes a bit addictive, and that means expensive. To save yourself the trouble of continually purchasing more and more succulents for your projects, you might be interested in learning how to propagate them from their own leaves and cuttings.
Research. Some succulents can be propagated from just a leaf, whereas others need a full cutting in order to grow. You can always experiment if you don’t mind some disappointments, but the easiest way to know the difference is to simply research. Learn the names of all your plants, and identify which ones can grow from a leaf versus the ones that require a full cutting.
Gather your leaves. To propagate succulents from leaves, gently twist the leaf off the stem. Leave nothing on the stem (and it’s fine to take a bit of stem, too). If you break off the leaf before the stem, it’s likely to die.
Take cuttings. If an entire cutting is required, use very sharp scissors, and cut the stem just above a leaf. You can take from the top of the plant or from an offshoot.
Dry your leaf or cutting. Leave the leaf or cutting to dry a bit (one to three days) so it can form a scab. Otherwise, when you try to propagate it, it will absorb too much water and essentially “drown” itself.
Propagate away! Set your scabbed leaves on top of the soil (not embedded into it) without the ends of the leaves actually touching the soil. Lightly water the soil each time it dries.
Cuttings do need to be planted into the soil. Water the soil when it’s dry.
Within two to three weeks you will see new rosettes or roots form. With succulents, expect some degree of failure. Not all cuttings or leaves will propagate, but with experience you will probably see a 50 percent success rate or greater. And of course, remember that succulents are slow-growing. It might be months or even a year before your new plants have reached full size, but that’s just more time to enjoy your new hobby!
Summer has arrived, and marks a favorite time of year for many. If you’re looking forward to fresh local vegetables and mornings spent peacefully browsing your local farmer’s market, you probably self-identify as a summer lover!
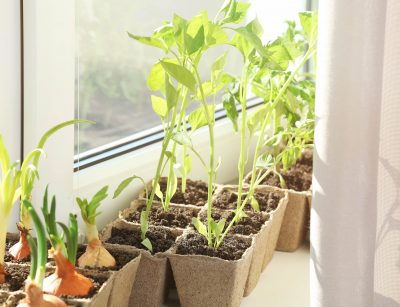
But what if you could extend that feeling throughout the year? Or, what if those of you lacking garden space could finally fulfill your dreams of growing your own food? Those are some of the goals of indoor food gardening, a growing trend among the health-conscious and nature-loving sort.
The benefits of indoor gardening. People are choosing to grow food indoors for numerous reasons, but some of the primary ones are:
Year-round access to fresh food
Cutting the cost of groceries
Certainty of the origin of foods
Ease of growing fully organic foods
Control over elements such as light, temperature, and moisture
No worries about insects or wildlife destroying your hard work
No need for a large yard if you don’t have one
It’s fun!
Which foods grow well indoors. Obviously, with indoor gardening you will face limits. You probably can’t imagine a twenty-foot watermelon vine snaking through your living room! However, many common staple foods can be easily grown in your kitchen or sunroom, including:
Scallions
Lettuces
Herbs
Radishes
Spinach
Tomatoes
Strawberries
Small varieties of potatoes (yes, really, this is possible!)
How to grow food indoors. First of all, think small. No, you won’t be able to run a farm in your kitchen, but you can easily grow enough microgreens to make your own salads. Small varieties, like cherry tomatoes, can be grown in pots or with the help of a hydroponic setup. Utilize space such as windows for hanging baskets of herbs and strawberries. Research planting depths; you will probably be limited to crops which can grow at a depth of 12 inches or less.
Second, keep natural elements in mind. The same ingredients for a successful outdoor garden will be utilized indoors. Choose crops that grow well with less sunlight, or invest in grow lights. Water can be managed manually, via regular waterings, or set up a cool-mist humidifier to mimic outdoor conditions.You can also purchase all-in-one countertop setups, which can allow for fast and easy growth of microgreens and herbs.
Give indoor food gardening a try, and you might find yourself a fun new hobby, along with a convenient way to obtain fresh organic food. If you have any questions or suggestions, let us know what you think in the comments section.
Growing up, many of us can remember visiting our grandparents’ farm, fishing in a nearby pond, and spending hours playing in the woods behind our houses. Somehow, the magic of our childhood seems lost today, as we rush about on our daily commutes from townhomes to bustling office buildings. Even our food seems decidedly un-magical, as we purchase bagged meals through car windows and grab factory-made snacks from vending machines. Seeking refuge in nature requires months of planning for an expensive vacation. Growing a garden in our own front yards might even conflict with HOA rules. Many of us have never met most of our neighbors.
For those weary of this impersonal, modern way of life, community planners have devised yet another “product” to market to you. But this one might be exactly what you seek. “Agrihoods” are popping up all over the country, offering life at a slower pace and a deeper connection to nature and each other.
These communities are often planned around farms, or offer community gardening spaces to homeowners. Those who adopt the agrihood lifestyle trade the convenience of fast food drive-throughs for the convenience of organic food grown in their front yards. They know where their food comes from, it’s grown by someone they know (or by themselves), and best of all, it’s fresh and available 24/7.
Other agrihood perks might include access to wooded areas, fishing, hiking trails, biking paths, and swimming holes. Community buildings encourage neighbors to intermingle, and social events are planned regularly. An agrihood is a place you can imagine your children and grandchildren roaming freely, learning in nature rather than through a screen. These developments promise a peaceful, slower pace of life, and a return to the connectedness of small community. They seemed designed to restore the magic of times past, but with added modern conveniences such as high-speed internet and proximity to public transit.
If you’re in the market for a new home, remember to consider not just the structure itself, but the atmosphere of the surrounding community. If you’ve felt that something is lacking within your current neighborhood, an agrihood just might provide those missing pieces.
And as always, we’re here for you whether you’re settling into a new home or renovating your old one. Give us a call if you’re considering any landscaping or hardscaping projects, and we’ll be happy to answer your questions and help you design the yard of your dreams.
Here in Southern California, we don’t often see as much rainfall as the rest of the country. But when it does rain, we have to deal with runoff like everyone else. In fact, water runoff can be harder to accommodate when conditions are normally dry, because it doesn’t soak into the ground as quickly.
A rain garden can offer a simple solution, that also fits well into your overall landscape design. This collection of perennials and native shrubs is planted into a slight depression, usually on a natural slope. While it might appear to simple serve as an attractive addition to the landscape, the rain garden is designed to hold and absorb temporary water runoff from your lawn, patio, roof, or driveway.
Rain gardens are efficient. Dry most of the time, a rain garden is only intended to hold and drain water for 12 to 48 hours after a rain event. During this time, it will remove 90 percent of nutrients and chemicals, and 80 percent of sediment, from the water runoff.
Rain gardens offer environmental protection. Water runoff from driveways, roads, and other hardscape tends to collect chemicals, dirt, oil, fertilizers, and more along the way. Then it enters storm drains and eventually flows to nearby streams and ponds. According to the Environmental Protection Agency (EPA), pollutants carried by rainwater runoff account for 70 percent of all water pollution.
A rain garden allows for most of these pollutants to be absorbed back into the ground, and filtered by vegetation.
Rain gardens are attractive additions to your landscape. Because we plant the rain garden with native shrubs, perennials, and flowers, it will simply appear to the naked eye to be an attractive landscape feature. In fact, the garden can be designed to compensate for areas that might otherwise detract from your home’s appearance, because rainwater runoff tends to collect somewhere anyway.
Rain gardens are low maintenance. Because the point is to collect water runoff, you won’t need to water your rain garden except during droughts. And because the garden so effectively absorbs nutrients, fertilizers aren’t usually needed. Weed removal will be necessary until your plants become established, at which point they will out-compete most weeds.
Since rain gardens are designed to absorb water runoff within 12 to 48 hours, the area should not become marshy, nor will it encourage the breeding of mosquitoes. Of course, this depends upon selecting the right spot for your rain garden, and digging the depression correctly.
For more information on installing a functional and attractive rain garden, please give us a call. We can take a look at your existing landscape and make recommendations to efficiently handle any runoff or drainage problems.

Why did you originally start gardening?
For many of us, the desire to increase the curb appeal of our homes is a matter of personal pride (and even a financial investment). For others, the appeal of homegrown foods and herbs is a major motivation. And of course, we all simply enjoy being surrounded by a beautiful environment.
But for some, gardening has become a practice in mindfulness. As our increasingly hectic, modern lives continue to pull us away from nature, gardening can serve as a purposefully regrounding experience. If you frequently experience stress and anxiety, you might find that mindful gardening provides the soul-soothing balance you’ve been craving.
Of course, it isn’t just a matter of going outside and getting your hands in the soil. To turn your regular gardening into a purposefully mindful activity, consider adding these steps to your routine.
Turn off your cell phone. The whole point of mindful gardening is to escape from the hustle and bustle of a busy, over-connected life. You will find yourself feeling more grounded after a break from constant notifications and messages.
Schedule your gardening time. Set aside this special time for yourself. It’s even better if you can commit to a block of time each day since mindful gardening can also serve as a daily meditation.
Use gardening as a transition time. Since you’re scheduling your gardening time anyway, try to choose a time that allows you to transition from one busy activity, into a more relaxed state of mind. For example, you might garden after arriving home from your daily commute, before dealing with dinner.
Engage your senses. At first, you might need to remind yourself to utilize all of your senses in the garden. Make a point to notice not only the sights, but sound, smell, and tactile feel in your garden space (and taste, too if you’re growing edible plants). Over time this will become a habit.
Don’t worry so much about the end goal. While finishing a big project is always rewarding, try not to focus so much of the end goal that you rush through the journey. Take the time to truly appreciate each step of a process. And sometimes, simply spend time meandering about in your sacred space, following your intuition.
If you need help establishing your garden space, give us a call. We can offer tips on creating the perfect, relaxing spot on your property.
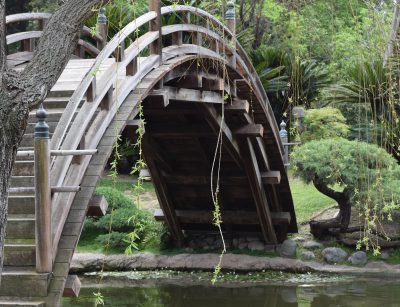
Sometimes the best way to gather inspiration for your own gardening projects is to see and experience what others have managed to accomplish. Plus, visiting area gardens can become a fun family outing, a creative date idea, or just a way for you to spend quiet time alone in nature. With that said, this week we wanted to highlight The Huntington Library, Art Collections, and Botanical Gardens (commonly known as The Huntington) in nearby San Marino.
The Huntington Gardens are named after Henry E Huntington, who purchased the San Marino Ranch in 1903. Over time, the ranch evolved into 16 themed gardens spread over the 120-acre estate.
Those 16 themed gardens include the…
Australian Garden
California Garden
Camellia Garden
Children’s Garden
Chinese Garden
Conservatory
Desert Garden
Herb Garden
Japanese Garden
Jungle Garden
Lily Ponds
Palm Garden
Ranch Garden
Rose Garden
Shakespeare Garden
Subtropical Garden
The Huntington Gardens also features a large collection of outdoor sculptures and fountains, personally selected by Huntington himself, and the Mausoleum designed to mimic the architecture of Greek temples.
As you’re planning your trip, check out the Huntington Gardens’ schedule of events. Special tours and lecture series are on a regular basis. Learn about tea ceremonies in the Japanese Gardens’ teahouse, or perhaps traditional music in the Chinese Garden is more your style.
If you visit Huntington Gardens in the spring or fall, you can partake in their biannual plant sales. Peruse thousands of rare, beautiful plants, and receive expert advice on a variety of gardening topics.
The Huntington Gardens are open from 10 am to 5 pm every day except Tuesdays. For more information on ticket pricing, group reservations, and more, visit their website!
Are you thinking about adding a swimming pool to your yard? Or perhaps you already enjoy your backyard pool, but you’d like to enhance it with some convenient or attractive new features? The following trends in swimming pool additions might be just what you’re looking for.
Beach entry:
This feature is exactly what it sounds like; a long, sloping entry to your pool – just like at the beach! This option is fun and attractive, but it’s also convenient for young children and those with mobility issues who have difficulty with stairs and ladders. The only downside is that you will require enough pool length for the slope to be constructed correctly, so this option won’t work well for smaller pools.
Reef step:
This type of wide step is basically a shelf, submerged about 8 to 16 inches below the surface of the pool, and provides easy entry. Young swimmers can enjoy a shallow spot to play, pets can utilize the step as an easy entry point, and those who have trouble with typical pool ladders will certainly appreciate it. Reef steps can also be used for sunbathing in shallow, cool water.
It’s easier to incorporate a reef step into a new pool, but it is possible to redesign your existing pool to add this feature. Just keep in mind that the shelf might not match your current pool’s surface exactly, or you could resurface the pool during the project.
Hot tub:
A hot tub will provide relaxation, and possibly therapy for sore muscles. It’s a great place for adults to socialize separately from the noise and splashing of the family pool, and it will expand your use of the pool space during cooler months.
You can always add a simple, pre-made hot tub to your pool deck, without adding too much expense. However, if you want to incorporate a hot tub feature into the pool’s design, be prepared with a generous budget. Depending upon your current pool’s construction, this could require a significant redesign. As with any construction project, the features and materials you choose will greatly impact the final cost.
Water features:
Waterfalls and fountain features can be incorporated into a new pool design or added later. Both children and adults will enjoy these additions, and you can customize them in almost any way that you imagine. Naturally, the more complicated the feature, the higher the cost. If you decide upon a waterfall feature, consider landscaping around the pool that will add to the tropical feel.
Fire features:
Fire features, like fire bowls, fire pits, torches, or candeleres, add an exciting element to nighttime pool parties. Many of these options are easy to add to an existing pool and provide an alternative to typical electric lighting.
For information on any of these swimming pool features or others that you have in mind, give us a call. We can help you weigh the pros and cons of various options, and design a beautiful backyard pool environment that suits your needs and budget.
Growing your own vegetables will give you access to fresh, affordable produce (and organic if you prefer). Vegetable gardens also serve as terrific educational tools for children and can save you money at the grocery store. But first, you need to establish a spot for your vegetable garden.
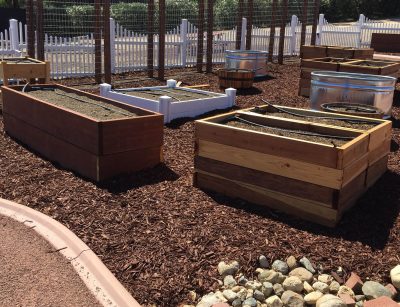
Raised beds offer the convenience of simply adding a garden to your yard, without having to plow up the soil and start from scratch. Simply build your bed, fill with the appropriate soil, and start planting! These beds can also add an attractive design element to your landscaping if you prefer. Let’s review some popular methods of building raised beds.
Stone beds:
If you choose to build your raised beds out of stone, you will add a permanent, practically indestructible landscape element to your yard. Stone beds are attractive and will blend with any type of landscape or architecture style. Of course, the downside of stone beds is the higher expense and labor.
Wood beds:
You could also build your own raised beds from lumber, which will allow you to customize the size and depth of your beds. Use treated lumber and you can expect your beds to last about ten years before they need repair. Consider your needs carefully when selecting a depth for your beds; taller walls can allow for easier gardening (for those with sore backs) and keep small children out of the vegetable garden. Some plants, also, require deeper soil.
Polypropylene plastic beds:
These UV-stable plastic gardening walls come with interlocking edges, so all you do is select the sizes you need, lock them together, and create your own customized rectangular or square raised beds. These materials are available in a variety of colors, too, if you want to add a pop of color to your landscape.
Purchase raised bed containers:
If construction projects aren’t your thing, you can always utilize pre-made raised bed containers. Tall horse troughs are a popular choice (and you can add legs to the bottom if you want to bring up the height). Garden supply manufacturers also offer a variety of tiered planters for those with limited gardening space, which often work perfectly for plants like herbs and lettuce.
Trellises:
Consider adding a trellis to your raised bed, to take advantage of vertical space. Some vegetables, like peas and gourds, prefer to grow up a trellis structure.
The creative approach:
If it holds soil, you can probably use it as a creative raised bed. Shop around at your favorite thrift stores, or peruse online marketplaces, to see what kind of interesting planters you can create. You could benefit the earth by reusing items that might otherwise be thrown away. Just know that some materials will degrade faster than others, so depending on your choice, you might need to replace your raised beds in a few years.
Add a seat:
Adding seats to your raised beds will cut back on the amount of stooping and bending you need to do, and probably save your back from some “wear and tear”.
For more information on adding raised vegetable beds to your existing landscape, give us a call. We can offer advice on the pros and cons of various materials, and help with installation if necessary.
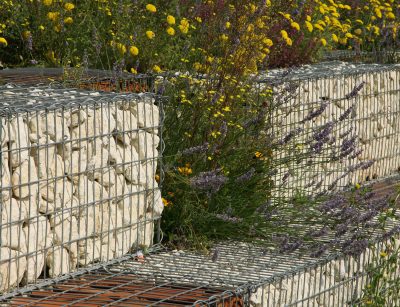
Used for thousands of years, gabion walls provide a retaining wall option that is both effective and attractive. The word “gabion” comes from an Italian word meaning “big cage” (“gabbione”), referring to the manner in which gabion walls are constructed. They are essentially containers, which can be filled with a variety of different materials, that form a wall that can be both useful and decorative.
Originally, gabion walls were constructed of wicker, but today’s hardscaping demands have required an upgrade to sturdy galvanized, coated, or stainless steel wire. Then we fill the “cage” with brick, rock, or concrete debris, according to both structural need and aesthetic preference. Gabion walls can be used to support an earth wall, prevent erosion, stabilize the soil, or be used for other practical purposes. And of course, they can be purely decorative if that is your goal.
Examples of Gabion walls. Throughout history, gabion walls have been used to shore up the banks of the Nile River, as military fortifications during the Medieval era, and in modern times to stabilize shorelines, riverbanks, and highways against erosion. Leonardo da Vinci even used gabion walls for the foundation of the San Marco castle in Milan.
How do gabion walls translate into hardscaping for today’s homeowner? Check out the following benefits:
Easy installation
Strength – in fact, the strength of gabion walls increase over time as materials settle
Conform to ground movement – because of the way they are constructed (using filler materials) gabion walls conform to ground movement. This provides additional stability.
Environmentally friendly – onsite material can be used as filler, eliminating transportation impacts, or you can choose environmentally friendly materials from a nearby provider
Sustainability – gabion walls can be used as shade screens in hot climates, while allowing air to move through
Permeability – this type of structure is self-draining, resisting erosion
Aesthetics – you can fill a gabion wall with a variety of materials, allowing you to create a seamless look that ties your home to the landscape
If you’re considering a hardscape project involving walls of any type, give us a call to learn more about gabion walls. We can help you decide if this versatile structure would work for your needs, and provide more information on construction methods, materials, and installation.

For a fun springtime family outing, and to gather a little inspiration for your own landscape design, head over to Balboa Park in San Diego. The park features numerous gardens, some designed decades ago by the original founders. Just to give you an idea of the park’s diversity, here is a list of their gardens currently open for touring:
1935 Cactus Garden
Australian Garden
Alcazar Garden
California Native Plant Garden
Casa del Rey Moro Garden
Desert Garden
EthnoBotany Children’s Peace Garden
Florida Canyon Native Plant Preserve
Marston House Garden
Japanese Friendship Garden
Inez Grant Parker Memorial Rose Garden
Palm Canyon
Veterans Memorial Garden
Trees for Health Garden
San Diego Zoo Botanical Collection
Zoro Garden
In addition to the many lush, landscaped garden areas, Balboa Park is the home of the San Diego Botanical Garden Foundation. The foundation hosts exhibitions, classes, and educational programs free to the public, so be sure to check their schedule before you visit. The Memorial Botanical Library is also open to the public, in case you want to pursue some research while you’re there.
Balboa Park is also the home of seventeen different museums, like the San Diego Art Institute and the Air and Space Museum. Numerous performing arts opportunities are also available, such as the Junior Theatre, dance performances, and the WorldBeat Center. And of course, food, drink, and lodging are all nearby, just in case you want to make a weekend trip of your outing.
As you explore the miles of trails through Balboa Park’s gardens, remember to take notes or grab a photo of anything that inspires you. Give us a call when you return, and we can advise you on incorporating your new ideas into your own alluring garden.

Perhaps your trampoline isn’t the most decorative part of your landscape, but it’s certainly important to the kids. So you want to take good care of it, and choose the best placement in your yard. We’re glad you checked our blog, because we have some input on these matters.
Where to place your trampoline. Directly on the ground is usually best; if you place your trampoline on a concrete patio or even wooden deck, you can expect obnoxious knocking sounds and damage to the trampoline’s legs. Plus, a fall onto a hard surface is likely to result in injuries.
Do keep in mind that if your soil is acidic, this can lead to premature rusting of the metal legs. Placing some mulch, sand, or other material underneath the trampoline can be a good idea.
Choose a flat spot in the yard that allows for easy visibility from at least one window, so you can check on the kids from time to time.
And of course, you want to avoid placing your trampoline underneath trees. Dripping sap and dropping debris will only make cleaning more difficult.
Cleaning your trampoline. First, remove any large debris, like limbs that have fallen onto the trampoline. Sweep away leaves, pinestraw, sand, or dirt with a broom.
Next, spray the mat with your garden hose. You can use a sprayer setting with a bit of force behind it, if you need to dislodge stubborn dirt.
Now, mix a bucket of warm soapy water, and scrub the trampoline by hand. Avoid any chemicals other than soap. Kids often want to pitch in, because sliding around on a soapy trampoline can be fun. That’s up to you, but setting a “hands and knees sliding, only” rule can prevent injuries. Running or jumping on a soapy trampoline can be dangerous.
Finally, simply rinse the trampoline with your hose once more, and allow it to dry in the sun.
And now for a bonus tip: Use a trampoline enclosure! Yes, it will make cleaning slightly less convenient, but an enclosure protects your kids from falls.
Give us a call if you need more help designing a kid-friendly landscape, or need help deciding upon a material to place underneath your play structures. We’ll be happy to help you keep your kids safe, while improving the appearance of your yard.

Nothing says summer like a homegrown tomato, or perhaps your own homemade salsa! If you’re getting ready to plant your spring garden, you might be wondering which tomato and pepper varieties are best suited for home use.
For container gardens. If space is an issue, you’ll be pleased to know that you can grow tomatoes and peppers in containers. All you need is a sunny spot on a porch or patio! Look for smaller, compact varieties, such as cherry or grape tomatoes. You can grow some larger varieties as well, but you will need a much larger pot. The early-producing types (like Early Girls) often yield more fruit throughout the season.
As for peppers, most smaller types will do just fine in pots. Hint: The word “dwarf” in the name will indicate a miniature, pot-friendly variety.
For standard gardens. For those of you with a larger garden space, you’re in luck: Just about any tomato or pepper variety can be grown right in your own backyard. With regard to climate, though, some types will certainly be better suited to Southern California than others. Since we have a long growing season, how about a variety that is bred to withstand sustained high temperatures? Granadero, brandywine, German Johnson, Caiman, and merlot tomatoes all fit the bill.
As for peppers, try lively Italian yellow, lively Italian orange, shishito, bastan poblano, ring-o-fire, sprinter, or olympus varieties. And of course, there’s always the standard Bell pepper.
And if you want to can or jar your own sauces… Keep in mind that the “meatier” varieties (with lower water content) work best. Roma tomatoes are known as the classic canning tomato, and we can also suggest bellstar, san marzano, rutgers, amish paste, or granadero.
As for peppers, you might prefer those with fewer seeds. We recommend California wonder, ancho poblano, or early jalapenos.
For more tips on getting your summer garden started, please give us a call or stop by. We can also discuss the different flowers you can plant nearby, to draw more pollinators to your garden and ensure a healthy harvest.

New Rose Varieties for 2019
Roses have long been a favorite flower of gardeners, due to their large, impressive blooms and incredible scent. Horticulturalists, also, enjoy experimenting with hybrid varieties, always seeking to create hardier plants, new colors, interesting scents, and more.
If you’re a rose enthusiast, it might interest you to learn some of this year’s brand-new hybrid varieties. These additions might be the perfect way to add something new and exciting to your landscape.
Star Roses has announced these new varieties…
Pretty Polly Lavender. These bloom a lovely shade of pastel lavender, from spring to fall. The compact bushes will fit easily into an existing landscape, and they’re bred for excellent disease resistance. These are also available in brilliant pink or classic white.
White Veranda. If you’re looking for a compact rose bush that could even grow well in a container, you might enjoy the lightly scented White Veranda.
Stiletto. Looking for something more dramatic? The bright magenta Stiletto roses feature a strong scent and deep, glossy green foliage. This variety performs best in Western climates, and grows up to 5 ½ feet tall.
Eyeconic Plum Lemonade. Another option in the purple color family, Eyeconic Plum Lemonade features pastel purple blooms with dark plum centers. These lightly scented roses grow on compact bushes, about two feet in height.
Weeks Roses, another popular supplier, has announced their own new varieties for 2019…
Arctic Blue. These blooms aren’t technically blue, but feature a bright lilac pink finished with lavender-blue edges. The backside of each petal is a deep cream, giving these roses a unique three-toned appearance.
All Dressed Up. These old fashioned, voluptuous cup-shaped pink blooms lend a chic touch to your garden. Their scent ranges from mild tea to fresh-cut apple.
Life of the Party. Another old fashioned, cup-shaped bloom, Life of the Party features light yellow blooms kissed with pink blush on the edges. This is another fantastic choice for gardeners looking for something unique.
Celestial Night. If “understated” isn’t your thing, you’ll enjoy Celestial Night’s large, plum-purple blooms with raspberry undersides. Their mildly fruity scent seems to match the flower’s appearance just perfectly.
These are just a sampling of the new roses available this spring. For more information on planting and growing rose bushes, give us a call and we can work your favorite new variety into a custom design!
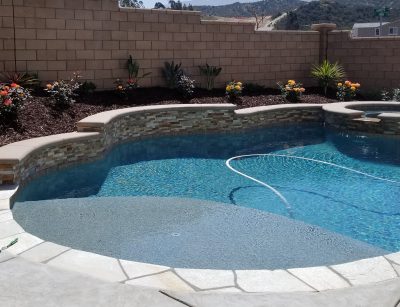
Your backyard swimming pool isn’t just a place to enjoy fun with family and friends. It also serves as a decorative centerpiece of your yard, so naturally you want to keep it looking lovely. If you’re installing a pool or refinishing your old one, take the time to learn about different pool finishes. You can choose one that compliments your landscape, suits your budget, and holds up to wear and tear over time.
Plaster pool finish. Plaster is one of the most common pool finishes, and it’s a classic. It’s smooth and bright white, and will make your water appear a clear crystal blue. Plaster is also one of the more affordable options, making it suitable for most budgets.
Since plaster is porous, it can stain more easily, and requires a bit more care to keep it looking nice. You can expect your plaster pool finish to last up to ten years, assuming you care for it meticulously.
Colored plaster. Colored plaster offers the same benefits and drawbacks of regular, white plaster, but you can customize the color. You might find this option an exciting step up from the classic look, without much added expense.
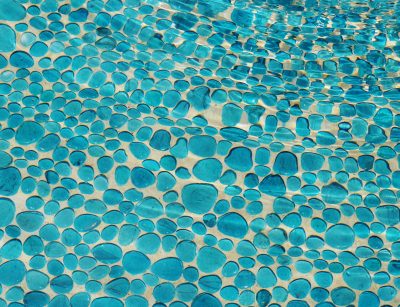
Pebble pool finish. Pebble pool finishes are constructed of a special cement mixed with pebbles. These pool finishes are popular due to their natural aesthetic, and you can choose from a wide array of pebble types and colors. Durable and stain resistant, a pebble pool finish will last between 15 and 20 years when you care for it properly.
The downside, though, is that pebble finishes can be rough on young swimmers’ feet. That’s why many families postpone this finish choice until children are a bit older.
Quartz pool finish. A combination of polymer-modified cement and quartz aggregate, quartz pool finishes combine the best of both plaster and pebble pool finishes. This type of pool finish is non-porous, holds up well against stains and pool chemicals, and can be expected to last up to 12 years. This is a low maintenance option that is perfect for those who want to give their pool a special look, without quite as much expense and maintenance as pebble options.
For more information on adding a pool to your yard, or on landscaping and design options to complement your pool, give us a call. We can help turn your plain swimming pool into a beautiful and functional backyard oasis!

If you spend a lot of time outside, it will happen eventually: You will be stung by a flying insect. This is especially true for flower gardeners; after all, you’re spending a lot of quality time with these insects’ food source!
If you know you’re severely allergic to stings, your first step should be to use your Epipen right away, or call 911 for help if you don’t have access to one. Otherwise, those who are not allergic can follow the following steps:
- Try to identify the type of sting. Take quick notice of what insect nabbed you, if you can.
- Pull out the stinger, if you can see it. If a venom sac is attached, be very careful not to squeeze it, or you could accidentally inject more venom into yourself. Flick it away with a rigid object such as a credit card.
- Watch for serious allergic reactions. If you’ve never been stung before, you could be allergic without knowing it. Call for help immediately if you have trouble breathing or experience other alarming symptoms.
- Most likely, you will only experience pain and mild to moderate swelling at the site of the sting. Place ice on the area to soothe it.
- To treat a bee sting, take an antihistamine such as Benadryl (if you’ve taken it before, and know that you won’t react strongly to the medication). Don’t drive afterward! These medications can make you sleepy or feel “loopy”.
- Or, try ammonia. Applied topically, alkaline ammonia counteracts acidic venom. If you don’t have ammonia handy, a handful of mud can be soothing.
How to avoid bee stings in the future. You can improve your odds of avoiding stings by choosing clothing that is less likely to attract them. Yellow, red, and orange are some of bees’ favorite colors, and keep in mind that they can’t differentiate between real blooms and flower prints on clothing! Don’t wear perfumes if you’re going outside, either. The smells confuse bees, and they might think you’re a tasty pollen snack.
Stay safe while you’re gardening this year! And remember, if you have any other questions we’re here to help. Stop by our nursery, explore our new blooms, and gain valuable input on keeping your garden beautiful all year.

If it’s inspiration you seek, you’ll find it at the flower fields in Carlsbad, California. This popular springtime destination offers over 50 acres of stunning flower fields, planted with the Tecolote Giant Ranunculus. An Asian member of the buttercup family, also known as the Persian Buttercup, you’re not likely to enjoy 50 acres of Ranunculus anywhere else! The site also features five acres planted with various other species of stunning blooms.
When to visit. The fields opened on March 1, and will remain open until May 12, from 9 am to 6 pm every day. Peak season usually falls from mid-March to mid-April, but that can vary slightly each year depending upon temperature and rainfall.
What to do at the park. Wear your walking shoes! You will be able to stroll the designated walking paths as long as you like, during operating hours. For those who have trouble walking, tractor wagon rides are available. Picnics are allowed, if you want to bring a meal and spend a day. The Carlsbad flower fields make a terrific family destination, or a great spot for a unique, romantic date!
Pick up some fresh-cut flowers or bulbs to take home. Yes, you can purchase your own Ranunculus flowers at the farm! They make a terrific hostess gift, or just take them home and enjoy for yourself. Many other lovely species are also available. If you feel inspired to grow your own Ranunculus, the farm also sells bulbs for planting in your garden.
Visit during special events. The whole family will enjoy Kids’ Day on March 23. Or, check out the Sunset Wine Tasting event on March 29. If yoga sessions among the flower fields sounds more your speed, head to the farm on March 30. Many other exciting events are coming up; check the farm’s website for a full schedule!
Remember that we’re available to aid your spring planting projects, too. If you need supplies or advice, just stop by our nursery and we’ll be happy to help.