
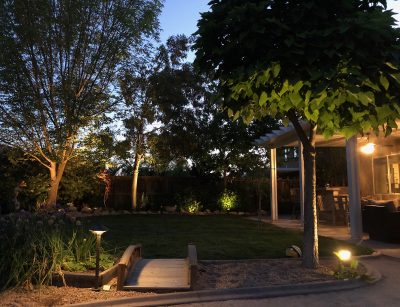
What if we told you a single project can add beauty to your landscape plus increase safety around your home? Low voltage lighting, when designed and installed thoughtfully, can accomplish both of these goals much more easily than you might believe.
First, let’s review some of the basic types of lighting available. In most cases you would use an assortment of these lights, depending upon the features and areas of your landscape that you wish to illuminate.
Waterproof pond lights illuminate water features such as ponds, waterfalls, and fountains.
Offset path lights illuminate walkways.
Wash lights offer a bit more light, to illuminate pathways and surrounding plants.
Tree-mounted spotlights simulate moonlight from above.
Flood lights illuminate trees, buildings, or other large features.
Uplighting versus downlighting. This decision is all about the direction of the lighting. You can mount a light below a feature and direct the light upward (uplighting), or install the light above a feature to illuminate the feature below (downlighting).
Consider the aesthetics of the element you’re highlighting. A Japanese maple, for example, benefits from an uplight which highlights the branch structure and delicate leaves. Uplighting other features such as columns or fountains adds drama.
On the other hand, downlighting is better for some features. The beauty of a hosta lies in its textured, variegated leaves, which are best viewed from above. Downlighting can also offer the most practical solution when a major pathway or seating area needs maximum illumination.
Why LED? Many landscape lighting professionals have switched to LED lighting, for a few important reasons. The bulbs last longer, and lower the cost of your lighting system because they use far less electricity. They also emit much less heat than halogen bulbs, which lowers your risk of a fire in the event that dry leaves or other flammable materials come into contact with lights.
Recent trends. Technology provides upgrades to landscape lighting according to how you need the system to perform. Upgrades are available to make your system more “green”, and “smart” systems allow you to control them remotely. Some landscape lighting systems even include a feature that repels mosquitoes. If you’re wondering whether a landscape lighting system can address your particular needs, the answer is probably “yes”! Give us a call to learn more, and we can help you design a system that suits your preferences.

We call them houseplants, but of course you can use interior plants in an office, too! In fact, there are many solid reasons that you should liven up your office with some plant life, including…
Aesthetic appeal
Cleaner air
Reduced noise levels
Stress reduction
Increased productivity
Boosted creativity
Fewer employee sick days
Yes, these claims are backed up by science. Various research studies have pointed out that the presence of a few plants in the office does indeed reduce stress levels, boost creativity, and increase worker productivity.
And of course, we already know that plants clean our air. Aside from removing carbon dioxide and replacing it with oxygen, researchers have also found that plants are effective at removing chemicals such as benzene, formaldehyde, and trichloroethylene from the air. It’s no surprise that cleaner air can result in a lower rate of illnesses and fewer sick days.
Choosing the right plants. Not all plants are right for an office setting. Consider how often each plant needs to be watered, and to whom you will assign that task. Research the amount of daylight your plants need, and place them accordingly (near windows, underneath skylights, and so on). As a bonus, placing plants near windows or in entryways will maximize their noise reduction effects.
Generally speaking, we find that succulents are the ideal choice for many workplaces; they don’t require a high degree of care, and you can combine several varieties to create beautiful centerpieces. Other good choices include pathos vine, peace lilies, philodendron, oxalis, begonia, snake plant, African violets, and many varieties of ivy.
Avoid toxic plants. Naturally, you might wish to avoid having any toxic plants in a workplace in a location that children can reach. While it’s unlikely that the plants will pose any risk to your adult coworkers, visiting children could become injured by toxic plants in waiting rooms or other public areas.

Bullet journals are all the rage right now, for both the organized and the organizationally challenged. And it just so happens that bullet journals and gardening go together like peanut butter and jelly! If the idea appeals to you, read on to discover how a bullet journal can help you organize your gardening tasks.
What is a bullet journal? A bullet journal is simply a notebook that you utilize to plan a number of schemes. You can use it to record to-do lists, make notes on upcoming events, brainstorm ideas, or even use it as a diary of sorts. The idea is to break out of “paragraph mode’ and simply make bullet points of everything you want to explore or remember.
Obviously, a bullet journal works perfectly for amateur to professional gardeners! There is so much to remember, but you often don’t need to go into intricate detail in order to get the job done.
What kind of things can you “bullet”?
- Blooming cycles
- Keeping inventory of your seeds and bulbs
- When things were planted
- Details on seedling growth
- When you need to plant things
- Weeding and watering schedules
- Harvest times
- When the irrigation clock was last updated
- Checking irrigation valves
- Spray patterns
- When to prune certain trees/shrubs/flowers
- When to clean out flower beds
- When to fertilize
- Weather details
- Checking low voltage light systems
- Money spent
- … and much, much more
Make sure to use a dump page (or several dump pages). A dump page is a place to simply “dump” everything that is floating around in your mind, that you might need to address at various points during the year. After “dumping” it somewhere, you can be assured you will remember it, and assign it to the appropriate place in your overall schedule.
You can “dump” monthly, and then use separate pages to record seasonal or even weekly schedules and ideas.
Now get organized. Divide your bullet journal into seasons, or even individual weeks, and plot out your to-do lists. Leave space so that you can add tasks at any time, as you think of them.
Use your bullet journal as a diary. Over time, you will discover that your bullet journal serves as an excellent record of planting, pruning, harvesting, and more. You can utilize it to learn from your mistakes and repeat your successes, and your journal will eventually become one of your most valuable learning tools.
Of course, we’re also at your disposal if you need help with any aspect of your landscaping. Just give us a call, and we’ll be happy to answer your questions and help you plan your next project.
Common in many other countries, multigenerational living is just starting to catch on in the United States. Due to the cost of real estate, student loan debt, and considerations such as nursing care for the elderly, we see more and more parents moving in with their children, adult children returning home after college, and so on.
Obviously this lifestyle change will necessitate some alterations to the home. Mother-in-law suites, basement apartments, garage studios are popular additions, and tiny homes have even begun to spring up in backyards. It might not surprise you to learn that landscaping should be, and is, changing as well.
Separate entrances. When installing a mother-in-law suite, it can be important to consider your needs regarding separate entrances. Not only will this afford more privacy and independence; it can make multigenerational living a bit less challenging with regard to visitors, package deliveries, and so on.
Make sure your landscaping reflects your architecture, and use features such as lighting, hardscape, pathways, shrubbery, and garden spaces to subtly cue visitors to the presence of a second entrance. If the family member enjoys gardening, having his or her own space to maintain will afford them greater independence as well.
Consider gathering spaces. Spending more time together is one of the great benefits of multigenerational living. Consider whether an outdoor gathering space would be beneficial to your family, and how exactly you wish for that space to function. Do you want an outdoor kitchen, a recreation space, just a simple porch for relaxing conversation, or something else? Anticipate not only current needs, but future uses for the space as well; will there be grandchildren someday, who need a place to play? For every need, a landscaping option exists!
Pathways and lighting. Aside from helping visitors navigate your yard, smooth pathways and well-placed lighting can help to prevent accidents. This will become especially important if your family member moves into a separate garage apartment or tiny home on the property, and might be coming and going at night.
Landscaping for other reasons. Aside from the practical concerns, you might wish to revamp your landscaping for other reasons related to multigenerational living. A vegetable garden or fruit trees can help to feed the entire family, or a flower garden can provide a hobby for retirees.
No matter what the reason, we can help with your landscaping concerns as you move into this exciting new phase in your life. Give us a call, and we’ll discuss your family’s needs and help you put together a plan to revamp your landscaping to accommodate your new lifestyle.

No matter how much we love our houseplants, we love our kids and pets even more. To keep tiny humans, cats, dogs, and other creatures safe, it is important to learn about plant toxicity. Many common houseplants seem perfectly innocuous, but can actually pose a danger to your little two-legged or four-legged explorers.
Avoid toxic plants in the home. All of these common household plants range from mildly to extremely toxic to both humans and pets:
- Arrowhead
- Sago palm
- Caladium
- Cyclamen
- Poinsettia
- Pothos
- Philodendron
- Most varieties of Lilies
- Devil’s Ivy
- English Ivy
- Mother-in-Law’s Tongue (Snake Plant)
- Oleander
In the case of Oleander, we want to remind you that it is extremely toxic, even to the point of being deadly. While some other plants listed above might cause only mild symptoms, Oleander is one you simply do not want in your home if you have children or pets.
Poisoning can occur from
- Eating the plant itself (flowers, stems, leaves, etc)
- Touching the plant
- Contact with the plant’s sap or juices
- Ingesting berries (they are not all edible)
- Eating the soil around some plants
- Drinking water from the plant tray
With regard to children, you know your kids best. There will probably come a time when you won’t have to be so vigilant with regard to plants. But since pets often do not grow out of their attraction to houseplants, you should always keep plants out of reach or simply exercise scrutiny when choosing plants for your home. Remember, too, that potting soils and fertilizers can also be dangerous to both children and pets.
Know the signs. Signs of plant toxicity include…
- Rash
- Nausea or vomiting
- Diarrhea
- Complaints of stomach ache
- Rapid heartbeat
- Impaired or labored breathing
- Lethargy
- Dizziness
- Confusion
- Burning or swelling around the mouth
- Drooling
- Staggering
- Hyperactivity
- Signs of shock or seizure
Finally, keep the numbers to Poison Control, your pediatrician, and your veterinarian posted in a central location in the home. If an accident does occur, help will be easy to access at a stressful time.

For some of us, the backyard is a place to showcase our skills honed over many years of gardening. For others, it’s a place of recreation and relaxation. We say: Why not both?
For those who recall the magic and wonder of their childhoods, we know that a backyard can provide hours of enjoyment and learning to our children and grandchildren. You can encourage that by drawing inspiration from Winnie the Pooh’s Hundred Acre Wood. Just search that phrase on Pinterest and you’ll see what we mean!
There are no rules to creating your own Hundred Acre Wood. Just consider adding one or more of these elements to stimulate imaginations young and old…
Hiding places. Young children love a cozy nook, in which to play or relax. A patch of sunflowers, a weeping tree, or climbing vines shaped on a trellis provide the perfect hiding spots.
A peaceful pond. A small water feature encourages birds, turtles, lizards, and other small creatures to visit. If you stock it with goldfish, even better! Add a small waterfall and you can enjoy the soothing sound of rushing water.
Inspired pathways. A simple pathway of stones or thin slices of logs can provide far more enjoyment than you might imagine! Children will enjoy going on adventures, following a winding path through the backyard, and can get exercise by leaping from one to the next.
A small bridge. You might recall that Christopher Robin and Pooh often played “poohsticks” on their favorite bridge. If you have a stream in your yard, adding a bridge can provide hours of enjoyment. But even if you lack running water, a small bridge can serve as a lovely focal point of your landscaping and inspire plenty of imaginary scenarios for the kids.
Wildflowers. What’s a magical forest without wildflowers? Wildflower seeds are inexpensive and usually need little care. Just toss handfuls of them where you want to grow a less structured garden, and enjoy their untamed beauty.
A picnic table. Hours of playtime make little bellies hungry. Provide a place to stop for a snack, ideally something with honey.
“Natural” playground equipment. Stumps for hopping, a rope course, a tire swing, and other types of “natural” playground equipment fit perfectly with the Hundred Acre Wood theme.
Get the Look, Part Four: Napa & NorCal
With spring just around the corner, you will appreciate this fourth blog in our “Get the Look” series. The Napa Valley/Northern California style is all about outdoor living. Grab a few of these ideas for your own yard, and extend your living space to the great outdoors.
Tidy, but expansive, landscaping. Recreate the feel of a Northern California vineyard by crafting gardens based on straight lines and walkable pathways. Your yard should inspire you to wander and take it all in. Napa style is somewhat more contemporary, so keep your layout clean, uncluttered, and well pruned.
Bring your living room outdoors. Not literally, of course. But to enjoy the true Napa/Norcal aesthetic, you will want to feel as comfortable on your patio or courtyard as you do in your living room. Shop for a plush outdoor furniture, end tables, and perhaps a dining table and chairs.
Provide shade. Grow traveling vines or ivy on a trellis to provide shade and elegant ambiance. Large potted plants or a living wall can be placed strategically, to block afternoon sun for greater enjoyment of your outdoor space.
Plant fruit or olive trees. Not only will these add to your “Norcal” vibe; they will provide abundant food for your family.
Your own personal vineyard. If you have room, building an arbor and growing your own grape vines can be a fun project. When the grapes are ready to harvest, making your own wine can turn into a learning adventure for the whole family. Carefully choose a variety of grapes that will grow well in our area; visiting local nurseries can help you learn more.
Set up for outdoor entertaining. Whether you go for a full outdoor kitchen, or choose a more modest setup, make sure you have equipment to serve cool drinks and appetizers at minimum. An outdoor bar setup is nice to have, but not required; a large tub of ice and some basic glassware will suffice.
Consider a fire feature. A fire pit or outdoor fireplace give evening gatherings that extra “wow” factor.
As you revamp your landscape to inspire more Napa or Norcal charm, don’t forget to consult with us. We can help you at every stage of your project, so that your dream backyard will provide enjoyment for years to come.
Get the Look, Part Three: Modern Farmhouse
The Modern Farmhouse aesthetic is all the rage these days, so we’ve selected it for the third post in our “Get the Look” blog series. We can provide some jumping-off points for your landscape design, but keep in mind that the farmhouse style is heavy on repurposed items. So, your own imagination is the limit with this theme!
Choose a color theme. The farmhouse aesthetic revolves around a neutral palette of whites, tans, or pastels, with one or two bolder colors incorporated into the mix. Bright red, blue, or yellow are common choices for color accents. Utilize this color them throughout your design to keep the look consistent.
It’s all about the porch. What’s a vintage farmhouse without a wide front porch? Make sure to play up this feature, or if you don’t have a porch, create a similar atmosphere on a patio or deck area. Select plush, comfortable furnishings with accents of gingham or plaid, and consider a porch swing. Add flower boxes or hanging arrangements to complete your outdoor oasis.
Farmhouse hardscaping. For walkways or patios, nature stone works best with the farmhouse style. Choosing stones with an irregular shape or weathered look will add to the “vintage” feel.
Add a vegetable garden. They don’t call it a “farm”house without good reason! Adding a small vegetable garden will give you a legitimate farmhouse yard. Plus, you can feed your family healthy, nutritious fresh produce. If you want to start small, try something simple like potted tomatoes or a few hanging baskets of strawberries.
Choose lush flowering plants. Farmers know that bees are necessary for pollinating crops, so they often plant vibrant flowering plants to attract them. Butterfly bushes, hydrangeas, rose bushes, tulips, daisies, and dogwoods make excellent choices for both their practical and aesthetic purposes.
Include the classic picket fence. If regulations or budget prevent you from fencing your entire yard, that’s okay! Just a few sections of picket fencing can be used as a decorative accent here and there, and the effect is just as quaint.
Repurpose and reusing. Farm life means using everything available, so go ahead and get creative. Old wagon wheels, wheelbarrows, bicycles, and more have been used at planters or accents in the garden. Browse garage sales or thrift stores, consult Pinterest, and let your imagination take over!
If you need help selecting new trees or installing features, we can help. Let’s discuss your project, and we can make additional recommendations based upon your space and preferences.

Get the Look Part Two: Tropical Paradise
This week in our “Get the Look” blog series, we’re focusing on landscaping to create your own tropical paradise. With warmer weather just a few months away, start making a plan now if you want to enjoy your own backyard paradise this summer.
Leafy greens. Bold, green leafy plants are a staple in tropical landscapes. Intersperse large, leafy ferns with tall, bold flowers for the perfect pairing. And of course, no tropical landscape is complete without a palm tree.
Vary your colors. Bold color is half the fun of tropical landscapes. When choosing flowering plants, remember to vary your color choices. Red, orange, yellow, and vivid purple combine to stimulate your visual senses.
Irrigate. Many tropical plants require moderate to heavy watering, so consider that need before installing this type of landscape. If such you already have an irrigation system installed on your property, check to be sure all features are working properly and are well placed for your needs. Then, consider whether you need to reprogram the system to produce more water for your new plants.
Add a water feature. What’s a lush tropical paradise without a water feature? A swimming pool or small pond is ideal, but a waterfall feature or simply a fountain would work well also. Just remember to consider plant choices carefully when landscaping around a pool; some can be messier than others.
What to do in winter. Some tropical varieties need to shelter indoors during cool weather. These varieties can be potted, so that you can easily move them from patio to indoors over the winter.
Consider a tiki bar. If you entertain in your backyard regularly (or you just want to enjoy it all alone) consider a tiki bar installation. This will give your landscape or pool area a Polynesian twist.
For more tropical landscaping ideas, give us a call to discuss your project. Whether you want to add a fun feature or two, or hope to overhaul your entire landscape, we can help you design a project that fits your needs and budget.
Get the Look, Part One: Pacific Northwest
This month, we’ll be focusing on different landscaping styles each week, via our “Get the Look” blog series. First up is the Pacific Northwest style; how can you bring these elements into your landscaping, and what will work in our climate?
Use native northwest plants. If you’ve visited the Pacific Northwest, or simply viewed pictures, you have probably cultivated a specific image in your mind already. Some of the more popular varieties include:
- Ferns (any of the varieties)
- Helleborus (if you have some shade)
- Japanese Maples (if you have some shade)
- Ornamental grasses (lots of them in all heights and colors)
- Rose bushes
- Pine trees (and other conifers)
- Trees and plants with fall color
- Birch Trees
- Strawberry Trees
- Redbud Trees
- Gingko Biloba Trees
- Saucer Magnolia Trees
- Flowering fruit trees (Peach, Cherry, Plum, Pear)
- Hydrangeas (traditional and Oak Leaf varieties)
- Camellia Shrubs
- Azalea Shrubs
- Forsythia Shrubs
- Lilac Shrubs
- Gaura
- Peruvian Lily (Alstromeria)
- Flower bulbs hidden throughout the gardens (daffodils, leucojum, dahlias etc.)
- Cranesbill ground cover
- Ivy ground cover
- Cotoneaster ground cover
Research growing preferences. Some stereotypically “Northwest” plants might require a damp environment, while others can tolerate more dryness. Our climate tends to be more dry, but that doesn’t mean you can’t use those that require more water. As with most landscape styles in California, an irrigation system with a dedicated watering schedule is an absolute must.
Vary your selections. A few stunning varieties (ideally a mixture of those that bloom at different times) can alter the entire ambiance of your landscape. You can certainly mix Northwest-style selections with a more standard Southern California landscape, and still achieve the look you want.
Consider your soil. Non-native species might require soil amendments before planting, for optimal health. Give us a call, and we can help you decide which types of plants will work best in your landscape, and make recommendations to incorporate a few of your Pacific Northwest favorites.

With New Year’s Day rapidly approaching, you might be thinking about the resolutions you plan to make. Getting into shape is a common theme at this time of year, and many people also plan to become more disciplined with regard to chores at home. We have some great news for you: You can “kill two birds with one stone” by combining these goals, because yard work makes a great workout!
Over the past century, our lifestyles have become increasingly sedentary. That might seem convenient if you enjoy working in an office, but there is a down side: Overall, our health isn’t so great. Three quarters of American men and 60 percent of women are overweight or obese, and nearly one in three children are headed in that direction as well. Diet is another culprit, of course, but our lack of exercise is cited as one of the major causes of our nation’s declining health.
Luckily for those who aren’t fans of the gym, there are ways to exercise that don’t involve elliptical machines or grueling Crossfit classes. In fact, there is no reason to believe that simply changing your lifestyle and becoming more active overall won’t have a major impact upon your health. Just look at how people lived 100 years ago; gym memberships didn’t exist in that time!
You might not live on a farm, but doing your own yard work will provide a terrific opportunity for natural exercise. Weeding and planting a garden, especially at a moderate or brisk pace, will provide aerobic exercise along with stretching. Trade in your riding mower for a push model, and you can burn hundreds of calories per hour. Even pruning your shrubbery, with a sturdy pair of pruning shears will tone your arms and shoulders more than you would think!
Of course, if you enjoy the convenience of modern technology, you don’t have to abandon it entirely. Wear your Fitbit or step counter while performing yard work, and you’ll see what we mean. Yard work can burn 330 to 440 calories per hour, for a 150-pound person working at a moderate pace.
Of course, we’re still here to help you with larger projects. Give us a call to discuss your design ideas, and we’ll help you install the landscaping of your dreams. You’ll enjoy maintaining it that much more!

Each year, we bring you an exciting update on the “colors of the year,” usually chosen by Pantone along with paint companies like Behr and Sherwin Williams. While we normally think of color trends as they apply to fashion and home decor, there are plenty of unique and innovative ways to work them into your outdoor designs as well.
Pantone has just released their Fashion Color Trend Report Spring/Summer 2020 edition, giving us plenty of time to plan for gardening season. As Executive Director Leatrice Eiseman stated, “Combining our desire for stability, creativity, and more spontaneous design approaches, the color palette for Spring/Summer 2020 infuses heritage and tradition with a colorful youthful update that creates strong multi-colored combinations as well as energizing and optimistic pairings.”
Using that inspiration, Pantone has established the following palette for Spring and Summer, 2020:
Flame Scarlet
Saffron
Classic Blue
Biscay Green
Chive
Faded Denim
Orange Peel
Mosaic Blue
Sunlight
Coral Pink
Cinnamon Stick
Grape Compote
As for “color of the year,” that announcement is on the way any day now. However, fashion insiders are reporting Flame Scarlet has dominated the runways this fall, and is the likely choice for 2020’s favorite hue.
That’s great news for gardening enthusiasts, as many varieties of flowers are available in that shade. In particular, look for horticulturists to release numerous flaming red roses this spring.
As for other ways to work this year’s palette into your landscape, remember that plants aren’t your only option! Redecorate your patio furniture by recovering upholstery or adding a few throw pillows. Purchase new flower pots in your desired hues, or repaint the ones you already own. Lawn statues, hanging decor, and found objects can be utilized throughout the garden and your porch or patio area. Even thrift store finds can be reinvigorated with a fresh coat of spray paint.
Call us with your landscaping concerns, and we’ll help you refresh your yard and update installations with new, on-trend colors and styles.

Landscape design often appears to follow modern trends, and we aim to bring you fresh ideas through our blogs. But we definitely never abandon the classics entirely. In fact, many plants used in landscape today go all the way back to ancient times, and are even mentioned in the Bible. Just check out this list on Wikipedia, which indexes all of the trees and other plants referenced in the scripture.
The act of gardening in itself could be considered a religious or spiritual practice. Genesis, the first book of the Bible, chronicles God’s creation of the world and everything in it. After God creates Earth, he entrusts its care to human beings. The purpose of plants is to provide food, materials, and even medicines for our use. In turn, we are charged with providing the water, nutrients, and clean air that plants need to grow.
We need look no further than Moses to find descriptions of nature’s glory: “For the Lord your God is bringing you into a good land—a land with brooks, streams, and deep springs gushing out into the valleys and hills; a land with wheat and barley, vines and fig trees, pomegranates, olive oil and honey.”
If being in nature and cultivating a garden appeals to you on a spiritual level, here are some ways you can incorporate plants that have been mentioned in the Bible.
Medicinal plants. If God intended for us to use herbs to our benefit, then why not plant your own? Sage, aloe, dill, coriander, cinnamon, mint, myrrh, chamomile, and many other healing plants are referenced in the Bible.
Edible plants. Clearly, we have been provided with healthy foods, which allow us to satiate hunger and care for our bodies. Apples, cucumbers, almonds, walnuts, beans, leeks, lentils, onions, grapes and many more earned a mention in the good book.
Symbolic flowers and trees. Perhaps you simply enjoy the powerful symbolism associated with certain plants. Lily of the valley, for example, is associated with purity and happiness. The acacia tree symbolizes resurrection and immortality. The berries of a juniper tree are thought to cleanse us.
Designing a garden around meaningful symbolism might be a fulfilling project for you. If you need help designing a garden that suits both your aesthetic values as well as your space, give us a call and we’ll be happy to help.
When visiting Disney theme parks, many of us tend to focus on rides, food, and shows. But the atmosphere of Disney parks is always present in the background, and is what makes any Disney experience truly magical. As you walk through different areas of each park, you will notice that designers dedicated themselves to creating an immersive experience.
While most of us don’t have a Disney-sized budget, we can still bring that level of imagination to our own backyards by applying these lessons from Disney’s landscape designers.
Choose the right plants. There’s a world of flora out there, and we aren’t limited to the ones that happen to be native to our region. As you design your landscaping project, consider the atmosphere you want to create and research unique plants to support that goal. For example, in the new Star Wars area of Disney World, designers chose plants that look “other-worldly”. Visitors feel transported to another planet entirely when they walk through this area of the park.
A dramatic centerpiece. All designs need a focal point. Disney often utilizes fast-growing evergreens, and then landscapers shape them into topiaries. Sphagnum moss, attached to wooden frames and then covered with vines or clumping plants, provide a quick topiary option which can be created in mere weeks.
Set the scene. Your landscape design will include much more than just plants. Various hardscape and structures can combine to create a space that is functional, but also “sets the stage” for the story you want to tell. A quaint potting shed lends an English garden atmosphere, picket fencing feels quaint and retro, lawn ornaments create a “farmhouse” vibe, and so on.
Repel destructive insects. Given the incredible amount of money invested into Disney’s landscaping, it won’t surprise you to learn that park engineers crafted detailed pest control regimens. In addition to insecticides, landscape teams deploy millions of beneficial insects annually in order to combat those which pose a threat to the intricate gardens.
Maintenance is key. Disney park operators dedicate themselves to maintaining the magic for visitors. That’s why their maintenance teams come out early in the morning, before each park opens, to complete scheduled tasks. The result is pristine landscapes that feel effortless. You probably don’t want to wake up at 4 am on a regular basis to maintain your yard, but you should stick to a planned schedule to keep everything in top notch condition.
Irrigation is essential. About 2,000 miles of piping and 65,000 sprinkler heads keep the landscapes of Disney World properly irrigated. Luckily, even private homeowners can employ high-tech irrigation systems. Program your system with a “smart” timer, and you won’t have to worry about watering the lawn again.
If you’re feeling inspired to create your own backyard escape, give us a call to discuss your ideas. We can help you utilize high-tech and imaginative design ideas, scaled down to homeowner-friendly spaces and budgets.

If you’re looking for ideas for unique gifts, you’ve come to the right place. Plants can serve as the gift that keeps on giving, for many seasons or even years. With a little forethought and creativity, your offering will be the star of each round of Dirty Santa at this year’s holiday parties.
How about a fruit tree? Many fruit trees are available in dwarf versions, that grow to about five feet tall and can be kept in large pots. Dwarf orange, lemon, lime, avocado, or even peach trees are easy to care for, and can be moved indoors during cooler weather. They make lovely home decor, as any plant does, but will also give the gift of fresh fruit in time.
Create a succulent garden. Choose an appropriate container, plant a small succulent garden, and offer it as a beautiful centerpiece.
Or how about an air garden? With minimal investment, you can fill a hanging planter with one more more tillandsia (air plants). This is the perfect gift for the novice plant owner, because air plants require very little in the way of care.
Don’t forget bonsai trees! A bonsai tree in an attractive container makes beautiful decor for any room of the home, and can become an interesting hobby as well.
If you’re feeling ambitious, try moss art. These projects can be a bit more challenging, but the results are worth it. Wall hangings containing a variety of moss add a “zen” touch to homes, and are the perfect gift for that eclectic friend who seems to have one of everything. They probably don’t have one of these!
Perhaps a terrarium. A terrarium filled with a unique plant or two makes a great gift for an office coworker, who might appreciate the calming addition to their desk or cubicle.
And of course, there’s always the poinsettia. The tried-and-true poinsettia is always a welcome addition to holiday decor, and can be planted outdoors when the season is over. If you want to be creative with this seasonal staple, try one of the newer speckled varieties, or a pink, purple, or salmon-colored hue.
Did you come up with a unique way to utilize plants in your holiday decor or gifts? We’d love to hear about it! Send us your pictures and they might serve as inspiration for upcoming blogs.

For those who love landscaping and gardening, oncoming winter might represent the beginning of a dormant time for your favorite hobby. But you can still have fun sprucing up your yard, and add holiday cheer to the exterior of your home, by utilizing seasonal decor in your landscaping.
Replace summer arrangements with winter version. With cooler weather arriving, you’ve moved your more tropical plants indoors now. If your porch, patio, or window boxes are looking bare, replenish them with winter varieties like holly, winterberry, evergreens, or other cool-weather decorative plants.
Deck the halls and… porch railings? Garland isn’t only for indoor use! Drape it along porch railings, and combine with lights, bows, wreaths, or other holiday decor for a festive look.
Add bursts of unexpected color. When selecting outdoor decorations or plants for your landscaping, don’t feel obligated to stick to red and green. A burst of an unexpected hue like purple, teal, or tangerine will make your lawn stand out among the crowd.
Don’t forget your mailbox. We tend to focus on the porch and yard for holiday decorating, but your mailbox can serve as a great focal point for seasonal cheer. Replenish flower beds with seasonal plantings, or decorate the mailbox itself (if you don’t have a community mailbox, that is).
Browse thrift stores for interesting decor. If you’re tired of the same old store-bought lawn decorations, get creative with thrift store finds. Set up an artificial Christmas tree outside, use objects like sleds for decor, repurpose deer or bird figurines, or use found objects to create your own holiday artwork.
Utilize your own trimmings. If you trim evergreen branches, use these to make your own wreaths or window dressings. Keep them plain or jazz it up with ribbons, bows, ornaments, tinsel, or lights.
Light it up. Many homeowners add a few holiday lights along their home’s gutters and siding, but why not make them functional, too? String lights along sidewalks, pathways, and bushes to light the way for evening visitors. Consider other elements that you’d like to highlight; you can illuminate flower boxes or water features to show them off at night.
If you’re concerned about any element of your landscaping, give us a call. We can offer ideas to refresh the look of your yard or add a new feature, to boost your home’s curb appeal throughout winter and beyond.

Autumn is in full swing, and you know what that means! No, we’re not talking about your favorite flavored coffee drink arriving in local shops. It’s time to clean up all of those beautiful leaves that have begun to fall. And believe it or not, you can actually choose from different options with regard to that chore.
First of all, do you even need to clean up leaves? You do have some choice in the matter. A thick cover of leaves can kill your grass, so move on to the next part of this blog if that’s where your leaves are falling. Otherwise, you can possibly deal with a light leaf cover without raking or blowing. Simply run your lawnmower over them to break them up, and they’ll actually serve as terrific fertilizer.
If you do need to clean up your leaves…
Mulch and bag them. Attach a bagging system to your lawn mower, and mow your lawn on a dry day (wet leaves will clog the bagger). Now you can dispose of the bags of leaves, or use them as fertilizer in flower beds (skip the beds with fruit trees in them).
Use a blower or leaf vacuum. These gadgets do the job, but they’re loud. So check with your HOA regarding quiet hours (some don’t allow loud power equipment to be used on Sundays, for example). But avoid using these when leaves are wet; you’ll just waste your time and frustrate yourself.
Grab a rake and get moving. It’s the most old-fashioned method to remove leaves, but it still works! Raking leaves is also great exercise, and it’s good for the environment since you won’t use any fuels or add emissions to the air. You could pay some neighborhood kids to take care of this chore, if you aren’t up to it yourself.
Don’t waste your leaves! Rotting leaves add significant nutritional value to the soil, so don’t bag them up for the trash man! Compost them and use them in flower or vegetable beds, or spread a thin layer on your lawn for fertilizer.

3 Tips to Fireproof Your Yard
With all the wildfires we’ve been seeing lately, you might be feeling a bit nervous. Other than reviewing and updating your homeowners insurance policy (which you definitely should do), there are other ways to protect yourself in the event fires come close to your home. Nothing is guaranteed, of course, but these methods can add a layer of “fireproofing” to your yard and therefore your home.
Just remember these three words: Remove, reduce, and replace.
Remove. The first step is to remove anything unnecessary that could serve as kindling for approaching fires. Clean out dead weeds and leaves, especially those that are piled up close to the house. If you keep a firewood pile near your home, move it farther away. If you spot dead branches in trees or shrubs, it’s time for a pruning to get rid of those.
Reduce. Obviously, you can’t remove absolutely everything from your landscaping. But you can reduce flammable native vegetation, if it’s overly dense. You should also break up dense shrubbery or tree cover with a good trimming.
Replace. You might also wish to get rid of highly flammable vegetation altogether; at least the ones growing within 30 feet or so of the home. You can replace these with a less flammable species. Some species will expel water from their leaves to help extinguish fires where others will go up like a roman candle!
If your siding or roofing is a more flammable variety, you might consider remodeling with a fire-rated, non-combustible material like fiber cement siding or class A asphalt roof shingles.
Finally, plastic attic vents should be replaced with metal ones. Choose one with openings less than one-quarter inch, to reduce the possibility of embers entering the attic.
If you need help evaluating your landscaping options, give us a call. We can help you select less flammable options and create a defensible zone around your home.
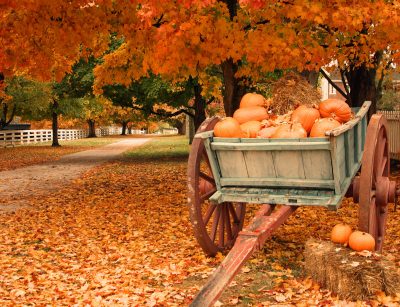
Most of us appreciate the cooler weather that arrives with autumn, and we all know about the fervor over pumpkin spice lattes, scented candles, and other products. But fall can also serve as the perfect opportunity for some fun outdoor projects, to decorate your yard and have fun with the kids.
Fall decorating can go beyond basic wreaths and the same old carved pumpkins. If you’re stumped (no pun intended) for more unique ideas, here’s a list that can help you brainstorm new, exciting projects this October. You can find pictures of these projects, and more, on Pinterest or Instagram.
Upcycle bundt pans and turn them into pumpkins
Dress up your mailbox with corn stalks and other festive decor
Make a tiered planter from bushel baskets
Create a fun display with a rustic wheelbarrow
Use a leaf garland to decorate your fence
Make your own scarecrow, or a whole scarecrow family (this project is extra fun for kids)
Paint wooden produce crates, and use them for storage or displays on your porch
Use an old galvanized bucket as a centerpiece, fill with straw, and place pumpkins or other seasonal items inside
Re-use an old pallet and make a hand-painted sign
Make pumpkin planters with Halloween candy buckets and concrete
Experiment with an old wagon wheel – paint it, or string it with lights
Use a tomato cage to create a pumpkin and gourd “tree”
Clean out window boxes, and plant mums and other fall-hued flowers
Use a wooden step ladder as a shelf for your display of pumpkins, gourds, etc
Remember that you don’t need to break the bank, to create a fun and festive fall display! After researching ideas online, browse thrift stores and garage sales for fun, unique items to upcycle. These items will make your decorations stand out from the crowd!
As always, contact us if you have any questions about your fall landscaping. We can offer advice on a design that is as beautiful as it is functional.

“Smart” houses are becoming increasingly popular, with homeowners enjoying the convenience of operating their oven remotely, or receiving notifications from their fridge. Likewise, designers are rolling out “smart” applications for the yard, so that your outdoors can be as high-tech as your indoors. These are just some of the latest innovations.
Smart irrigation. Watering your lawn can feel like a science class assignment. You need to gauge the weather, assess your lawn’s needs, and determine how much you should water and when. If you’d rather skip the work and spend more time enjoying your yard, a smart irrigation system does the work for you. It will assess conditions and respond appropriately, so that you never have to think about watering the lawn.
Rain sensors. Let’s say you’re using an irrigation system on a timer, and while you’re away from home it begins raining. You don’t need to rush home and manually shut off your sprinklers if you’ve previously installed a rain sensor. This handy gadget understands that running the irrigation system during rain is an unnecessary waste, and turns off the system for you.
Soil monitor. Shouldn’t watering be tailored to the soil’s current condition and needs? If you said yes, you’re onto something. A soil monitor does that work for you, by assessing the amount of moisture in the soil and then calculating the amount of irrigation needed. This device takes the guesswork out of watering your lawn, so that you don’t risk over- or underwatering.
Bluetooth landscape lighting. Landscape lighting hasn’t changed much in the last few decades – until now. With a Bluetooth transformer attached to your lighting system, you can adjust your lights (timing and wattage) from a smartphone app.
Robotic lawnmowers. No, it doesn’t look like Rosie from the Jetsons. But it will get the job done! A robotic lawnmower takes care of cutting the grass. All you need to do is program it with your preferred settings, and then set it loose on your lawn.
If you have any questions about these “smart” landscaping options, we’ll be happy to answer your questions. The market provides a variety of options, so consult with an expert to be sure you’re selecting the right product for your needs.

One of the more perplexing problems with hardscape is that often we cannot control what Mother Nature decides to do. Even with the best planning, sometimes water does not drain the way we hope it will. In those cases we often must implement a solution to deal with unwanted water runoff, which can cause erosion and damage if we don’t do something about it.
Permeable concrete was invented with this problem in mind. This type of concrete is composed of concrete, coarse aggregate, and water, with very little or no fine aggregate such as sand. The result is a concrete that is porous, and allows water to flow through. This clever solution reduces runoff and prevents problems due to standing water and/or erosion.
The benefits of permeable concrete are numerous:
Stormwater management
Environmental management
Lower costs over time (because you don’t need to construct another method to deal with water runoff)
Easy to place
Aesthetic appeal
Your mind might already be spinning with the possibilities. And you’re right; permeable concrete can be used in a variety of applications, such as…
Sidewalks
Driveways
Cycling paths
Parking lots
Sports use
Patios
Walls
Sub-base for other types of structures
And more!
Permeable concrete is good for the environment, too. It allows water to return to underground aquifers, while trapping solids and pollutants that ordinarily might contaminate groundwater.
All of that sounds great, but are there any drawbacks to permeable concrete? Sort of. While permeable concrete is still plenty strong for the applications listed above (and others), it isn’t strong enough for highways or other extremely high-use areas. Permeable concrete must also be installed carefully to allow for the right amount of water absorption; otherwise, the water table below the structure could rise and cause problems.
For more information on permeable concrete and installation of your project, give us a call. We can assess your needs and help you decide if this unique solution is right for your landscaping application.
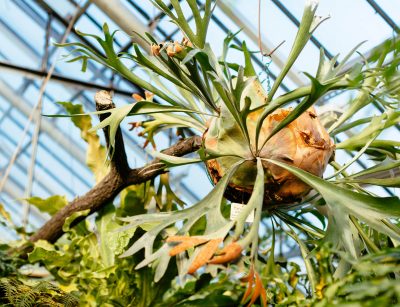
If you’re interested in unique houseplants as living decor for your walls, a staghorn fern might be just what you’re looking for. These epiphytic plants originally came from Australia, but are quickly becoming a hot trend here in the US.
First, to grasp the potential uses of staghorn ferns, you should understand what “epiphytic” means. These are plants that grow rooted not in soil, but upon other plants! Staghorn ferns are often found clinging to the crooks of trees, where their roots serve to hold them in place. The large, lush fronds do the work of absorbing nutrients. For this reason, staghorn ferns make excellent decor for your walls. With a bit of attention to mounting them correctly, staghorn ferns will feel right at home on your living room wall.
We grow indoor plants for a variety of reasons: They clean our air, they can be calming, and they simply look pretty. Like air plants, staghorn ferns can make a terrific addition to your indoor garden, as long as you pay attention to their basic needs and understand how they differ from other plants.
Where to place staghorn ferns. Staghorn ferns need a lot of indirect or diffused sunlight, but not direct light. Therefore, you should display them in an area of your home that receives plenty of natural light, but not directly in glaring sun. A room with Southern or Eastern exposure is best.
How to display staghorn ferns. Unlike other ferns, you don’t want to use a bit pot full of soil. Staghorn ferns are often sold with their root balls wrapped in burlap, and then mounted to a board. You can hang them on your wall this way, or purchase young staghorn ferns and make your own mounting board.
How to water staghorn ferns. About once per week during hot, dry weather, mist your fern thoroughly with a spray bottle. During cooler months you can stretch that to every two or three weeks. Alternately, you can soak your fern by running it under water, and then allowing it to dry before re-hanging it.
Fertilizing your staghorn fern. Monthly during growing season, you can dissolve some water soluble fertilizer in your spray bottle. Use a fertilizer with a 1:1:1 ratio. During dormant periods, you can reduce fertilizing to every other month. A mature staghorn fern only needs fertilizer about twice per year.
What temperature do staghorn ferns prefer? These plants are fairly hardy. Just don’t let the temperature drop below 50 degrees, or go above 100. That’s pretty simple to accomplish if you’re keeping your ferns indoors.
What else should you know about staghorn ferns? With proper care, staghorn ferns have been known to live 25 years or longer. During this time you might need to occasionally separate the fern, so that it doesn’t become too crowded on the mounting board.
If you see a few fronds turn brown and curl around the root ball, this is fine! Don’t remove them; the point is to protect the base of the plant. And if you see brown fuzz on the underside of fronds, leave it alone. Those are just the plant’s reproductive spores.
If you have any other questions, feel free to call us! We’re always here to answer your plant or lawn care questions.
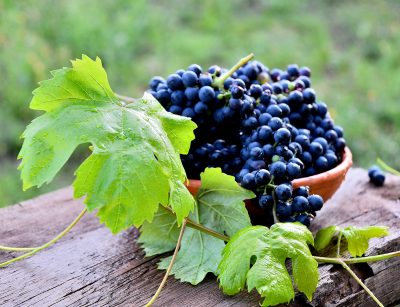
For the wine connoisseur, nothing beats the perfect bottle of vino… Except, perhaps, the satisfaction of creating it yourself! Homemade wine is making a comeback, and it’s easier than you think. While you might want to pick up a book or two on the subject in order to reach an expert level, we can get you started on a wine-making adventure with a few basic tips right now.
Grape choices. The type of grapes used will greatly influence the end results for your homemade wine. And this is where many amateur wine makers make their first mistake.
Unfortunately, you can’t simply choose your favorite type of wine and grow the appropriate grape. Theoretically this is possible, but grapes are fairly choosy about their environment. So, if your favorite grape happens to be one that cannot tolerate our environment here in Southern California, you will be fighting an uphill battle.
Luckily, many types of grapes do grow well in our climate. Vitis vinifera is a long-standing favorite among wine-makers, for its variety of flavor and historical authenticity. This family of grapes encompasses those grown for Chardonnay, Merlot, Cabernet Sauvignon, and Zinfandel wines. Luckily this grape happens to grow well in our climate!
Or, if you want to skip the growing phase of wine-making, you can simply purchase grapes from a wholesaler.
How many grapes do I need to grow? How much wine do you want to make (and drink)? Crop yields will depend upon a variety of factors, such as weather, soil conditions, and your cultivation skills. But generally speaking, you will need about 20 pounds of fruit to create one gallon of wine. Plan your garden accordingly!
Harvesting your grapes. This is the key to good wine. You need to harvest your grapes at just the right time, when the sugar levels are optimal. Squish a handful and measure the sugar with a device called a hydrometer. When the sugar level reaches 22 degrees Brix, and the grapes taste ripe and sweet (but slightly tart), it is time to harvest them.
From here you will follow standard instructions for the wine you have chosen to create. Just remember that a clean environment is key to avoid potential contamination.
For more advice on building a grape arbor, give us a call. We can help you select the right spot on your property, and get you started on what might become your new favorite hobby.
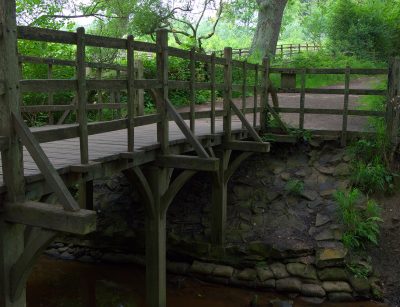
If you recall the Hundred Acre Wood, from the nostalgic Winnie the Pooh series of books and movies, you might remember fantasizing that such a place could exist in the world. As it turns out, the fictional Hundred Acre Wood was inspired by a real place! Even better, you can actually make a pilgrimage to visit it – and many fans do, every year.
Author A.A. Milne first drafted the series after watching his son play in the woods near their home in Ashdown Forest in East Sussex, England. If you start in the village of Nutley and hike the three miles to Ashdown Forest, you will pass through locations such as Gill’s Lap (renamed Galleon’s Lap in the stories) and the Five Hundred Acre Wood.
As you cross the River Medway on a simple footbridge, you can stop and join other tourists in a game of Poohsticks.
While you’re there, a stay at the Ashdown Park Hotel and Country Club is in order. The hotel caters to Pooh-enthused tourists by serving “hunny” sandwiches, Kanga cupcakes, and Winnie the Pooh tea.
You might have heard the news that earlier this year, the area suffered a fire that destroyed 15 hectares of the famous forest. Luckily, however, a quick response by the local fire and rescue service spared the majority of the woods from devastation. Rest assured, nature will take its course and the damaged area of the real-life Hundred Acre Wood will surely be restored before long.
If a trip across “the pond” to visit A.A. Milne’s place of inspiration won’t exactly fit into your budget or schedule right now, let us help you create your own backyard retreat. A bit of imagination goes a long way! WIth the right landscaping, you too can enjoy a soothing or adventurous escape that inspires the inner child in you.

If you need to build a wall or other concrete structure on your property (like the wall of a BBQ or a firepit, for example), one of the first decisions you will make involves poured walls versus block. There are definitely reasons to support either choice, but let’s examine why poured concrete often has an edge over block-built structures.
How is a poured wall constructed? Essentially, the crew first builds a form from lumber, and then the concrete is poured into it. If steel reinforcement is desired, vertical rods will be placed at intervals before the concrete is poured. After the concrete cures the forms can be removed.
Is a poured wall stronger? Many people assume that a poured wall is stronger, but the strength of a wall can depend upon many variables such as thickness, height, reinforcement, and so on. What we can definitely tell you is that a reinforced wall of any type is always stronger than a non-reinforced wall.
In general, however, a poured wall will resist cracking better. Reinforce it with steel, and it will stand up to significant force.
Is a poured wall faster? Speed of installation is where poured walls really shine. In many cases a contractor can build up the frame of a wall and then pour in the concrete in a single day (this depends on the size of the project, of course). The concrete will need to cure for some time, before any additional work can be performed. Still, you might prefer this process to building a wall block by block.
Are there aesthetic differences? Yes! Poured concrete walls can be finished in a variety of patterns, such as brick or stucco, so that you can match the structure to the rest of your home if desired. If the natural wood pattern is used, the effect can be a great rustic or Pacific Northwest style feature for your landscape.
Poured concrete is versatile. Other than walls, poured concrete can be used to construct a variety of structures such as barbecues, fire pits, and more. Before you begin your construction project, let’s discuss poured concrete to see if it might be a better fit for your functional or design needs.