

We all hope to enjoy a landscape that complements our homes, adds curb appeal, and provides for our outdoor living needs But as we get older, we confront other considerations. It’s common to renovate the inside of homes in order to accommodate age and disability, but what about the outside?
Yes, in fact, this is something we should all consider. If you’re approaching retirement age, it’s time to think about whether you want to remain in your home for the long haul. And if so, does the landscape need any alterations that will help you to better enjoy the outdoors as you age?
Likewise, you might be helping a parent or neighbor make these very same decisions. Perhaps you’re even considering multi-generational living, and a parent or other relative is moving in with you. The following landscape alterations will benefit your situation as well.
Ramps. Ramps are a necessity for anyone who uses a wheelchair (and, in fact, will be required by law for rental units in which a person with certain disabilities will live). But ramps are also useful for anyone using a walker, even temporarily after an injury. For those who experience difficulty with vision or coordination, ramps can be much easier to navigate than stairs.
Wider walkways. Walkways should also accommodate wheelchairs and motorized scooters. The Americans with Disabilities Act requires that sidewalks must be 36 inches wide, so use that measurement as your rule of thumb.
Clearance between structures. Likewise, clearance between outdoor structures such as posts and barbecues should be as least 36 inches. This width allows for clearance of wheelchairs so that all outdoor areas can be accessed by those with mobility challenges.
Raised beds. Do you, or does your loved one, enjoy gardening? Bending and kneeling can become challenging with age, but raised garden beds eliminate this difficulty. Garden beds can be constructed at any height you desire, so that you can continue with this rewarding hobby from a standing or seated position.
A private patio. If an older relative is moving into your in-law suite, consider constructing them an outdoor patio or deck. A tidy outdoor space allows for greater independence and privacy while entertaining, and makes the place feel like home.
Contact us for more landscape design ideas as life brings you changes and challenges. We will help you accommodate your new lifestyle with a beautiful, functional landscape.

Do you ever dream of living in a vineyard? Or perhaps you just enjoy learning to grow new foods. If grapes are next on your list of gardening skills to explore, check out the following guide to get started.
Build a support structure. Grape vines need support as they grow, so your first task is to build a trellis or arbor. Choose a spot that receives at least seven to eight hours of sun each day. Where possible, shoot for about five feet between rows of vines, and provide 50 to 100 square feet of trellis space for each vine.
Amend your soil. Grapes can grow in a variety of soil types, but will do best in rich, well-drained organic soil. Mix ample compost deep into your soil, and ensure that the area will not retain water. Grapes cannot tolerate excess moisture. Provide for ample air circulation on all sides of your grapevine area, to prevent fungal diseases.
Choose a grape variety. You can choose from three main types of grapes – American, European, and Muscadine. Hybrids of these varieties are also available. Some prefer cooler environments while others thrive in the heat, so pay close attention to growing recommendations. The best way to ensure success is to first choose a grape variety that will thrive in your climate.
Remember that some grape vines are ornamental only, and do not produce fruit. Choose carefully to get the results you want.
Prune. Once your grape vines are established and trained to their trellis, it’s time to implement a pruning schedule. Grapes produce on vines that are a year old, so you must continue to prompt new growth. Prune your grape vines twice per year, once during their dormant phase and then once in the spring or summer.
Feed and protect your vines. Grape vines require only minimal amounts of fertilizer. Apply a light 10-10-10 or 10-20-20 fertilizer in early spring only. Watch for signs of powdery mildew and spray for it immediately if you see signs of the problem developing. Cover your vines with netting to protect the fruit from birds, who are notoriously destructive to this crop.
Harvest your grapes. Grapes are ready to harvest when they are richly colored, juicy, and full of flavor. Try a few to test them! If your grapes are slow to ripen, pinch back foliage to allow more light to the fruit.
After producing, grape vines will change color and lose their leaves annually. Don’t worry! This is normal, and your grape vines will be back in full force for the next growing season.
If you need assistance as you fit grape vines into your existing landscape, give us a call. We can help you choose a suitable location, offer advice on support structures, and answer any more questions you might have.

Outdoor kitchens have exploded in popularity over recent years. But if you’re growing tired of the same old grilling menu, why not branch out to explore other options? A pizza oven allows you to serve up a time-tested party favorite from your outdoor kitchen.
As with other aspects of designing an outdoor kitchen, choosing a pizza oven will depend upon factors such as cost, fuel type, aesthetics, and more. The following four options are the most common choices for outdoor pizza ovens, and one of them will suit your needs perfectly.
Brick ovens. A brick pizza oven can be customized to fit seamlessly with your aesthetic preferences. Since you build the oven on-site, using bricks, you can design the oven in any size or style you wish. Choose bricks that match your home’s exterior, or select those that provide a complementary contrast to the rest of your outdoor kitchen. These pizza ovens are a bit more labor-intensive, of course, but you can’t beat the authentic wood-fired flavor they provide.
A countertop pizza oven. The advantage of using a countertop option is that it won’t need to be permanently installed. You’ll save on overhead expenses, and can take the pizza oven with you if you ever decide to move. Countertop pizza ovens often use propane as a fuel source, but wood-fired options are available too. Of course, you need countertop space that will accommodate the oven.
Free-standing pizza ovens. Like countertop ovens, freestanding pizza ovens are available in a variety of fuel sources. Their mobility makes them easy to install and move. But they do require more space, as they are similar in size to a free-standing charcoal or gas grill.
Barbecue conversion. This option is perhaps the simplest, as you simply convert your existing barbecause into a pizza oven. Purchase a pizza oven box for use on a charcoal grill, and now you’ve installed a makeshift pizza oven. The results are good, but you won’t achieve that wood-fired flavor. And some people do report that cleaning the box is a bit of a hassle.
After reading the pros and cons of each type of pizza oven, which one appeals to you? Give us a call to discuss your options in more detail, and we can help you incorporate a beautiful brick pizza oven into your outdoor kitchen if you decide to go that route.

After pouring a concrete driveway, patio, or sidewalk, the work is done, right? The durable surface will last for decades, and you don’t need to do anything else? Well, not quite. Concrete hardscape does require some care and maintenance.
Once your concrete has been poured, the first thing to remember is that it must cure for about six months.
Unfortunately, there are some things that can impact your concrete that aren’t in your control. For example, you might notice a white stain that clings to the surface of your concrete, and it doesn’t respond to your efforts to wash and remove it.
This white substance is called efflorescence, and it’s composed of crystalline deposits of salts composed of calcium, potassium, or sodium. Water transports these compounds to the concrete, either from rain or upward moisture in the underlying soil, and then they collect on the surface. While the white patches won’t harm the concrete, you might find them unsightly and wish to remove them.
Sometimes, you can wash these deposits away with water if you address them as soon as they appear. This is only possible if the deposits have not had time to react with carbon dioxide in the atmosphere to become insoluble.
Otherwise, older stains must be scrubbed with an acidic solution. You can use a packaged efflorescence remover, or create one of the following solutions yourself:
● One part hydrochloric acid (muriatic) in 10 to 20 parts water (10 percent to 5 percent concentration);
● One part phosphoric acid in 10 parts water;
● One part phosphoric acid, plus one part acetic acid in 20 parts water
First, flood the concrete with water, and then apply your cleaning solution. Allow it to rest for about five minutes and then scrub with a stiff brush. Immediately flush the surface with more water to remove the acid.
It can require a bit of elbow grease, but in most cases these efflorescence stains can be removed. If you have questions about caring for your hardscape, call us for expert guidance. We can help you remedy any problems and learn how to prevent them in the future.

In 2016, California voters passed Proposition 64 to legalize home growth and use of marijuana. But that doesn’t mean you can set up a pot farm in your backyard! Research the law first, and then spend a bit of time learning how to grow these plants correctly for the best results.
Regulations do restrict who can grow marijuana, and how much they can grow. Here’s what you need to know before you start some plants.
You must be 21 years old. You must be 21 both to grow the plants and to use them. Younger growers or users could still face infractions.
You’re limited to six plants. You can only grow six plants for personal use, and that isn’t a lot. So don’t get carried away!
Your garden is subject to strict limits. You can only grow marijuana plants indoors, or outdoors if you own the property. The plants must be secured (for example, with a high fence and a gate that locks) and they cannot be viewed from a public place.
Having covered the basics of the law, it’s time to learn how to grow these special plants. Yes, many growers find success with indoor gardening. Marijuana plants are quite hardy and do well under a variety of conditions. Growing plants indoors, under LED grow lights, can result in a significant harvest.
But if you want to grow outdoors, just make sure your garden follows the above regulations. Remember that these plants need full sun for at least 6 hours of the day.
Starting your seeds. Marijuana seeds need at least 12 hours of light per day in order to get started properly. So starting them indoors is usually a good idea.
Provide air. These plants need moving air in order to develop strength and resist mold. You don’t have to worry about this if you grow plants outdoors but provide moving air with a fan if you’re growing indoors.
Water your plants regularly. Marijuana plants are especially thirsty. An indoor hydroponic setup will provide a terrific result, but if you grow in the ground outdoors you will need to water your plants daily.
Provide rich soil. Use compost to provide adequate nutrients to in-ground plants, or a formulated nutrient mix for hydroponic plants.
Luckily, marijuana plants are hardy and can survive quite well in Southern California. You won’t have to worry about extreme temperatures in most cases, but light cycles do influence when your plants begin to flower. Take the time to research flowering so that you can prompt your plants to produce at the right time.
And yes, you can grow marijuana in large pots! That’s great news for those of you without large yards or space for indoor growing.
If you need a wall or fencing to secure your garden, give us a call to discuss your options.

Hopefully you’ve enjoyed plenty of time with friends and family over the summer, enjoying backyard barbecues. But by now, you might have noticed that things are getting a bit stale. If the same old hot dogs, burgers, and chicken just aren’t all that exciting anymore, try these ideas to take your barbecues to the next level.
Check out some new recipes. Even chicken can become exciting again with a new recipe. Browse Pinterest to get inspired, and consider some new meats that you don’t normally eat in your household (goat, anyone?)
Pizza on the grill. Whip up a batch of pizza dough, place a variety of toppings, sauces, and cheese in bowls, and let everyone make their own personal pizza! Yes, you can grill pizza on a barbecue, and the flavor is amazing.
Shish kabobs. Shish kabobs are a fun option, and you don’t need a lot of eating utensils to enjoy them. Alternate meat, veggies, and even fruits on kabob sticks, and grill them up just as you normally would grill meat. Shrimp and bacon are another popular option, and don’t forget tofu for the vegetarians and vegans in your crowd.
Barbecue, then shred. Grill or smoke up some meat of your choice, and then shred it in a large bowl. Set out taco shells and toppings, and we guarantee this will be everyone’s favorite Taco Tuesday.
Go vegetarian. Meat isn’t the only thing you can barbecue! Toss some honey-drizzled pineapples, peaches, tomatoes, or polenta with mozzarella cheese onto the grill.
Bake some bread. Yes, bread! A bit of research first will go a long way toward making this experiment successful, but plenty of people do bake bread right on their backyard barbecue.
Breakfast bonanza. If you have a flat-top grill or a griddle pan, think outside of the afternoon-barbecue box. Head outdoors first thing in the morning, and scramble up some eggs, fry some bacon, and even make pancakes on your grill.
Did these ideas inspire you? Contact us to learn more about building an outdoor kitchen that supports any of your barbecuing goals. We can help you design a kitchen that is as beautiful as it is functional.

You dream of relaxing days in the yard, enjoying time with friends, your kids and pets… This all sounds great until those dogs that we love so much contribute a bit too much “odor” to the ambiance.
On the other hand, maybe you just purchased a home that clearly had a lot of pets who left some signature scents behind.
Both scenarios lead to the question: What can you do about pet smells in the yard?
First, identify the source of the smell. Does your dog prefer to urinate and defecate in one particular area? Since many of us aren’t home during the day, this isn’t always an easy question to answer. Did you know that using a blacklight after dark can help illuminate the areas of concern? Since dogs tend to prefer one area in particular, you probably don’t need to clean the entire yard.
Now, identify the type of material you need to clean. Pick up solid waste and get to work on urine smells. For your lawn (natural grass), you can simply sprinkle the area with garden lime. Be generous with the application, because urine has probably soaked deep into the ground. Then saturate the area with water.
As a bonus, the garden lime will not only clear up urine smells but will also neutralize acidity in the soil. The result will be a lush, bright green lawn.
But for porous materials like concrete or cement, you will need to take a more aggressive approach. That’s because urine can soak into these materials and get trapped. Mix bleach with water and spread over the area of concern (try a test area in a small out of sight corner to ensure no discoloration occurs). Let the solution soak into your patio or other hardscape for at least ten minutes, and then rinse with water.
If that doesn’t do the trick, you might need to wash porous surfaces with agitation or a pressure washer.
Keep in mind that you might have to repeat the above processes for very strong and stubborn odors. Products such as enzymatic cleaners should also be considered, because they break down the bacteria that causes odor in the first place.
Finally, consider restricting your dog to one area of the yard so that this problem doesn’t happen again. Consider building a dog run to give your pet his own space. After training him to use that space for his bathroom, you can usually still enjoy plenty of time with him or her outside of the run, too.
For more information on building a dog run or caring for your lawn, give us a call. We can troubleshoot your situation and help you decide how to tackle a particularly stinky problem.

If you’re considering artificial turf, or already have it, you appreciate the benefits of never having to mow a lawn again. And you’re probably thrilled by the idea of not having to worry about watering grass, either. But some people actually do install low water spray irrigation systems along with their artificial turf. Why?
Keep the heat down. Artificial turf can really heat up in bright sunlight! If you prefer going outside barefoot, or you want to protect your children’s feet and pets’ paws, watering the turf in the afternoon can cool it down. Your yard will feel a bit cooler, too.
Wash away debris and smells. Artificial turf can get dirty and trap smells. If you live in an area with low rainfall, installing an irrigation system gives you an easy way to “wash” the “lawn”. Plus, you get rid of pet odors. Artificial turf can get really stinky for California families – heat plus pet smells minus rain equals…you get it.
Keep the turf bright and clean. Pollen, dust, and just dirt in general can dull the look of your artificial turf. Keeping it clean with regular irrigation can help you to enjoy the look of a lush, green lawn all year round – without the work of cutting grass and manually watering.
Less work. Speaking of manual watering, work isn’t what you had in mind when you decided to install artificial turf. Yet, because you do need to keep it clean, installing an irrigation system will mean less work for you in the long run. You can program the system to water your turf on a regular basis (even once a week will help with the above concerns), leaving you with more leisure time.
Installing an irrigation system is an especially good idea in areas that receive low rainfall. Otherwise, you could find yourself spending too much time using the garden hose to wash away stains and clean up your yard. Give us a call to discuss your artificial turf options, and we’ll help you learn more about how an irrigation system makes a valuable addition to this lawn choice.
Installation of an irrigation system really needs to be done prior to turf install to be effective so planning ahead is pretty important on this one!
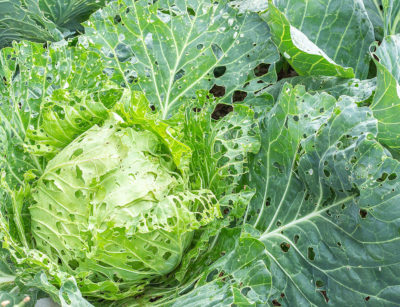
After working so hard on your garden all summer, you’re looking forward to delicious homegrown veggies at the dinner table. The last thing you want to discover is that some critters beat you to it! If something has been nibbling in your garden, use this brief guide to determine what you’re dealing with.
Aphids are tiny, pear-shaped insects that prefer to suck the juices of plants like lettuce, kale, cabbage, and tomatoes. The loss of fluid causes distorted deformed growth. You might also spot large groups of these insects on the undersides of leaves. To deal with aphids, pick them off and crush them by hand, take steps to attract beneficial insects like ladybugs, or apply neem oil or insecticidal soap to your plants.
Snails and slugs leave irregular holes in leaves. You might not spot them during the day, because they prefer to feed at night or in the rain. Copper rings around plants can repel them, or you might prefer to simply pick them off your plants. Encourage birds, toads, frogs, and snakes in the garden as natural predators. Beer traps work, too.
Caterpillars should be suspected when you discover ragged holes in foliage. Plus, you can probably see them! One of the easiest ways to control caterpillar damage is to simply pick them off and drop them into a bucket of soapy water. Of course, that method is also time consuming. Insect barrier fabrics are another organic option. If you want to get serious and don’t mind chemicals, many common garden pesticides will work well on caterpillars.
Earwigs aren’t often discovered during the day, because they’re nocturnal. But since they prefer damp and dark hiding places, you might be hosting earwigs within mulch piles, compost heaps, or wood piles without knowing it. Ragged holes on the edges of leaves and petals are a common sign of earwigs. Since earwigs can’t travel very far from home, simply adding barriers to your garden might do the trick. You can also “trap” them by leaving wet rolls of newspaper near the garden overnight and then removing them in the morning.
Gophers and rabbits might burrow under your fence to access your garden. That will be the first sign you notice, along with heavily munched-upon veggies. Pouring a solution of one part ammonia, two parts water into gopher tunnels can discourage them. For rabbits, deterrents like talcum powder, dried red pepper flakes, garlic powder, human, dog, or cat hair can do the trick. And of course, strengthening your barriers will often help quite a bit.
Moles and voles make raised tunnels that you can feel collapse under foot when walking in your garden. A good cat makes a great deterrent! You can even place some used cat litter into the tunnels to scare off these pesky rodents. And if you don’t mind them, snakes love to feed on moles and voles, so don’t remove them from your garden. Planting garlic around your garden can also discourage underground tunnelers.
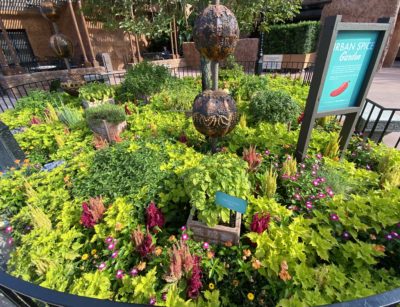
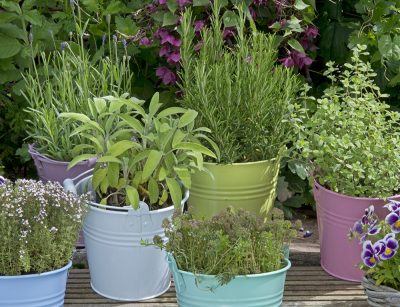
Gardens aren’t just beautiful; they can also provide us with food. And if you design your gardens well, they can do both! If you don’t have room to grow vegetables, or if you already grow vegetables and you’re looking for your next fun project, a spice garden will add variety to your cooking and color to your yard.
You can plant a spice garden directly in the ground, in a raised bed, or in pots clustered together on a patio. Raised beds or pots are often preferred because you can better control the soil condition, and struggle with fewer weeds.
We drew inspiration for this blog from the urban spice garden in the Morocco pavilion at Disney World’s Epcot park. Morocco is known for its vibrant culture and spicy food, as the country historically served as a major trade thoroughfare during the Middle Ages. In fact, back then exotic spices were difficult to obtain, and were often considered more valuable than gold.
A spice garden could feature cinnamon, cumin, mint (watch for crazy spreading with this one!), ginger, parsley, saffron, sesame seeds, black pepper plants, and much more. Technically, we call something an herb if you use the leaves and flowers for seasoning food, whereas a spice comes from the seeds, stem, or root of the plant. In fact, some plants are both! You’re probably familiar with the leaves of cilantro herb plants, but the seeds from those same plants are actually the spice known as coriander.
For the purposes of your spice garden, you can certainly use both herbs and spices. Choose plants in a variety of textures and colors to create an eclectic look, and consider the height of fully mature plants when designing your garden bed. Varying heights creates a more full look, and taller plants can provide for shade-loving varieties.
And perhaps most of all, choose plants that provide the flavors you enjoy! Cooking can be such a creative endeavor, and it’s even more rewarding when you’re using snippets of herbs and spices that you grew in your own garden.
If you need more input on where to place your spice garden or incorporating it into your existing landscape, call us for our expert advice.
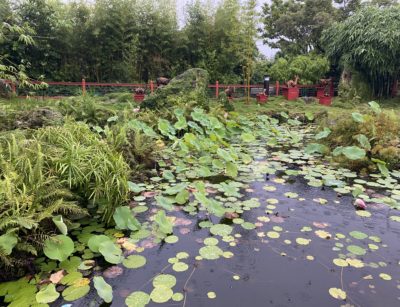
If you suspect that building a pond requires more than filling a hole with water, you’d be right. To accomplish a healthy ecosystem and an aesthetically pleasing pond, you must make careful choices regarding everything you put into it.
You might set up your pond with a filtration system, recirculation system, rocks or gravel, fish and various other features to create the look you want. But for the purposes of this blog, we will focus on choosing plants for your pond. Plants act as Mother Nature’s filters, as they thrive on the excess nutrients within a pond ecosystem while also depriving algae of its food source. Plus, they add color and beauty to your pond.
The ideal pond setup will incorporate both sunlight and shade. You need some sunlight in order to allow for proper plant growth. Too much shade from nearby trees can deprive the pond ecosystem of enough oxygen, and you will probably struggle with excess debris falling into the water. However, too much sun can contribute to green pond water or algae bloom. Hence, sun and shade should be balanced so that the ecosystem can flourish.
As you choose plants for your pond, consider a mix of plants for variety and to reap various benefits. Aquatic plants typically fall into three categories:
Floating plants live on the water’s surface and provide shade, preventing algae which thrives in direct sunlight.
Marginal water plants grow around the edges of ponds in shallow water. They absorb the impurities that would otherwise feed algae, and filter the water to keep it healthier.
Submerged oxygenating plants help to keep the pond clean by feeding on debris and fish waste. They also add oxygen to your pond and provide habitat for koi and fish.
Water lilies are a popular choice due to their beautiful, exotic blooms that appear from spring to fall. Tubers can be planted beneath the water, and will send up stems with rounded leaves and gorgeous blooms that float on the surface of your pond.
For beginners, it is often easier to pot water lilies and then place them 12 to 18 inches deep in the water. If you choose a tropical variety, remember that they need a water temperature above 70 degrees and should be removed from the pond in winter if you can’t maintain that requirement.
Finally, be careful about over-fertilizing your aquatic plants. Doing so often feeds the obnoxious algae that you don’t want in your pond.
If you’re considering a pond addition to your landscape, give us a call so that we can discuss the appropriate number and type of shade plants to use around it. We can also recommend the right mix of aquatic plants to keep your pond ecosystem in perfect balance.

No one does topiaries like Disney, but that doesn’t mean you can’t have some fun garden whimsy right at home. Topiaries are actually not difficult to grow, and once you learn some basics you can shape them just about any way you want.
First, you will choose between a vining topiary or a shrub. English ivy, Boston ivy, and periwinkle are popular vine choices that you can grow on a topiary frame. If you prefer a shrub, start with a small boxwood, holly, or laurel. Dwarf varieties remain more compact and require less pruning.
Then, choose a form or frame. You can purchase these online or at many garden supply stores, or even build your own if you’re crafty.
Forms should be filled with sphagnum moss, and then planted with the vining plant of your choice. You might need to use several plants toward the bottom in order to adequately fill the form. Allow the vines to grow upward, training them to wrap around the form by attaching them with plant ties. Regularly prune growth that exceeds the shape and size you want to achieve.
Use a frame around topiary shrubs, especially if you’re a beginner. The frame will help you decide where to shape and prune your shrub. But because pruning encourages new and more bushy growth, you’ll want to prune conservatively (no more than three inches at a time).
And of course, because topiaries are plants, they must be cared for properly. Water your shrub or vine as appropriate for the variety you’ve chosen and fertilize regularly to keep your topiary healthy with brilliant green foliage.
Topiaries do require time and patience. But once you get the hang of it, you will discover that the result is worth the wait!
For more information on how you can incorporate topiaries into your existing landscape, give us a call. We can help you decide upon placement and any complementary features that you might desire to showcase your new project.

Orchids carry such an exotic and mysterious aura, that it can be easy to feel intimidated by them. But with a little knowledge, orchids aren’t actually all that difficult to grow. Here’s what you need to know.
First of all, orchids are epiphytes. This means that instead of growing in soil, most grow by hanging onto the bark of trees. Some orchids, such as lady slippers, do grow in loamy soil. Since orchids are different from other flowering plants, they just need different care in order to grow them successfully.
And if you do take proper care of them, orchids can live indefinitely!
Pot your orchid in a special orchid mix. This substrate is created especially for orchids. Because orchids typically grow on trees, they gain their nutrients from decaying organic matter and animal waste that washes down the tree. You probably can’t recreate that mix of nutrients on your own, but a bag of orchid mix will work just fine.
When your orchid stops blooming, repot it in fresh mix.
Choose the right pot. Resist the urge to pot your orchid in a larger pot than absolutely necessary. Orchids actually do quite well in smaller pots. A clear one will allow light to the roots, which will prevent smothering and root rot. And since it’s believed that the roots do engage in photosynthesis, this can help them grow similar to how they would in nature.
Place your orchid in the right spot. A sunny window facing east or west is ideal.
Research your orchid’s light needs. Some are “low light” while others are “high light”. However, their needs don’t typically range to the extremes that other plants often do. Your orchid might need to spend some time outdoors, or you can supply supplemental light with a broad spectrum bulb.
If your orchid won’t bloom, inadequate light is often the culprit.
Feed your orchid. Look for fertilizers specifically formulated for orchids, and feed once per week according to package directions.
Water weekly. Most orchids only need to be watered once weekly. Overwatering can create the risk of root rot. Wet the mix and roots thoroughly, and then check throughout the week. The roots shouldn’t dry out, but they shouldn’t remain saturated too long either.
Keep your orchid humid. Orchids don’t like to have their roots drowned, but they do appreciate humidity. Placing the pot on a humidity tray will work well for this purpose.
Keep your orchid at the right temperature. Orchids can vary greatly in their temperature preferences, ranging from 10 degrees to the mid-80s depending upon species. But most will do well in intermediate temperatures as long as they don’t get too hot or cold.
Since some varieties do depend upon temperature fluctuations to inform them of seasonal changes, you might wish to artificially adjust their temperature to encourage blooming at the right time.
Care for sick orchids. Spraying your plants monthly with Physan can prevent fungal or bacterial infections. If a plant does get sick, separate it from others immediately and have it tested. There is no cure for viral infections, but other types of illness or infestation can often be treated.
It seems like a lot of information, but you will quickly learn a routine for your orchids. Once you become accustomed to their needs, growing these dramatic blooms is enjoyable and not nearly as difficult as you once imagined!
You might remember the old saying, “waste not; want not.” The idea is that when we use our resources carefully, we are never in need. But how many usable resources from our gardens go to waste every year? In many cases, we’re overlooking opportunities to reap so much more from our landscaping than pretty flowers.
Just consider these fun and interesting ideas to make use of all that your garden has to offer.
Make lemon oil. Your lemon tree adds a cheerful burst of color, and maybe you even enjoy homemade lemonade when lemons are in season. But there’s more that you can do with lemons, by making products you can use all year long.
By steeping lemon zest (the rind of lemons) in olive oil, you can create a simple marinade and base for salad dressings that can be used for months to come.
Extend the use of your flowers. Fresh bouquets are beautiful and smell lovely, but they don’t last very long. Dry blooms such as lavender and roses and create sachets or potpourri. Or use the dried flowers to infuse your own oils or make tinctures that can be used for scenting your home, skin care, remedies for conditions like anxiety, and much more.
To make oils, you simply simmer the dried flowers in olive oil for about half an hour, then cool and store in a clean glass jar. To create tinctures, just cover crushed dried flowers in grain alcohol or vodka. Keep the mixture in a glass jar, place in a dark spot in your cupboard, and shake it daily for about two weeks.
Dehydrate fruit. Fruit trees can provide an abundance of fresh food, but sometimes it’s more than we bargained for! If you get sick of apples, oranges, or other fruits when they’re in season, why not dehydrate them for later use? All you need is one-time investment in a food dehydrator, and then you can use fruits for a variety of purposes in the future.
Dehydrated fruit makes a great snack for kids’ lunchboxes, or you can include it in homemade trail mix. Make your own fruity potpourri or use the fruit as treats for certain pets.
If you get creative, it’s usually possible to find a way to preserve and use almost anything from the garden. Don’t let anything go to waste, and you’ll appreciate your hard work that much more.
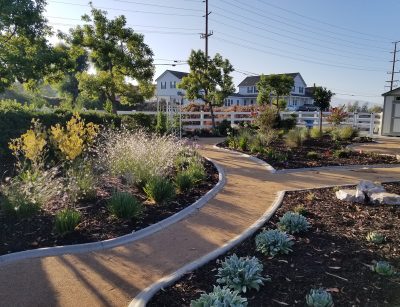
There are a number of ways to design a backyard garden, and none of them are more or less “correct” than any other. But of course, there might be a design type that is more suitable for you. If you’d prefer a garden that encourages visitors to move from one feature to another, appreciating the backyard from different angles, then a strolling garden might be perfect for your landscape.
A strolling garden gets its name from design features that encourage you to stroll from one to another. Strolling gardens are composed of a series of walkways and often include a water feature of some sort.
Choosing your pathways. You might think that creating a strolling garden of pathways will be expensive. But remember, you have options beyond actually paving sidewalks throughout your backyard. The pathways can be as elaborate as custom-designed pavers, to simple pebble pathways, or even log rounds or strategically placed steppingstones. You can also opt for a combination of these methods, for a more eclectic look.
Now… Where are you walking to? A strolling garden is more than a series of pathways. Your eyes should be drawn to various garden features along the way, and generally speaking, you should include a variety of different ones.
Consider both vertical space and depth. Low flowers, border plants, and shrubs help to define the walking space. Meanwhile, taller features such as trees add a sense of overhead cover. Including fruit trees in your strolling garden can send guests on a mission to pick fruit. Archways, complete with vining flowers, draw the eyes overhead.
And of course, gardens include more than just plant life. Consider sitting areas, a swing, or a water feature such as a fountain to add enjoyment to your landscape.
Other benefits of a strolling garden. More walking pathways and large features mean less grass to mow; great news if you want to create a landscape that requires less cutting and watering. It is even possible to design a stroll garden that includes many rock features and other low-water landscaping ideas, so that you can enjoy a lush backyard that won’t increase your water bill.
If a strolling garden sounds appealing to you, give us a call to discuss your options. We can help you choose hardscaping for the pathways, design gardens, and work in other features as suitable to your preferences and budget.

Every so often, we begin to notice that our homes look “dated” to a bygone decade. One of the easiest ways to refresh our decor, both inside and out, is by renovating new colors. Just think of the 1970s and certain colors come to mind! And the same goes for just about any other decade.
Of course, you probably don’t want to completely redecorate every few years. That’s why choosing neutral colors, and then simply changing out accent colors when you feel like it, is often the more cost-effective way to go. But even neutral colors have their time in the spotlight.
The good news is that gray is back in a very big way! Gray is one of those neutral colors that coordinates well with various shades of almost any other color. So if you go with gray within your landscaping and exterior home projects, you can be assured that swapping out trendier color accents every few years is all you will need to do. For quite a long time, you can keep redecorating costs low by monitoring color trends and including those in more subtle ways.
Just think back to the Pantone Color of the Year for the past few years… We’ve seen Classic Blue, Living Coral, Ultraviolet, and Greenery in recent years. All of these colors work quite well with shades of gray, and we can reasonably expect that future color trends will continue to do so.
So, where can you incorporate gray into the exterior of your home? Consider gray when it’s time to upgrade features such as
● Hardscaping, such as concrete, rock, and pavers used to create patios and walkways
● Rock or concrete used in retaining walls
● The exterior color of your home’s siding or paint
● A dark charcoal for the roof
● Patio covers or shades
● Outdoor kitchen cabinets or countertops
● Fire pits and water features
● Cushion covers for patio furniture
● Flowerpots and other decor
● … and probably much more!
Where else can you incorporate shades of gray into your home’s exterior and landscaping? Call us to discuss your ideas, and we’ll help you choose materials or create a design that’s beautiful and versatile for years to come.
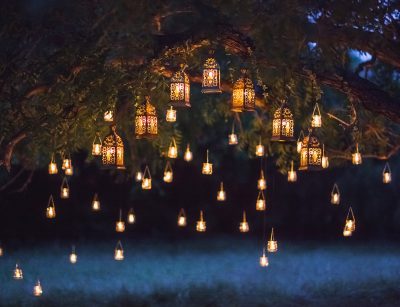
Landscape lighting carries numerous benefits, such as attractively illuminating your property at night and increasing safety. But installing a lighting system isn’t always simple. You might desire lighting in an area where it’s difficult to run wires, or you might not have professional grade fixtures in your project budget. When a traditional wired lighting system isn’t the best option, solar landscape lighting often provides a workable solution.
How do solar lights work? Each day, your solar lights will charge in the sunlight and then turn on at night. Depending upon the battery power of the light, along with placement, you can expect up to eight hours of nighttime lighting. In order to receive the maximum amount of light at night, you must place the lights in positions that receive at least six hours of direct sunlight during the day.
Are solar lights worth it? It depends upon what you expect to gain from your solar lighting system, but most homeowners are very happy with their systems. You will make an upfront investment in the lights themselves, but then they operate without electricity and therefore won’t cost you anything. The batteries within the lights usually last about two years and will need to be replaced at that point.
Where should you use solar landscape lighting? You can use solar lights to illuminate any area of the yard that you wish, assuming they will receive six hours of direct sunlight during the day. Solar lights are particularly good for spots where you don’t want to run wiring, either due to expense or because you’ll be digging in that area frequently.
Placing solar lights along pathways is also an easy way to illuminate walking areas at night, increasing safety for yourself and visitors. You might also want to highlight certain features in your yard, such as particular plantings or sitting areas.
What options are available? Solar lights are available in stakes that you place into the ground, or in spotlights that you can mount to a wall, tree, or other surface. Manufacturers also produce solar string lighting, which are a great way to add a festive touch to patios, porches, and arbors without having to worry about locating a nearby power outlet.
If you’re curious about installing solar landscape lighting, contact us to discuss your options. We can explain more about how they work, and help you determine the best placement for a solar lighting system within your landscape.
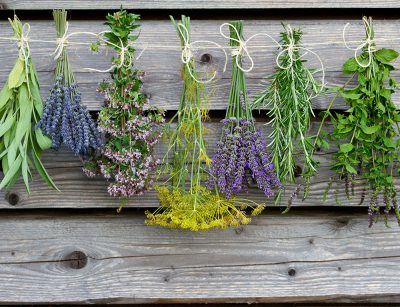
You enjoy the lush beauty of your garden throughout spring and summer, and you might reap a few meals from your vegetable plants, too. But many plants have a purpose beyond providing decorative flowers and food crops. Use these plants in your garden, and you can support your health, repel pests, and more.
Aloe. If you’ve ever had a sunburn, you might have used aloe lotion from the store. But did you know the raw gel from an aloe plant is actually much better for your skin? Simply pinch off a small part of your aloe plant, apply the gel, and burns will heal much more quickly.
Ginger. Ginger adds delicious flavor to curry dishes, but it also carries numerous health benefits. Grating the root into food or drink can soothe nausea (especially morning sickness during pregnancy). It can also help to fight the common cold, improve symptoms associated with osteoporosis, reduce the risk of heart disease, and lower cholesterol levels.
Lavender. Use dried lavender in sachets to calm anxiety, relieve headaches, and help you sleep better. Lavender oil can also treat skin blemishes, prevent fungal growth, relieve menopausal hot flashes, and much more.
Basil. Aside from being delicious in salads and Italian dishes, basil can help to lower blood pressure, manage blood sugar, improve blood flow, and help to heal inflammatory bowel conditions.
Rosemary. This herb contains antioxidants which can help to combat free radicals in your body and lower inflammation. It also works as a cognitive stimulant, improving your attention and memory.
Chamomile. If you’re struggling with sleep, make yourself a nice warm cup of chamomile tea. Chamomile can also treat cold symptoms, reduce menstrual pain, lower inflammation in the body, and help to manage blood sugar.
Thyme. Thyme looks like an inconsequential little flavoring when you sprinkle it in food. But it contains numerous nutrients like vitamin A, vitamin C, copper, fiber, iron, and manganese. Some studies have shown that thyme tincture works better on acne than store-bought products. Thyme oil also works as a cough remedy, can fight mold in your home, repels many pests such as rats, and boosts immunity.
Mint. If you struggle with various digestive complaints, mint can become a powerful weapon in your natural medicine cabinet. It can also help with stress, bad breath, and cold symptoms.
Turmeric and curcumin. Turmeric and curcumin are some of the most powerful anti-inflammatory compounds in nature. Include these in your diet to fight a wide range of inflammation-linked diseases, along with boosting brain function.
Sage. Sage is rich in several nutrients, and the tea may contain anti-cancer properties. And of course, burning sage can rid your home of nasty smells, and some say it carries spiritual properties as well.
When using any of the above plants, remember preparation is key. Do your research, and use oils, tinctures, or teas according to your specific needs. And of course, discuss symptoms and your use of herbs with your physician. In certain situations herbal preparations can interfere with a few different prescription medications, so your doctor should be aware of any regular use of these remedies.
To learn more about incorporating an herb garden into your existing landscape, call us for advice geared to your situation.

Does your garden area need just a little extra “something”? Your garden serves as a special place, where you spend hours tending your plants or simply sitting and enjoying the fruits of your labor. It’s your home away from home, so why not give it a special entryway of its own? Hopefully the following ideas will spark your imagination.
Use containers to direct a focal point. Containers of ferns, ornamental kale, flowers, or other decorative plants can be placed to create an entry point to your garden. These can be moved, or you can add to them, as the seasons change and you want to switch up the look of your garden.
Build an arbor or trellis. An arbor or trellis can be used to support vining flowers or even crops like berries and grapes. And yes, you can allow several different vining plants, which produce fruit or flowers at different times, to grow on the same structure. That way you always have something new to enjoy.
Create a gourd tunnel. If you want to enjoy something truly dramatic, create a “tunnel” from wood or heavy duty hardware cloth. Then train vining pumpkin, squash, or gourd plants to grow up and over the tunnel. In late summer the result is hanging fruits that will remind you of lanterns.
Add a traditional touch with columns. Install traditional columns, in painted wood or even cement, on either side of your garden entry. These will contribute an Old World, classical ambiance to your garden. You might feel as though you’re strolling into a Renaissance-era painting!
Install a moon gate. Moon gates, or circular openings in garden walls, are a traditional component of Chinese gardens. Some moon gates even carry spiritual meanings according to the shape of the gate and materials used to build it. Your moon gate can be composed of metal, stone, wood, concrete, or really any material you can think of. Some are created for the purpose of supporting vining plants, adding even more intrigue to the style.
Repurpose old materials. Find an old wrought-iron fence gate, and install at the entrance to your garden. It will contribute an antiquey, romantic Victorian feel to your landscape. Or, go for a picket fence gate for a vintage farmhouse appeal.
Are you feeling inspired by these garden entryway ideas? Check out our Pinterest page for more decorative gardening inspiration, and call us if you have any questions about incorporating your garden area into the overall landscape of your yard.
Garlic is one of the most popular flavors in the kitchen, and fortunately it can be very easy to grow at home. Once you get a good patch of garlic started in the garden, it should come back year after year. Follow these steps to grow your own garlic, and you can harvest and enjoy this popular plant at peak freshness.
Prepare the soil. Garlic prefers well-drained soil, which will prevent the bulbs from rotting in the ground. You should adjust to a pH of 6.5 to 7, and keep the bed loose and slightly sandy. Garlic grows well in most soil types except those heavy in clay.
Prepare your bulbs. Garlic grows better after it has endured a chilly period of weather. Since we don’t enjoy much cold weather here in Southern California, storing your garlic bulbs in the refrigerator for a few weeks before planting can simulate this effect.
Plant your bulbs. Garlic can be planted any time of year, although planting in the fall will yield larger bulbs with stronger flavor. Simply separate cloves from larger bulbs, keeping the papery thin covering intact. Place them about four inches deep in the soil, and six inches apart.
Use garlic to repel pests. If you’re planting garlic anyway, you might as well reap full usage from the plants. Aside from adding delicious flavor to your favorite dishes, garlic can repel many common garden pests. Plant the bulbs alongside beets, celery, cabbage, tomatoes, or carrots to reduce common insects that are attracted to those crops. Garlic also makes a great companion plant underneath apple trees!
Place mulch over your planted bulbs. Mulch will discourage weed growth and help to keep plants insulated in the winter. Since our weather is warm here, you won’t need an overly thick layer of mulch.
Water regularly at first. Water your garlic plants every three to five days in the spring, when bulbs are forming. You should stop watering regularly after July to prevent rotting. If Fall is hot and dry, soak the bulbs about every ten days and allow soil to dry completely between waterings to encourage deep root growth. Water occasionally through the winter if rain is sparse.
Fertilize annually. Each spring, spread an inch of compost around the base of your garlic plants. These perennials don’t need fertilizing otherwise.
Harvest your garlic. In late summer or early fall, you will notice that the bottom two leaves of your garlic plants turn yellow and wither. That’s your signal to dig up the larger bulbs, taking care not to tear the paper skin. Store your garlic bulbs at room temperature in a bag or container with plenty of air circulation, and it will keep for months.
Now, just peel away cloves as needed, and enjoy your fresh, homegrown garlic. If you have any questions about installing a garden bed into your existing landscape, give us a call and we’ll be happy to offer our expert advice.

Each year, Mother’s Day falls on the second Sunday in May. Over the years, we have evolved from honoring not only our own mothers, but also other relatives, friends, and neighbors who are mothers. If you’re looking for some simple but heartfelt gift ideas for the special mothers in your life, why not a bouquet of homegrown flowers?
Handmade gifts always seem more unique and thoughtful, and the best part is that kids can help you compose these bouquets. It’s good for them, too. According to Maria Montessori, helping a child to develop sensory and aesthetic sensibilities prepares them for moral awareness.
Use these simple floral arrangement tips, adjusting for your kids’ ages and abilities.
First, choose your flowers. Walk through the garden and cut a variety of flowers that appeal to you. You might discuss using a color theme, centered around a favorite color, or incorporating complementary colors which are opposite one another on the color wheel.
Now, settle down to compose your arrangement. Choose a clean vase or other container, fill it about halfway with water, and mix in plant food to keep your flowers fresh. Skillful floral arranging is more than just plopping flowers into a vase. First you need to remove all leaves on the stem that will fall below the water line in your chosen vase.
Now, consider the height at which you prefer each flower to stand in the vase. Cut the stems at a 45-degree angle with sharp scissors, keeping in mind that you can always shorten a stem but you can’t make it longer.
Now, arrange flowers by size. Start by choosing the largest blooms and/or strongest stems, and place those in the vase first. This will provide a support structure for the rest of your arrangement.
Continue to fill in your bouquet by adding medium-sized blooms, and then finally smaller, more wispy ones as an accent. Vary heights and colors of your cuttings, and experiment with moving them around until you’re satisfied with the final result. This activity provides a terrific opportunity for children to develop their own sense of style and express themselves.
Finally, present the finished bouquet and enjoy the smile you’ve brought to a happy mother’s face!

Throughout history, flowers have been used by cultures all over the world as decorative additions to the garden. We also know some flowers have therapeutic properties, can be edible, and provide soothing or enjoyable scents. Arrangements are common at weddings, funerals, other social gatherings, and are sent as get-well wishes. And of course, flowers have long been a popular choice among suitors vying for a special lady’s attention.
But did you know individual flowers are considered to symbolize particular emotions or themes? This sentiment exploded in popularity during the Victorian era, at which time open, blunt expression of thoughts and feelings was considered crude. At that time, simply handing someone a flower with the right hand signaled “yes” to a question, whereas using the left hand to deliver the flower also delivered a “no”.
Giving flowers wasn’t always a compliment, either! A pomegranate flower insinuated conceit, and the flower of aloe plants signaled bitterness. A lady who received an apple blossom from a gentleman, indicating his preference for her, might decline his attention by returning a yellow carnation to signal her disdain. Ouch!
Certain flowers are thought to symbolize certain things, so it is often wise to perform a bit of research before sending flowers to a particularly discriminating (or knowledgeable) recipient. For example, gardenias represent a secret love, whereas lavender signals distrust. You might use myrtle at a wedding, as it promises love and luck within a marriage. On the other hand, rhododendron might make an odd choice for the event, since it symbolizes danger.
And of course, we know that the colors of flowers, and roses in particular, have long been associated with certain themes. For example,
● Yellow roses are thought to symbolize friendship (although some interpretations include jealousy or infidelity)
● White roses symbolize purity, innocence, or a fresh start
● Pink roses signal grace or happiness
● Lavender roses signal love at first sight
● Orange roses symbolize enthusiasm, energy, and desire
● Coral roses convey sympathy
● Deep, crimson roses signal mourning
● And of course, we all know that bright red roses stand for passionate love
Some people find the secret language of flowers to be mere entertainment and prefer to choose them based on appearance instead. But if deeper meanings matter to you, you might enjoy including certain flowers in your garden. Call us to discuss your ideas, and we can help you design a landscape that symbolizes good luck, prosperity, joy, or other positive emotions.

Planting your garden and watching it grow is considered the “fun part” of gardening. The clean-up chores often feel less glamorous. But with a little creativity, you can put many garden byproducts to use in or around the home, giving some of them a second life. Planning fun projects for your “leftovers” can make these mundane clean-up chores feel a bit more exciting.
For example, we all know that we should pick up fallen rose petals as they are discarded. But instead of throwing them away, you can create so many useful things with these byproducts, such as…
● Sachets
● Rose water
● Tea
● Dried arrangements
● Essential oil
● Scented sugar scrubs
● Salad toppings
● Bath bombs or bath salts
● Rose hip kombucha
And of course, you can simply place fallen petals in a bowl or vase, and enjoy them arranged that way. They will still give off a bit of scent, too, depending upon the varieties you have planted in your garden.
Lavender can also be used in many of the above projects. In addition, lavender is delicious in lemonade, makes a healthier alternative to mothballs, and is even used in natural ear infection remedies due to its antibacterial properties! Use lavender sachets or spritz your pillows with lavender for its anxiety-calming properties. Some people even say lavender oil relieves headaches.
As ornamental grasses begin to die at the end of their growing cycles, dry them and use in creative arrangements around the home. Toward the end of summer these decorations signal the arrival of fall.
And of course, composting dead plant matter is the best way to complete the circle of life. Healthy compost keeps your garden fertile and thriving, and saves you money on store-bought products.
What other ideas do you have for reusing your yard’s byproducts? Check out Pinterest for more tips, and you will find a use for almost everything in your garden.
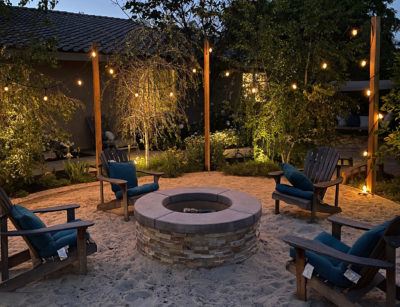
Fire pits have exploded in popularity in recent years, and for good reason. Not only do they provide heat and lighting for nighttime gatherings; fire pits encourage us to slow down and enjoy the simpler things in life. They appeal to kids and adults alike and can be enjoyed year round.
So, it’s understandable that so many of us have purchased the standard round fire pit in our nearest big box store. But after a few years, some of these models begin to show signs of wear, or you might be wishing for additional features. The good news is that a permanent install can provide an instant upgrade to your landscaping or patio area, and you can customize your firepit with a variety of design elements.
When designing your fire pit, ask and answer questions such as these to determine your preferences:
● What height do you want? Inground, above ground, convenient for cooking, safe for young children – these are just some considerations.
● What shape do you prefer? Round, square, or more oblong so that you can fit more people around the fire pit?
● Which fuel type do you prefer? An old-fashioned campfire style, using wood? Gas? Charcoal? Pellets? (At the moment, the state of California is discouraging wood-burning fire pits, and encourages consumers to choose gas)
● What type of material would you prefer, and what matches your existing landscape best? Fire pits can be made of stucco, stone, concrete (rustic or very smooth)?
● Would you prefer to design your fire pit around a bowl or cauldron? Check Etsy for creative ideas.
● Do you want to fill with lava rock or glass? What color? So many colors are available!
● Would you like to include a cooking surface?
And of course, what about the rest of your outdoor seating area? If you choose to install a permanent fire pit structure, it would be wise to consider the landscaping around it. Perhaps you’d like a nice patio, a water feature, some landscaping, or a pathway leading out to your relaxation zone. Your imagination is the limit! Give us a call, and we can discuss your ideas.


")
Now that April has arrived, you might be noticing flowers and trees that are blooming in full splendor. If you’re wondering what you could plan in your own yard, so that you can enjoy beautiful early spring blooms next year, this blog is for you! The following trees and flowers would make a lovely addition to your garden, bringing festive blooms early in the season.
Jacaranda Tree. This beautiful tropical variety boasts clusters of brilliant, purple, trumpet-shaped blooms. Due to its fern-like foliage, the Jacaranda tree also provides excellent shade.
Redbud Tree. Also known as the Judas tree, the Redbud tree produces bright, mauve-pink blooms that last about three weeks. These ornamental trees typically remain on the small side, making them an excellent addition to yards with limited space.
Crabapple Tree. Another small ornamental tree, the Crabapple provides an explosion of flowers in shades of white, pink, magenta, red, burgundy, or coral. After blooms fade, gardeners and passers-by continue to enjoy their lush foliage in shades of bright green, dark green, or purple. In the fall, the Crabapple produces fruit in shades of lime green, yellow, red, gold, pink, orange, and even purple.
English Roses. These shrubs produce classic cup- or rosette-shaped flowers in just about any hue you can imagine. Many are also bred for their unique fragrances.
Breath of Heaven. These light, airy shrubs produce small, delicate flowers in shades of pink, white, magenta, or purple. Moving easily in a light breeze, Breath of Heaven also lends a wispy, romantic feel to your landscape.
Gaura. Blooming from April all the way into fall, Gaura bloom white and slowly fade to pink. Since flowers are positioned at the tops of long stems, Gaura make excellent cuttings for vases.
Dianthus. Also known as Sweet Williams, Dianthus flowers are available in shades of pink, red, salmon, and white. The fragrance contains notes of cinnamon or clove.
Pincushion. The Scabiosa, or Pincushion flower, provide a burst of color in hues of blue, white, or purple. These plants perform well in beds, borders, or containers, and tend to attract plenty of butterflies to the garden.
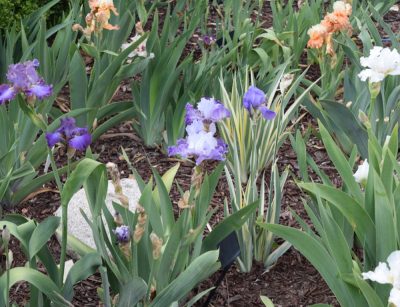
Bearded iris. If you appreciate exotically-shaped flowers in shades of blue, bearded iris might be perfect for your garden. The prolific bloomers also make for beautiful arrangements in vases.
Wisteria. If you’ve ever noticed climbing vines dripping with brilliant blue to purple flowers, you were probably admiring wisteria. While beautiful to behold, keep in mind that wisteria is also extremely invasive. Choose their location carefully.
Lavender Star Flower. Technically a tree, the lavender star flower is frequently grown as a shrub or even a container plant. It can be pruned heavily at any time of year, to prevent it from spreading out aggressively. The delicate, star-shaped lavender blooms are a favorite of butterflies.
Yellow Jasmine. Yellow Jessamine, or Jasmine, is a prolific climbing vine that frequently tumbles over fences, arbors, and trellises. The bright yellow, trumpet-shaped blooms add a festive feel to gardens in the spring.
If any of these spring blooms tickle your fancy, give us a call. We can help you design a landscape to include more spring-blooming trees, shrubs, annuals, perennials, and vines.