

With the drought getting even worse, you wouldn’t think that many homeowners are highly concerned with water runoff. But actually, that’s exactly what happens. When the ground is dried and hardened from long periods of drought, it won’t readily soak up water introduced by a sprinkler system, the garden hose, or rainfall. Instead, you will notice a massive amount of water runoff, and this can create certain problems.
In particular, water runoff can cause problems with hardscape structures like patios and driveways. Over time, water flow will erode these structures, and pooling water causes its own set of problems.
Permeable concrete provides an excellent solution for these dilemmas. With permeable concrete, the structure is composed mostly of a coarse aggregate and water rather than a fine aggregate like sand. This results in a concrete that is porous, allowing water to flow through instead of on top of the surface.
You might be surprised to learn that permeable concrete allows three to five gallons of water per square foot to pass through it every minute! That makes permeable concrete, when designed and installed correctly, an excellent solution for flash flooding and other runoff issues.
Permeable concrete carries many benefits, such as…
It’s easy to install
It provides aesthetic appeal
It costs less over time, because it’s less likely to need as many repairs
It helps you manage stormwater flow
It carries environmental benefits, by allowing water to return to underground aquifers while trapping certain pollutants that sometimes contaminate groundwater
You might think that permeable concrete is the obvious solution for all hardscape structures, but that’s not always the case. It’s not strong enough for some high-use areas, and installers must carefully consider the level of water absorption required. Without this careful consideration, the water table underneath the structure could rise and create serious problems.
To determine whether permeable concrete is right for your project, give us a call to schedule a consultation. We can assess the area and determine if water runoff is a risk, and then decide what to do about it.
With fall just beginning and the holiday season looming, you probably aren’t even thinking about spring just yet! But if you want to enjoy a beautiful and bountiful garden in the spring, putting forth a little effort now will go a long way toward reaping greater rewards later. As a bonus, you might find that you save yourself quite a bit of labor in the spring if you take care of a few basic tasks now.
Plant a cover crop. When you leave garden beds empty over the winter, they actually suffer from nutrient loss. Plus, empty beds might as well be wearing a huge VACANCY sign, as far as weeds are concerned! Planting a cover crop such as garlic, fava beans, alfalfa, buckwheat, or clover can actually keep your soil healthier, keep pollinators fed, and prevent invading weeds.
Start a compost pile. You’re going to throw out food scraps anyway, but with a tiny bit of effort you can use your trash to create nourishing compost.
Use an old garbage can or build a box for your compost, and then begin layering “browns” (dead leaves and twigs) and “greens” (coffee grounds, grass clippings, vegetable peelings, and other “wet” plant material). Just be sure not to throw weeds or diseased plants into your compost pile, or you could invite unwanted problems into your garden later.
Turn the compost regularly to aerate it, and that’s all you have to do! Bugs and worms will do the rest of the work.
As a bonus, using compost means you can avoid chemical fertilizers and save money.
Clean and sharpen your gardening tools. Get your tools ready for spring by cleaning them thoroughly with a nontoxic oil (like baby oil or mineral oil) mixed into a bucket of sand. Thrust the blades into the sand using an up-and-down motion several times, and then store them in a sheltered, dry place until spring.
These projects are simple to perform now and throughout winter, but you’ll be glad you did when spring arrives! You will have less work to do, and more time to focus on planting.

We tend to think of spring and summer as the ideal time for flowers in the garden, but plenty of species actually bloom in autumn. In fact, it can be interesting to note that most fall blooms tend to match the colors we typically associate with autumn leaves. Chrysanthemums, in particular, are full and dense perennial fall flowers that feature shades of yellow, orange, gold, and scarlet.
And luckily for all of us, chrysanthemums are easy to grow. Even beginning gardeners will find great success with these popular blooms.
Assess your space. Are you working with a small planter on the porch, or a larger garden space in the yard? Choose a chrysanthemum variety that suits the space. These flowers can range from tiny cushion mums to enormous spider mums. A larger space demands a larger flower, or you can layer several sizes for variety.
Consider color. The easiest answer to this question is to cultivate mums in the typical autumn colors. But you can also mix in green or purple mums to add more color. Or, you might choose just one large mum in a bold color, and mix it in with other fall flowers of different types.
Grow your chrysanthemums. The most important consideration for mums is soil quality, because they will rot when planted in overly damp soil. Choose a well-drained, sunny spot in the yard for your mums, and add peat moss and compost to the soil (especially if it contains a lot of clay).
Mums should be planted early in the season, so that they can establish healthy roots before winter. Then make sure to fertilize them regularly throughout their growing season, because mums need a lot of nutrients.
Prune your chrysanthemums. Next spring, pinch off early buds from your perennial mums before July. This will double the number of blooms you receive in the fall.
Another popular pruning technique involves “disbudding”, meaning you remove all side buds and leave only one central bud. This forces the plant to focus all its energy on that one bud, resulting in a single, enormous bloom.
For more information on incorporating mums into your landscape, call us for expert advice. We can help you plan a new garden space or expand the one you already enjoy.
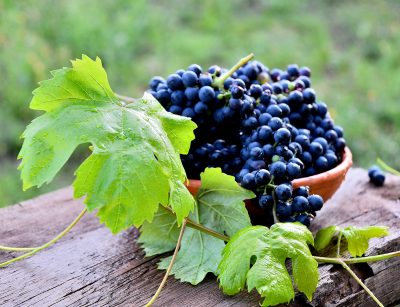
Wine has enjoyed a resurgence of popularity in recent years, with many of us enjoying wine tastings, vineyard visits, and that relaxing afternoon glass of wine on the porch. But have you ever considered making your own wine? Experiencing the entire process from start to finish can be a truly educational hobby, and you could someday impress friends and family with gifted bottles of your own special recipe.
So how does homemade wine making work? Essentially you will follow three main steps, and the actual wine making is probably the easiest one!
Choose your grapes. It might not surprise you to learn that grapes are the most important component of crafting a good wine. No, all grapes are not created the same! Depending upon the types of grape you choose, you can end up with a vastly different taste in your homemade wine.
Your primary consideration should be climate. Some grapes simply won’t grow well in your climate, whereas others are ideally suited to it. Set yourself up for success by researching the varieties of grapes that will grow well in your geographical location, and choose from among those.
Here in Southern California, the family of groups known as vitis vinifera is well-known for its suitability to our climate as well as versatility in results. You can create Merlot, Chardonnay, Cabernet Sauvignon, and Zinfandel wines from grapes in this family.
You can also purchase grapes from a local wholesaler, if you’re just not the gardening type.
Deciding upon quantity. Whether you grow your grapes or purchase them, it can be hard to know how many you will need. Consider this: It takes about 20 pounds of grapes to create one gallon of wine! So if you want to make enough wine for personal use, plus a few extra bottles to give as gifts, you’re looking at quite an undertaking.
Do keep in mind that weather, soil conditions, gardening know-how and just general luck can greatly impact your results. Aim to grow more grapes than you anticipate needing.
Harvest your grapes and make your wine. The key to truly excellent wine is to harvest your grapes at the right time. Grab a handful and squish them, and then measure their sugar levels with a tool called a hydrometer. You’re looking for grapes with a sugar level of 22 degrees Brix, meaning they are ripe and sweet but just a little tart.
In a completely clean environment (to avoid contamination) follow the directions for the wine you wish to create. Do remember that wine making is a science, and that you need to be precise in order to reap the maximum reward for your efforts.
If you do decide to grow your own grapes, give us a call about planning a grape arbor for your garden. We can help you fit your newfound hobby into your existing landscape.

Now that summer is winding down, it’s time to get your landscaping and garden ready for the change in seasons. Luckily, we get to enjoy an extended warm season here in Southern California, so you can actually enjoy a second growing season! But you should definitely pay attention to a few details regarding the change in seasons, and treat your lawn accordingly. These early autumn preparation tips will help.
Clear away annuals. Some of your annuals have finished blooming for the year, and can be cleared away to make room for new seasonal blooms. Potted plants that require warmer weather should be moved indoors by the end of fall.
Clean and mulch your beds. While you’re cleaning up flower beds, add a fresh layer of mulch to preserve moisture and protect any new plants that you select for the garden.
Choose new plantings. Plenty of flowers bloom later in the year, and even through winter. Now is the time to replant your beds with seasonal varieties to keep your landscaping refreshed and attractive through the cool season.
Plant spring bulbs. This is the time for planning your spring garden. Many flower bulbs like tulips and daffodils should be planted now if you want to enjoy their blooms next year.
Cut back some perennials. Once their growing season is finished, many perennials should be cut back to help them preserve energy through the winter. They will return with vigor next spring. However, this is not the time to prune shrubs, evergreens, perennials with woody stems, or those that provide winter interest.
Consider trees and shrubs. The soil is still plenty warm, and many trees and shrubs are going on sale at this time of year. Consider new trees or shrubs to compliment your existing landscaping, and get them in the ground before winter.
Continue to water your garden. Yes, many varieties of plants appear to be going dormant at this time. But their roots are still active and need water.
Monitor and adjust your care of Bermuda grass. Cut back to weekly waterings if you have Bermuda grass, and transition to monthly waterings through winter. This encourages the roots to go deeper in search of water, and will keep your lawn healthier and greener next year. Allow the grass to grow a bit taller in fall and winter, and target weeds as soon as they pop up so that you don’t have a full-blown weed problem in the spring.
If you have any questions about caring for your landscape at any time of year, remember we’re here to help you. Just give us a call and we’ll discuss a maintenance regimen that is right for your yard, or help you to evaluate changes that might be necessary.

During times of drought, we all need to do our part to reduce water usage. But at the same time, dry conditions create environmental hazards like dying trees and the possibility of wildfires. While conserving water is important, it is possible to go too far and increase the risk to your own property and life.
But how do you find this balance? The first thing to remember is that you want to avoid waste. Never use more water than you actually need to maintain your landscaping, and look for ways to conserve water inside the home with low water appliances, showerheads that conserve water, and so on.
But you do need to use some water. Water your lawn and shrubbery often enough that they stay healthy and alive. Dried lawns and dead shrubbery around your home can essentially serve as kindling in the event of spreading wildfire in your area. Healthy plants are “wet” on the inside, and a single spark usually won’t ignite a blaze. But dry, dead plants can do exactly that.
If you want to conserve water while also maintaining healthy landscaping, consider an underground irrigation system. When you water a lawn or garden from the top, a large percentage of the water simply runs off the surface. But when you deliver moisture at the roots of the plant, all of it gets used. So underground irrigation systems require much less water than watering by sprinkler or hose, and you can set them to run automatically. It’s one less chore for you to remember, and you protect your home from wildfire at the same time.
Choosing water wise plants for your landscape can also be a big help. Those that have evolved to fit into our climate here in Southern California (or climates like ours) will naturally require less water, and can therefore stay healthy during periods of drought.
And of course, you want to water trees deeply on occasion to keep them healthy. Dead trees become dry and brittle, and can pose a risk of falling. Tree roots extend far under the surface of your yard, where they can access deeply stored moisture. But during extreme droughts, you do want to water your trees to prevent unnecessary deaths.
Give us a call for more information on irrigation systems and the appropriate amount of water for your landscape. We can also discuss low-water landscapes if you want to maintain an attractive lawn while using less of this valuable public resource.

Children with special needs like autism or ADHD need outdoor time as much as any other child. But their individual challenges often necessitate some changes to your typical backyard. These ideas can help you create a fun and safe outdoor environment for your child, while accounting for their unique needs.
Build a fence. For many families with a neurodivergent child, a secure fence is an absolute imperative. Many people (both children and adults) with autism, ADHD, and some other conditions tend to elope unpredictably. A privacy fence can be the best way to keep your child safe from traffic and other dangers when playing outside. Plus, for the sensory sensitive, a fence also provides some cushion against outside noise.
Provide soundproofing. For many individuals with special needs, overwhelming sensory input can prevent them from fully enjoying new experiences. If you live in an area with a high or even moderate amount of noise pollution, soundproofing can provide a more calm environment for the whole family. Plant a row of hedges along the fence, build a living wall, or install a water fountain for white noise.
Create sensory experiences. Even with their sensitivities, many children with special needs really enjoy certain types of sensory experiences. The backyard is the perfect place for enriching fun, so consider items like a sandbox, baby pool, trampoline, or swing. Just remember to empty children’s pools every day so that they don’t pose a drowning danger or attract mosquitoes to your yard.
Consider a hiding spot. Your child might need a quiet place to retreat from time to time. A small playhouse, tent, or creative landscaping can provide the perfect “hidey hole” to help them feel secure.
The above ideas are just the tip of the iceberg, because children with special needs are individuals. Your project should be based on your child’s unique requirements and preferences. Give us a call as you plan your backyard makeover, and we’ll help you customize a plan to perfectly suit your family.
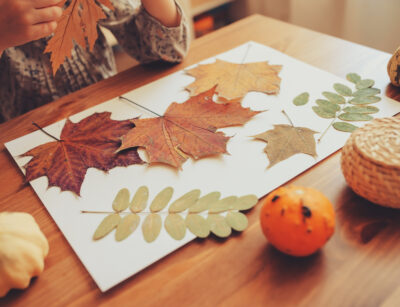
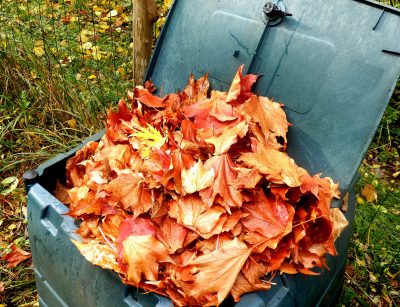
Everyone’s favorite season has finally arrived! And with it comes the changing of leaves on deciduous trees. While raking the lawn might not be your favorite chore, you can at least have fun with a variety of fall-themed craft activities. The following ideas are great for kids and adults alike, and can help you use some of your favorite fall leaves in your home decor.
Leaf pressing. Make sure to fold your leaves inside a piece of paper before placing them within a large book. Then add books on top to create pressure on the leaf. Check your leaves after one week to be sure they’re drying (rather than rotting). Continue to press for another week or so, until fully dried and flat.
If you want to create more supple pressed leaves, soak them in diluted fabric softener before starting the pressing process.
Preserving leaves. Choose leaves that have already partially dried, and then sandwich them between two sheets of wax paper. Place a cloth on top of the wax paper and set your iron to the high setting. Slowly iron your leaves without pressing too hard, so that they don’t shift inside the wax paper.
You’re finished when the wax paper sheets have melted and sealed the leaves inside. Then allow the leaves to cool and carefully cut them out with scissors, leaving a margin around the edge so that the wax paper remains sealed.
Concrete stepping stones. Leaves can serve as nature’s stamps to create fun designs in concrete stepping stones. Coat your chosen molds with vegetable oil, and paint a thin layer of oil on the vein side of the leaf. Pour concrete into the molds and press your leaf, vein side down, into the top of the concrete.
Then press the leaf by covering it with small rocks for 24 hours. Gently peel the leaf out of the concrete, then remove your new stepping stone from the mold. Use your stepping stones anywhere you need a decorative pathway, or simply scatter them around the garden to add a personal touch.
Use your new items in fall decorations, or mix them in with year-round decor. But most of all, have fun!
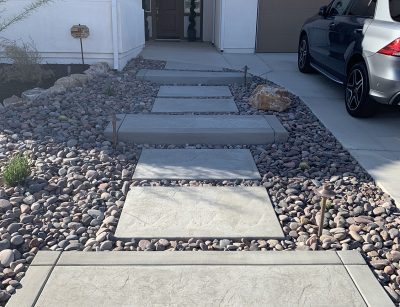
Stepping stones can be one of the simplest ways of constructing an attractive pathway through your yard or garden. But it’s a bit more complicated than simply tossing down a row of concrete squares or stones. You might also need to landscape around them a bit, both to make the pathway more appealing and to create a more level walking surface.
So, what do you use in between your large pavers or stepping stones? First of all, we actually don’t recommend grass. Grass can be more difficult to maintain, and weeds set in more easily. For a more attractive look, we would steer you toward either pebbles or a decorative and low-maintenance groundcover.
Small round pebbles, such as glacier gravel, or Mexican beach pebbles are both popular choices for use between large stepping stones. The fun thing about using pebbles is that you can choose from a range of colors and create a strong visual contrast between them and the larger pavers. You can really brighten up a garden or add curb appeal to your home this way.
Or, if you would rather use a groundcover, choose something low-growing that won’t crowd out the pavers, but still vigorous enough that it will spread quickly and out-compete weeds. We often recommend Kurapia or Dymondia for this purpose. Both of these groundcover plants are low maintenance and very hardy, so you can create a beautiful walkway that requires very little labor from you.
Or, if you want a groundcover that provides a burst of color, try blue star creeper. And for those of you seeking to please all the senses, creeping thyme, chamomile, or jewel mint provide a lovely fragrance for your garden.
Finally, you might be wondering whether artificial turf would be a good option for use between stepping stones. Yes, it can be done if that’s the look that you prefer! But we would caution you that artificial turf, when used this way, might not be as low maintenance as you had hoped! Curling and lifting around the stones can become problems.
As you can see, you can choose from a wide variety of options! But what works best for one homeowner might not be right for another’s preferences, budget, or time constraints. So give us a call if you’re considering a walking path for your yard, and we can help you identify your priorities and guide you toward a groundcover that works best for your situation.
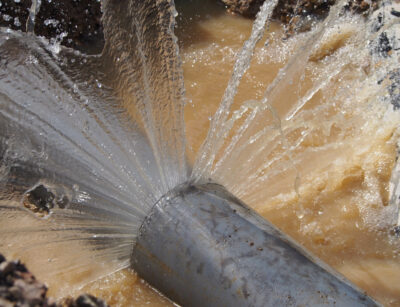
Have you noticed that your water bills seem higher than expected? Or do you just want to ensure that all of your home’s systems continue to function properly? Either way, it makes sense to routinely check your landscaping irrigation system for leaks. They can and do happen, and a leak can cost you in terms of a higher water bill and possibly an over-watered yard.
It always makes more sense to detect a problem early on and fix it because it costs you even more time and effort in the future. Follow these simple steps to check your irrigation system for leaks.
First, turn off all faucets and appliances that use water, including your irrigation system. . Write down the number on your water meter, and wait about an hour to recheck it. If the reading has changed despite the fact that you’re not running water anywhere, that indicates a leak.
Now for the tricky part: Where is the leak? Is it inside the house, or outdoors? If you’re lucky enough to have a dedicated irrigation meter, you can determine whether it’s your irrigation system using excess water. Otherwise, proceed to the next step.
You can usually rule out leaks in the house by checking all appliances that use water (particularly the hoses connect to them) and looking for drips and puddles underneath sinks and in crawl spaces. If water is leaking from a pipe inside the wall, you might notice a musty smell over time.
If a leak is not present within the house, you would be right to suspect the irrigation system.
First, check your system’s controller. It is possible that it is simply not programmed correctly, and is running more than you expected. Is your irrigation system turning on at precisely the right times, and only those times?
Next, inspect your sprinkler valves. Each valve box should be dry. If they’re flooded, check them for loose parts or water leaking between fittings.
Next, check each sprinkler station. It will help if you have a partner who can turn on the irrigation system as you check each sprinkler for signs of malfunction (geysers, spurting between sprinkler heads, puddling water between heads, spurting water at the base of sprinkler heads, or other patterns of water distribution that don’t seem correct to you). The need for simple repairs, such as replacing seals or spray heads, can be detected this way.
Finally, sometimes the leak originates underground. If that appears to be the case, it is usually best to call in the experts. Call us so that we can handle the diagnosis and digging, and you can avoid the risk of doing even more damage to your irrigation system.
We recommend you perform simple checks once per month, to keep your irrigation system functioning properly, your lawn and garden watered correctly, and your water bills under control.

Reading is good for your mind, and sunlight and fresh air are good for your health. Why not combine the two, and enjoy reading outdoors more often? Create a cozy reading nook outdoors, and you can disappear into your own private hideaway. But we must warn you; the whole family might love it!
The following ideas can help you create the perfect reading nook. Choose one based on the amount of work you’re willing to put into it, as well as the decorative touch it adds to your yard.
Plant a weeping tree. A weeping willow or other “weeping” variety of tree will create the perfect, natural reading environment underneath its draping branches. You can throw a blanket onto the ground or install a small bench beside the tree. The down side, of course, is the time required to grow the tree. This isn’t a project you can complete in the span of a weekend.
Purchase a ready-made nook. On the other end of the difficulty and time spectrum, you can simply purchase a ready-made nook. A number of enclosed seating options are available for purchase – some free-standing, some hanging. Choose one that suits you, with regard to its appearance and size, and simply install in your yard or on the porch. To personalize your seating a bit more, consider planting shrubs or flowers around it (taller ones add more privacy).
Build an arbor. Purchase or build an arbor, and then train a vining plant to grow up the structure. Add seating underneath, and you’ve created a cozy reading nook that also adds a beautiful focal point to your garden. This is a good option for those of you who like the idea of a weeping tree, but don’t want to wait several years.
Repurpose a used item. Browse local ads for cheap items or free giveaways that someone wants hauled off from their yard or farm. An old potting shed can be repurposed, with one or two sides removed to open it up. Add a bench seat, climbing plants, or twinkly tea lights, and you’ve created a unique shabby chic nook that reflects your personal style.
Utilize your landscaping. Look around your garden; you might already have a reading nook halfway constructed. The space between a shrub and your fence can be optimized with seating and perhaps a few more plants to add privacy. Or a hidden corner of the house might already provide a cozy spot, and all it needs is a bench and some shade. Use what you already have, and you can complete this reading nook project in a weekend.
For more ideas on how to optimize your current landscaping to get more enjoyment from your yard, give us a call. We can take a look at your current situation and offer ideas for recreational, relaxing, or social gathering spots.

Summer is a time of fun outdoor parties, lounging by the pool, and barbecues with friends. And due to the heat, everyone needs a nice cold beverage. If you’re looking to add festivity to your get-togethers, or simply enjoy a more posh atmosphere when you’re hanging out alone, ice cubes infused with edible flowers or herbs add a colorful touch of class to your drinks.
But like all Pinterest-worthy ideas, a bit of skill is needed to create the perfect decorative ice cubes. Just follow these simple tips.
Use a silicone ice cube tray. Silicone ice cube trays work best for this project, because you can easily pop out the cubes without damaging them. Choose one that makes large, square cubes.
Select your flowers. You might not want to actually eat your flowers as the cubes melt, but sticking with edible ones is best anyway. Nasturtiums, pansies, marigolds, violets, geraniums, and miniature roses work best.
Or, use herbs. Herbs like basil and mint work great in a number of alcoholic or non-alcoholic drinks. Lavender adds an interesting flavor to lemonade or cocktails. Consider your drinks ahead of time, and choose herbs that will complement their flavors.
Use distilled water. Your tap water might contain trace additives or minerals that create more cloudy ice cubes. Use distilled water for the clearest cubes, so you can actually see your herbs or flowers well.
Freeze in layers. The main difficulty with decorative ice cubes is that the flowers or herbs tend to float to the top. If you want your blooms or leaves trapped in the center of the cube, this will become a multi-step project. Fill your ice cube tray about one third of the way full, and then add your herbs or flowers. Freeze until solid, then add another layer of water and freeze. Finally, add the last layer of water and freeze. Your decorations should end up trapped in the center of the cube this way.
Get creative. Try using several different flowers or herbs for a multi-colored look, and experiment with shaping your blooms in the tray for a variety of results.
Store your cubes in a cute ice bucket. If you’re using your decorative cubes for a party, remember ice will melt quickly. Store them in a decorative bucket that is designed to keep ice frozen for hours.
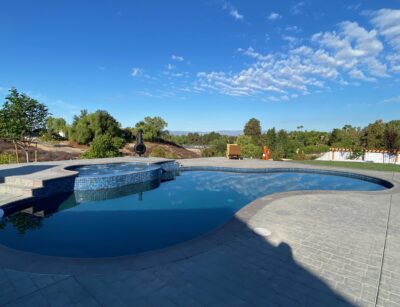
Backyard pools just aren’t what they used to be. For many decades a pool served as a fun recreational spot for the family, and yes they could be designed to serve as an attractive focal point for your yard. But infinity edge pools take “attractive” to a whole new level; these pools are a work of art!
What is an infinity edge pool? Also called a “negative edge pool” and several other common nicknames, an infinity edge pool is designed with a spillway on one or more sides to give the appearance of water that blends into the horizon. They are often built to compliment landscaping that includes a long-range view.
Where are infinity edge pools installed? Once mainly seen in upscale resort settings, the infinity edge pool trend has extended to backyard landscaping. They are often built on the edge of land that includes a sudden drop, especially if the backyard overlooks a lake, river, or even a cityscape.
However, infinity edge pools can also be built in a more typical backyard environment. If you don’t have much slope to your yard, the pool can be built “up”, but you probably won’t have a very tall spillway or a view.
If you want a pool that also serves as an attractive landscaping feature with an upscale feel, an infinity edge pool fits the bill.
How high can you build an infinity edge pool? An infinity edge pool can be designed to suit almost any space, but most homeowners don’t build above a spillway height of six feet. At that point, the cost of building the pool increases dramatically.
Other things to consider. What will go on the front of your spillway? This side of the pool might be visible from other spots in your yard or to neighbors. Since it will essentially serve as a large wall in your yard, you might wish to design it as attractively as possible. On the other hand, if no one can really see it, you might wish to stick to plain concrete for budget reasons.
Infinity edge pools do experience a lot of evaporation, so close monitoring will be necessary in order to maintain just the right amount of water in the pool.
An infinity edge pool must be designed very carefully, in order to create the most attractive focal point possible. Let’s discuss your ideas, and we can help you decide how an infinity edge pool would best fit into your landscape.
You spend a large portion of your life at home, and deserve to enjoy your surroundings. That’s why we sometimes remodel to make a house more comfortable and attractive. But your backyard and especially your swimming pool are an extension of your home, and provide a place for entertaining and relaxation. And so, you might wish to remodel your pool area so that the atmosphere is just perfect.
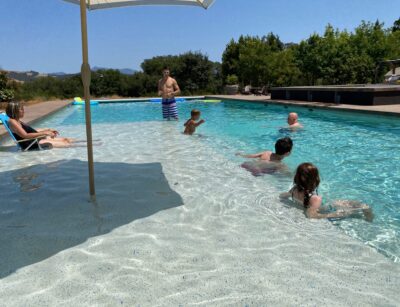
Now that summer has arrived, you might be spending more time in your pool than ever. These ideas can help you revamp it and turn it into your dream backyard oasis.
Revamp the pool’s surface. The pool’s surface can be the most important aspect of its visual appeal. If your plaster is older, dingy, or cracked, it is probably time to redo it. Re-plastering the pool can make it look brand new again.
But why stop there? You could also choose a brand new surface for your pool. Pebble surfacing has grown in popularity, because pebble provides so many different style options. You can choose from a wide range of colors and textures, and even create a multicolored surface. Tile provides another great option, and tiles are available in just about any color or design that you could imagine.
Pebble and tile resurfacing are both time-consuming projects, but if you’re draining the pool to re-plaster anyway, they are both worth considering. Either option will beautify your pool for many years to come.
Restructure your pool. Does your pool function the way you prefer, or would you enjoy the addition of a few structural elements? Are you tired of climbing down a plain metal pool ladder? The addition of steps, a baja shelf, or beach entry could increase your ease of access to the pool, as well as your enjoyment.
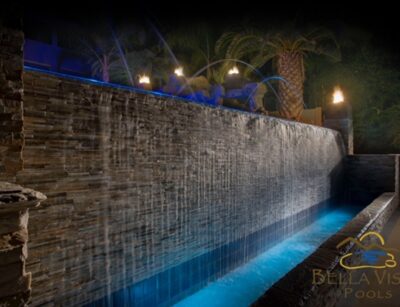
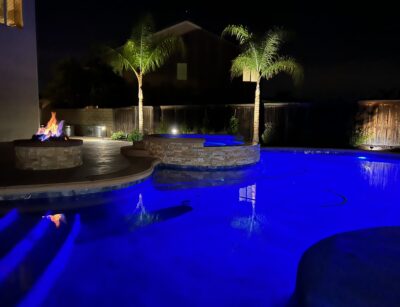
Add decorative elements. Wouldn’t it be nice to relax by the sound of a waterfall that cascades into your pool? Or how about a fire pit to light up those nighttime gatherings? Even just a new ribbon around the pool will completely change its look; swap out that old stone or brick ribbon for something more contemporary.
Replace the deck. Your pool deck provides a significant portion of your backyard fun. Other than an attractive frame for your pool, it also serves as the perfect spot for relaxing or socializing. Replace an old, worn out deck with a new, more attractive one. Or, enlarge the deck space so that you can host larger pool parties.
Before you plan a pool remodel, do check on whether you can obtain the appropriate permits. Some of the above jobs will require one, and others will not (generally speaking, purely cosmetic changes will not require a permit). Give us a call to discuss your ideas, and we can help you decide what is possible in your situation, and will increase your enjoyment of your pool area.
Some of us enter our pools with a running cannonball jump. But for those of us who are feeling a bit less boisterous, or for young children, the elderly, or disabled, that might not be an option. Aside from installing your standard metal pool ladder, we can design today’s pools with creative entry options that make your pool easier for everyone to use.
Reef step. A reef step, or baja shelf, essentially creates a shallow area at one end of your pool. One extended step is built a few inches to a foot below the water’s surface, based upon your preferences, that allows for easier entry. A reef step also provides an attractive option, and a terrific place to lounge in shallow water on hot days.
While a reef step is not the ideal entryway for a person who needs more assistance, it does provide a terrific option for children. Younger ones enjoy what is essentially a kiddie pool inside your pool, and can play within your reach. Of course, because they can still fall off into the deeper part of the pool, you still need to supervise the youngest ones carefully.
You will sacrifice a bit of the overall area of your pool to add a reef step, but most pool owners agree that the added feature is worth a bit less of the deeper area.
Beach entry. Beach entry is exactly what you’re picturing. At the ocean, we can walk into gradually deepening water, and a beach entry for a pool provides the same experience. These entries are fantastic for children, the elderly, and disabled alike. Dogs even enjoy it!
Beach entries can be designed to fit a variety of spaces by altering the slope, so it’s a very customizable option. If you hope to create a beachy atmosphere, you can add a variety of decorative elements around this type of entryway.
The only drawback to beach entry is that you do sacrifice some of your pool’s deeper swimming area, unless you have space to simply increase the size of the overall pool.
If you’re curious about the design of a reef step or beach entry, give us a call. We can take measurements and help you decide if one of these options would work for your backyard pool project.
A swimming pool will keep you cool and provide fun all summer long. But it can also serve as an attractive focal point for your backyard, and a fun place for social gatherings. So naturally, you might want to add a few components to beautify your pool or increase your enjoyment of it. The following additions have grown in popularity these days, and are worth your consideration if you’re looking for a few extra bells and whistles.
To increase the attractiveness of your pool, consider…
Pebble surfaces. Available in a wide variety of colors and textures, a pebble surface instantly transforms the look of your pool. And with three different finishes available, this type of surface is often more durable than the standard plaster option. However, pebble surfaces can be rough on your feet when not installed correctly, so definitely consult with a reputable professional before making this choice.
Colored LED lights. LED lights aren’t a must-have, but they’re definitely a nice-to-have! LED lights help you enjoy your pool at night, and add ambiance to backyard parties. At the touch of a button, you can change the color of your pool or even set it to change automatically. LED lights also increase safety, as a well-lit area helps you to monitor the pool and the area around it much more easily.
To increase the convenience of pool ownership, consider…
Pool automation. Pool automation, or a pool computer, mainly functions as a convenience feature for you. Pool maintenance, such as cleaning and monitoring pH levels, is the part of pool ownership that almost no one enjoys. When you choose an automation system to handle those tasks for you, you will gain more time to enjoy your pool! Automation systems vary in their complexity, so you can choose one that provides the features you want.
Salt system. Treating your pool with traditional chlorine can be a lot of work for the homeowner, and you might also have concerns about your exposure to chemicals. Salt systems provide an alternative, by using salt to clean the water naturally. You won’t have to buy and haul chlorine anymore, making maintenance so much easier. And no, the water won’t taste salty or corrode your pool surface.
Ultimately, your decision will come down to what is most important to you.
If you feel interested in any of the above upgrades for your pool, or anything else that will add to your convenience or enjoyment, call us to discuss your ideas. We will help you determine which features best suit your needs.
In response to drought conditions, or perhaps simply in an effort to reduce water bills and maintenance time, many of our customers have replaced their traditional grass lawns with kurapia. Kurapia has enjoyed a surge of popularity due to its low water requirements, but many of you don’t know much about it otherwise. Now that your kurapia lawn has filled in, here’s what you need to know about maintaining it.
No, you don’t need to mow kurapia. Before your kurapia lawn fills out, mowing can encourage the plant to put out more runners and help it become well established. After your lawn has filled in, you don’t actually need to mow it anymore. When allowed to grow uncontrolled, kurapia will top out at only 2 to 3 inches tall. So you don’t need to mow it, but you can certainly do so (once or twice per month) if you prefer the lawn to stay shorter.
Edging will control the spread of kurapia. While kurapia does not grow very tall, it will continue to spread laterally. So you do need to perform regular edging to prevent it from taking over other garden spaces or even sprawling across hardscape.
Weeding might be necessary. Weeds can and do invade kurapia lawns. Treating the ground for weeds before installing your kurapia lawn can prevent much of this problem. If you do notice weeds encroaching into your turf, you can pull them by hand or apply an appropriate herbicide.
Kurapia needs minimal fertilizer. Avoid fertilizers while your kurapia lawn is establishing itself. Once it has filled out, you only need to fertilize twice per year. Avoid liquid fertilizers, and use a slow-release, balanced organic option instead.
Kurapia provides a low-water groundcover after it is established. New kurapia turf should be watered lightly and frequently until it is well established. Mature kurapia, on the other hand, can withstand significant drought.
When you water your mature kurapia lawn, do so deeply and then allow the ground to completely dry before the next watering. In most cases twice-monthly waterings will suffice, but you might need to adjust this according to sun and sandy soil conditions.
And finally, make sure you avoid over-watering your kurapia lawn. This is the most common problem with kurapia, and it will cause diseases and rot.
If you’re considering a kurapia lawn, or need more information on maintaining your current installation, do give us a call. We will share everything you need to know, so that you can enjoy a lush, durable lawn.
If you’re in Riverside County, you probably know that we’re suffering through a period of drought. In order to combat this problem and ensure that we have enough water for essential services, everyone needs to do their part.
The first thing you need to know is that, yes, our county is subject to certain restrictions on water use. The Metropolitan Water District selected six areas for these restrictions, including Riverside County, and the new rules began on June 1.
Primarily, we have been asked to refrain from watering our lawns more than once per week, or within 48 hours of measurable rainfall. Yes, this means that you might need to embrace a brown lawn for this summer.
Your other option is to install low-water xeriscaping. It’s a one-time investment in your home’s exterior, but you’ll enjoy a beautiful yard even in the worst droughts. Rebate programs are available to help offset some of the expense. You can learn more through the California Water Service website.
With xeriscaping, you would never have to suffer through high water bills again. And, of course, you won’t have to worry about breaking any rules under the current restrictions.
On that note… What happens if you break the rules? If you’re caught over-watering your lawn (beyond the requested once-per-week irrigation) you could be fined in the amount of $1,500 for every acre-foot that you water excessively.
Aside from watering your lawn, other restrictions include:
Hosing off sidewalks, driveways, and other hardscapes
Washing automobiles without a shut-off nozzle on your hose
Using non-recirculated water in a fountain or other decorative water feature
Watering lawns in a manner that that causes runoff
Irrigating ornamental turf on public street medians
The long term effects of a drought provide another reason to comply with the restrictions. If we don’t conserve enough water now, even more areas of Southern California will become affected. Water rates will continue to climb, and it will become increasingly difficult to pull ourselves out of this drought.
So please, do your part to comply with the restrictions, and endeavor to do a bit more if you can. And if you want to know more about ditching the high-maintenance lawn and installing something much more environmentally friendly, give us a call about our low-water landscapes.
Summer is swimming pool season, and you might be dreaming of your own backyard pool. One trend we’re seeing a lot lately is raised, or elevated, swimming pools. But before you opt for this visually appealing construction style, make sure you’ve researched all of the benefits and drawbacks.
Benefit #1: Raised pools are suitable for some yards. If your land falls within a flood zone, having an in-ground pool can create a hassle. Raising the pool could prevent flood water from getting into it. Raised pools can also be a great option for a sloping lot that you cannot or should not level. And finally, digging into ground that is very rocky can become labor-intensive or even impossible. Building the pool above ground is much easier in those cases.
Benefit #2: Raised pools are visually interesting. This is often the main reason homeowners express interest in raised pools. They just look cool! We can’t really argue with that, and if you prefer the look of a raised pool then it might be worth the drawbacks in your opinion.
Benefit #3: Raised pools might flow better with existing structures. If you already have a deck or other structure in your backyard, installing a raised pool can provide a seamless look.
Benefit #4: Raised pools are convenient for the elderly or disabled. Some people experience difficulty with getting into a typical in-ground pool. A raised pool can provide easier entry.
Drawback #1: You probably won’t save money. Many homeowners believe that building a raised pool will save a bit of money, due to not having to dig as far into the ground. But in most cases this simply isn’t true. Once we bring out the equipment to dig a pool and get started, going another foot deep does not really make much of a difference. Meanwhile, constructing the pool above ground actually does require some additional expense. You’re essentially building retaining walls strong enough to withstand the pressure of thousands of gallons of water, and those can get pricey.
Drawback #2: Security can be more challenging. We all understand the dangers a swimming pool can pose to young children. Some raised pools, installed level with the home’s deck, provide very easy entry to kids. But these same pools can be harder to secure with a fence.
Drawback #3: Maintenance is a bit more complicated. The maintenance of your raised pool will be similar to that of an in-ground pool. But there is one big difference; you now have to clean the outside of the walls as well. It’s just one more chore, but might be a drawback if you’re already very busy.
Even with a few drawbacks, a raised pool is a good option or even the only option for some homeowners. Call us to discuss your ideas, and we can help you plan a backyard oasis that meets your style and budget preferences.
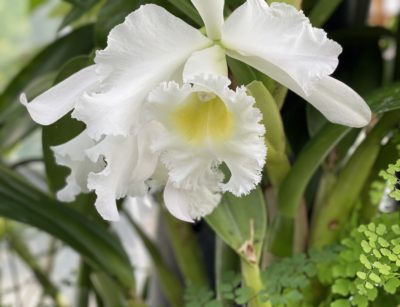
Orchids are some of the most unique and beautiful flowers, and have certainly earned their outstanding reputation among passionate home gardeners. And contrary to common belief, orchids aren’t always as difficult to maintain as many people think! Of course, that depends upon species, and some orchids can certainly be more finicky than others.
Once you’ve gotten the hang of orchid growing, you might begin to branch out into more creative endeavors. If you’re curious about creative ways to display these unusual blooms, check out the following ideas to incorporate them into your home decor.
Choose unusual containers. There is no reason to feel stuck with actual flower pots that you purchase at a garden supply store. Browse your local thrift stores for unusual containers, and let your imagination run wild. Mason jars, decorative pitchers, glass bowls, and silver or copper items might add a whimsical touch to your decor.
Try a shower caddy. Liven up your bathroom by turning a shower caddy into a wall planter. It will blend seamlessly with your bathroom while the orchid takes center stage.
Hang your orchids. Hanging planters allow you to display your orchids in an “outside the box” way. Instead of a cluster of flowers on a tabletop or other surface, you can arrange your collection in front of a window or fill another empty space in the room. Arranging them vertically allows for more interest; try varying the heights of your orchids for a look that draws the eye to the collection.
Upside-down orchids. This variation on a hanging display turns the orchids upside down for an interesting visual appeal. We tend to think of flowers as growing straight up, so upside-down orchids will immediately catch the eye!
Mount planters on the wall. Wall planters provide another way to use your orchids as convenient decorative items. We all have those blank spaces on our walls that need a little something. Add an orchid and you can enjoy instant liveliness.
Of course, if you want to display your orchids outdoors, remember to carefully research their light and humidity requirements. And give us a call for more information on updating your garden or outdoor living space.
Your landscaping doesn’t just provide beauty and curb appeal to your home’s exterior. It also serves as an outdoor recreational space. And so, over time your yard might evolve to meet your family’s changing interests and needs, or even just to keep pace with current trends in landscaping or entertainment. Right now, we’re seeing a surge in interest toward horseshoe pits. Could this be your family’s next outdoor addition?
What makes for a great horseshoe pit? Horseshoe pits are relatively simple additions for almost any backyard. The sides are typically constructed of wood, so just choose a type of lumber that compliments your landscaping. Most homeowners opt for sand in their pits, and you can choose from a few different colors if that’s important to you. And finally, you might wish to build a raised backstop for your horseshoe pit to prevent players from throwing past the pit.
What else can you do with a horseshoe pit? It might seem obvious, but a horseshoe pit can certainly double as a sandbox for young children. And yes, your horseshoe pit can also double as a bocce court, if you design it with those dual purposes in mind. You might as well get as much out of the project as possible!
How do you design a horseshoe pit to fit into your landscaping? Regulation size of horseshoe pits can range from 31to 36 inches wide, and from 43 to 72 inches long. So yes, we can design your pit in a variety of sizes so that it fits appropriately into your existing landscaping. If you want, you can paint the wood to match your outdoor decor.
Do remember that the landscaping timbers on the sides of the pit will add to the overall dimensions. And finally, we need to find a level spot for your play area. Otherwise, fitting a horseshoe pit into almost any backyard is easy!
How do you maintain your horseshoe pit? Maintaining your horseshoe pit is a snap. Make sure you use pre-treated lumber while building it, so that you don’t have to worry about rot for many years. Covering the pit when not in use is a good idea, to keep the sand dry and to prevent stray cats from using your recreational space as a litter box. You can use a tarp, weighted with rocks on the sides, or custom build a cover if you prefer.
If young children use the pit as a sandbox, you might need to replace sand on occasion. And when mowing the grass, be sure to turn your lawnmower so that cut grass does not blow into the pit. But that’s about all the maintenance it will need!
If you’re considering a horseshoe pit or any other recreational addition to your landscaping, call us to discuss your vision. We can help you turn your backyard into a beautiful, functional, and fun place to relax or play.
With Memorial Day and a summer of barbecues approaching, you might be eyeing your outdoor space with some fresh inspiration in mind. Is it finally time to install the outdoor kitchen of your dreams? Or are you looking for some trendy updates for your existing space? We’ve been seeing a lot of the following five trends.
Griddles. More and more homeowners express a preference for griddles rather than, or in addition to, a regular barbecue grill. Why? For one thing, a griddle can accomplish things that a grill just cannot. Picture yourself flipping pancakes and frying bacon outdoors. What a relaxing way to spend a Sunday morning! Plus, griddles are easy to season and keep clean. And since they’re gas powered, there are no messy bags of charcoal to worry with.
Additional seating space. Now that we’re moving into the post-pandemic era, you’re probably considering larger gatherings again. Now is the time to evaluate your seating area, and add more furniture to accommodate your guests. This might necessitate an expansion of your existing patio or deck.
A tiki bar. With outdoor gatherings growing in size, serve up fun cocktails from your own tiki bar. A tiki bar adds a festive touch for the adults.
Pizza ovens. There’s just nothing like the crust on a wood-fired pizza. The same old barbecue foods can get old over time, so why not add a new option? Family members and guests will enjoy topping their own personal pizzas and cooking them outdoors in your new pizza oven.
Media options. Plenty of seating, a spot to get out of the shade, and terrific food options… These are the foundations of a fantastic outdoor gathering. Now take things up a notch by adding a screen for movies and sportings, and surround sound speakers for watching these events or blasting your favorite tunes. No need to miss the game while you’re whipping up your favorite barbecue dishes!
And of course, your outdoor kitchen area might simply need a style makeover! Over time, trends in colors and materials do change, and you want your gathering spot to complement your home’s overall decor. Call us to discuss your design ideas, and we’ll help you give your outdoor kitchen the makeover it deserves.
Mothers Day is rapidly approaching, and it’s time to plan your brunch and other activities. With the weather so warm and pleasant lately, why not spend the day outdoors? Kids can always benefit from less screen time and more nature time, and there’s plenty to keep them busy in the yard or elsewhere outside. Check out these five fun ideas.
Go on an adventure. Lace up your shoes and hit a hiking trail together. Most kids enjoy an outdoor adventure, but there are sneaky ways to woo the reluctant ones. Teach them fun songs as you hike, or hunt for rare plants, mushrooms, and animals. Bring along a pair of binoculars for spotting birds, squirrels, and other wildlife.
Set up a scavenger hunt. More appropriately, ask your husband or another adult to arrange this activity; you don’t need another chore on Mothers Day! Going on a scavenger hunt can be a great way to spend time together. Make it creative, such as a list of clues rather than a simple list of items. Or, see if you can make it funny by creating a craft out of your objects after you’ve found them all.
Plant a garden. Mothers Day is the perfect time to start a garden together. Plus, this is a quality time project that will keep on giving for months as you harvest fresh veggies or cut flowers together.
Enjoy a picnic or tea. Be as basic or creative as you like with this idea. A simple picnic at a park, beach, or other outdoor setting can be a great way to spend time together. Or, set up a fancy “tea time” in your backyard or rented garden space. Small children love to invite their favorite dolls or teddy bears. You might also invite a few fellow moms and their kids, and turn the event into a party.
Play outdoor games. Set up your favorite outdoor games, and challenge the whole family to an Olympics-style tournament. Volleyball, corn hole, horseshoes, a homemade putt-putt course, and even outdoor Twister can provide hours of entertainment. Add some bubbles, water toys, and sidewalk chalk to keep the youngest kids busy if they find some of the more advanced games too frustrating.
If any of your outdoor activities lead to planning a new garden area, give us a call. We can help you design a new space that the whole family can enjoy together.
Now that many of us are starting to travel again, you might be looking for vacation ideas. With Las Vegas a convenient drive from Southern California, and so much to do there, the city might top your list of potential vacation spots. But did you know Las Vegas has so much to offer aside from the casinos and entertainment. In particular, you should check out the landscaping while you’re there!
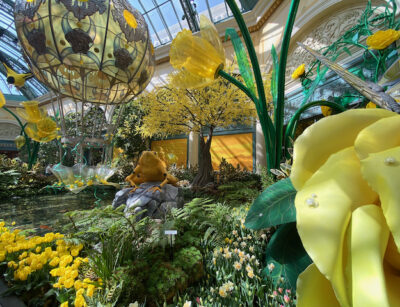
Some of the big hotels in Vegas put on a spectacular show when it comes to landscaping. For example, the Bellagio features an enormous, 14,000-square-foot atrium that contains rotating garden exhibits. The exhibits change each season, featuring winter, spring, summer, and fall, with brief “dark periods” as the horticulture team swaps out the displays.
Best of all, the Bellagio atrium is open to the public, with no entrance fee. So even if you don’t stay at the hotel, you can walk right in and enjoy the spectacular landscaping! Do check the website before you travel, to be sure you will arrive while your favorite season is featured.
If butterflies are your thing, head over to Springs Preserve this spring and check out their seasonal butterfly habitat. The exhibit features a wide range of flowering plants, designed to attract a multitude of different species of butterflies. The 180-acre gardens are open during the rest of the year, too, but head over in the spring if you want to see the butterflies.
If a learning experience is more your thing, head to the Indoor Ag-Con next February. This agricultural trade show will feature exhibits on vertical farming and controlled environment agriculture, for those of you interested in learning something new.
And of course, once you arrive in Las Vegas the best thing to do is walk the strip. You never know which hotels might be featuring something new in their gardens, or what type of events are going on at any given time. There’s something for everyone, even the outdoorsy gardening types!
And give us a call when you return from your trip full of inspiration. Ready to change up your landscaping? We’ll be happy to help you incorporate your new ideas into your yard.
Last but certainly not least in our series on current design trends, we will discuss Modern style concepts for 2022 and upcoming years. While you might think of Modern as “simple”, to be well done it must be planned as carefully as any other style! If the saying “less is more” appeals to you, check out the new twists on doing “less” that still provide more style for your outdoor space.
First, let’s recall what “Modern” means with regard to design. Modern styles focus on clean, straight lines with minimal fuss. You will see a lot of sharp angles, cool gray tones, wood and concrete, and an emphasis on height and texture. What you won’t see is a lot of flowers, ornamentation, rounded edges, or a rainbow of different colors. Having said that, Modern style falls along a spectrum, just like the other design concepts. It doesn’t have to mean cold and barren!
On that note, the Modern Farmhouse style comes to mind. The word “farmhouse” probably evokes more traditional imagery for many people, but the concept has gone modern in recent years. Architects have simplified this style in homes, and now the Modern Farmhouse trend has reached outdoor design as well. We focus on grasses in the light green, silver, and pale blue spectrums, and combine them with perennial plantings in muted colors. Modern paving and rustic touches round out the look.
On the far end of the spectrum, Modern Minimal provides the most low-fuss environment imaginable. Shapes are rectangular, plantings are arranged geometrically, and a feeling of openness is emphasized. Cool gray landscaping mixes with dark-toned wood to create a formal atmosphere.
And for those who enjoy clean lines but prefer a more eclectic look, we offer you Modern Bohemian. Lines are still clean and angles sharp, but materials are more mix-matched. Rather than sticking with solid colors, we throw in a pattern or two, but sparingly (think throw pillows or rugs). Plant spacing should be informal and layered. You can include a bit more “stuff” in a Modern Bohemian design scheme, making it feel warm and inviting, but remember to keep the atmosphere open and airy.
And those are just a few of the most current Modern design concepts that are trending this year. To learn more about a clean, functional landscape design that suits almost any home style, call us to discuss your ideas. We will be happy to guide your process and help you with the landscape of your dreams.