
As we dive into 2024, the world of pool technology is making waves with innovative advancements that promise to elevate your backyard swimming experience. From cutting-edge lighting and pool equipment to specialty heating systems, mesmerizing pool surfaces, and deck features, here’s a glimpse into the exciting innovations in pool technology and landscaping to consider for the upcoming year.
Smart Lighting Technology. Illuminate your pool with the latest in smart lighting technology. These systems allow for customizable color schemes, mood lighting, and even synchronized lighting effects that can be controlled effortlessly through mobile apps or voice commands.
Energy-Efficient Pool Equipment. Stay environmentally conscious and save on energy costs with the latest pool equipment innovations. Energy-efficient pumps, filters, and heaters are designed to optimize performance while minimizing energy consumption, contributing to both sustainability and savings.
Advanced Heating Systems. Embrace the luxury of specialty heating systems that extend your swimming season. Solar-powered heaters and advanced heat pumps are emerging as top choices, providing sustainable and efficient options to keep your pool comfortably warm even during cooler months.
Next-Gen Pool Surfaces. Explore innovative pool surfaces that go beyond traditional materials. High-tech surfaces like glass tiles, pebble finishes, and composite materials are gaining popularity for their modern appeal and longevity. New finishes, such as eco-friendly recycled glass and quartz, offer enhanced durability, resistance to staining, and a luxurious aesthetic. You can also choose from an expanded palette of colors and textures to suit your style. Maybe it’s time to give your pool a makeover!
Smart Pool Features. Incorporate smart features into your pool design, such as automated water level control, remote-controlled pool covers, and integrated water features. These additions not only enhance convenience but also contribute to a more enjoyable and customizable pool experience.
Fire and Water Elements. Merge the primal elements of fire and water for a truly captivating poolside ambiance. Fire bowls, pits, or fireplaces strategically placed around the pool area create a visually striking contrast while providing warmth during cooler evenings.
Innovative Decking Materials. Rethink poolside decking with innovative materials that combine aesthetics with functionality. Composite decking, recycled materials, and modular deck systems are making waves for their sustainability and ease of installation.
Smart Pool Landscaping. Elevate your pool area with smart landscaping. Automated irrigation systems, sensor-based plant care, and eco-friendly landscaping practices contribute to a harmonious and efficient outdoor space.
In 2024, pool owners have an array of exciting innovations to choose from, transforming their pools into not just aquatic retreats but sophisticated spaces that seamlessly blend technology, aesthetics, and sustainability. As we move into the future of swimming pool design and landscaping, these fresh ideas can turn your backyard oasis into a showcase of the latest in pool technology and style. Call us to discuss your vision, and we’ll help you make your backyard pool and landscaping dreams a reality.

As the design world evolves, so do the color palettes that shape our living spaces. In 2024, we’re set to witness a captivating fusion of timeless classics and vibrant hues, offering a versatile canvas for personal expression and creativity.
Earthy Elegance. While grays continue to hold their ground, a warm resurgence of brown is making its way back into our color schemes. Brown, with its earthy undertones, adds depth and sophistication, creating cozy and inviting atmospheres. It’s a nod to nature, emphasizing a connection to the organic elements in our surroundings.
Muted Tones with a Twist. Muted colors maintain their popularity this year but with a modern twist. Subdued hues like sage green, soft terracotta, and muted blush are gaining prominence. These tones evoke tranquility and provide a soothing backdrop for diverse design styles.
Bold Statements. In a departure from the understated tones of recent years, 2024 sees a resurgence of bold colors and jewel tones. Deep blues, rich emeralds, and opulent purples infuse spaces with a sense of luxury and drama. These daring choices are set to make a striking impact in various design elements.
Pantone Color of the Year 2024. With the selection of “Peach Fuzz” as the Color of the Year, Pantone has unveiled a color that embodies the essence of warmth and softness This delightful hue sits at the intersection of soothing pastels and vibrant warmth, reminiscent of the gentle glow that graces a summer sunset. Whether adorning interiors, fashion, or graphic design, Peach Fuzz carries a timeless elegance and a touch of whimsy, infusing spaces with a subtle charm that resonates with both familiarity and modernity. This color choice reflects a desire for optimism, nostalgia, and a harmonious blend of the contemporary and the classic in the year’s design landscape.
Tranquil Neutrals. Neutral palettes are not fading away; instead, they’re taking on a tranquil demeanor. Soft grays, warm taupes, and creamy whites create serene backdrops, allowing other elements in the space to shine. These neutrals provide a timeless foundation that complements various design aesthetics.
Metallic Infusions. Metallic accents continue to elevate color palettes, adding a touch of glamour and sophistication. Gold and brass remain popular choices, infusing spaces with a sense of opulence and refinement.
Nature-Inspired Greens. Greens inspired by nature are flourishing in 2024. Olive greens, forest hues, and botanical shades bring the outdoors in, promoting a sense of rejuvenation and harmony with the environment.
In the kaleidoscope of 2024’s color trends, the key lies in balance and personal expression. Whether you lean towards the warm embrace of earthy tones, the bold allure of jewel colors, or the tranquility of muted palettes, this year’s color trends invite you to infuse your living spaces with a spectrum of your own personal emotions and aesthetics. As you consider your landscape design, call us for a consultation. We can help you bring new colors and new life into your outdoor living spaces.

As you plan to create the perfect poolside oasis, the choice of pavers plays a crucial role in achieving both aesthetic appeal and practical functionality. Two popular options for pool decks are natural stone, such as travertine and limestone, and porcelain pavers. Let’s explore the benefits and drawbacks of each to help you make an informed decision.
Natural Stone Pavers
The benefits of natural stone pavers include:
Timeless Elegance. Natural stone pavers, particularly travertine and limestone, exude timeless elegance and charm. Their unique patterns and earthy tones can effortlessly complement various pool designs, creating a luxurious and inviting atmosphere.
Cool to the Touch. One significant advantage of natural stone is its ability to remain cool even under the scorching sun. This makes it a comfortable surface for bare feet, enhancing the overall poolside experience.
Durability. Well-maintained natural stone can withstand the test of time. It’s resistant to fading, and when sealed properly, it becomes less porous, reducing the risk of damage from pool chemicals and water exposure.
Of course, few materials are perfect for every situation. The drawbacks of natural stone pavers include:
Cost. The initial cost of natural stone pavers, particularly high-end varieties like travertine, can be higher compared to porcelain. This may impact the overall budget for your poolside project.
Maintenance. Natural stone requires periodic sealing to maintain its integrity. Additionally, it may be more susceptible to staining from oils, leaves, or other debris around the pool area.
Porcelain Pavers
The benefits of porcelain pavers include:
Versatility in Design. Porcelain pavers offer a wide range of design options, mimicking the appearance of natural stone, wood, or even concrete. This versatility allows homeowners to achieve the desired aesthetic without compromising on durability.
Low Maintenance. Porcelain is known for its low-maintenance characteristics. It is resistant to staining and fading and requires minimal sealing. This makes it an excellent choice for those seeking a hassle-free poolside surface.
Cost-Effective Options. While high-end porcelain can be comparable in price to natural stone, there are cost-effective options that still provide durability and aesthetic appeal.
Drawbacks of porcelain pavers include:
Temperature Sensitivity. Porcelain pavers may absorb and retain heat, potentially making them uncomfortable to walk on during hot summer days. Choosing lighter-colored porcelain can mitigate this issue to some extent.
Lack of Natural Variation. While porcelain can mimic the appearance of natural stone convincingly, some homeowners prefer the authenticity and uniqueness of genuine stone.
The choice between natural stone and porcelain pavers depends on your priorities and budget. If you value the timeless beauty of natural stone and are willing to invest in maintenance, it can be an excellent choice. Call us as you consider your swimming pool design, and we can help you explore the different options for creating the backyard pool of your dreams.

‘Tis the season for decking the halls with festive greenery, and as you adorn your home with Christmas plants, it’s crucial to ensure they stay vibrant and fresh until the big day. When you care for seasonal plants appropriately, you can ensure that your festive decorations stay bright and fragrant throughout the season.
Nurturing Your Christmas Tree. For those who opt for a traditional Christmas tree, the key to longevity lies in proper hydration. Ensure the tree is freshly cut at the base before placing it in a water-filled stand. This initial cut opens up the tree’s vessels, allowing it to absorb water more efficiently. Keep the stand consistently filled with water, checking it daily to prevent the base from drying out. Position the tree away from heat sources like radiators and fireplaces to maintain its freshness and keep your family safe.
Caring for Potted Greenery. If you’ve chosen potted greenery like miniature evergreens or spruce, provide them with a suitable environment. Place the pots in well-draining containers and water them when the topsoil feels dry to the touch. Keep them in indirect sunlight to mimic their natural outdoor habitat. Consider misting the foliage occasionally to maintain humidity, especially if your indoor space tends to be dry due to heating.
Keeping Poinsettias Fresh. Poinsettias, with their vibrant red bracts, are iconic Christmas plants. To keep them looking their best, place them in a location with bright, indirect sunlight. Be mindful of drafts and extreme temperature changes, as poinsettias are sensitive to both. Water them thoroughly but allow the soil to dry out slightly between watering sessions. If you receive a poinsettia wrapped in foil, ensure there are drainage holes or remove the foil to prevent waterlogging. Remember that once the holidays are finished, poinsettias can be planted in an area of your yard that receives indirect sunlight.
Mindful Maintenance. Regardless of the seasonal plants you choose, regular maintenance is essential. Remove any spent or yellowing leaves to encourage healthy growth. Wipe down the leaves to remove dust, which can inhibit the plant’s ability to absorb light. Keep an eye out for pests and treat them promptly to prevent infestations from spreading.
By adopting these simple practices, you can ensure that your Christmas plants stay lush and vibrant throughout the holiday season. And as always, remember we’re here to discuss ideas for your landscape design. If you’re dreaming of a new garden or other addition to your yard in the new year, we can help make that wish come true.

No matter how you feel about your Elf on the Shelf, one thing is for sure: The kids expect him to move periodically. Parents can get a bit bored or overwhelmed, trying to think of increasingly imaginative pranks to play with their elves. This holiday season, why not add a touch of nature to your festive traditions by giving the classic Elf on the Shelf a green makeover?
Embrace the beauty of the outdoors with nature-themed setups that not only bring joy to your home but also celebrate the wonders of the environment. Here are some creative ideas to infuse creativity into your Elf on the Shelf tradition.
Garden Gnome Gathering. Transform your Elf into a miniature garden gnome surrounded by tiny potted plants, succulents, and fairy lights. Create a whimsical scene where the mischievous elf is hosting a secret gathering of garden sprites, adding a touch of enchantment to your indoor greenery.
Recycled Wonderland. Craft a magical landscape using recycled materials. Turn empty cardboard rolls into miniature trees, fashion a tiny sled from old popsicle sticks, and let your elf embark on an eco-friendly adventure through a winter wonderland made entirely from repurposed items. Bonus: It’s a delightful way to teach kids about the importance of recycling.
Elf Farmer’s Market. Transform your kitchen or dining area into an elf-sized farmer’s market. Place your elf amidst an array of mini fruits, vegetables, and herbs. Use tiny baskets made from recycled materials to display the elf’s harvest, creating a scene that promotes the beauty of locally sourced and sustainable produce.
Botanical Retreat. Give your Elf a serene escape by creating a miniature botanical retreat. Set up a tiny hammock between houseplants, use mini fairy lights to illuminate the space, and let your elf enjoy a moment of tranquility surrounded by the lush greenery. It’s a great way to remind everyone of the importance of connecting with nature.
Pollinator Paradise. Highlight the significance of pollinators in our ecosystem by turning your Elf into a guardian of the garden. Place your elf next to flowers, fruits, and a small bee or butterfly figurine. This setup not only looks charming but also serves as a gentle reminder of the role these pollinators play in sustaining our environment.
As you embark on this eco-friendly Elf on the Shelf adventure, remember that the magic is in the details. By incorporating nature and environmental themes, you not only enhance the holiday spirit but also instill a love for the environment in the hearts of your family, making this festive season both magical and meaningful.

The holiday season is upon us, and as we deck the halls with boughs of holly, there’s a revolution taking place in the world of Christmas lights. This year, it’s all about embracing cutting-edge technology to make your festive decor truly dazzling. One of the most exciting trends is the integration of professional low-voltage lights with the latest color-changing LED technology.
Traditionally, Christmas lights have always been a simple affair, with static bulbs in red, green, and white twinkling merrily through the winter night. However, technological advancements have transformed this humble decoration into a dynamic and customizable spectacle. Enter color-changing LED lights – a game-changer for holiday decor.
The beauty of color-changing LED lights lies in their versatility. With a spectrum of vibrant hues at your fingertips, you can create a mesmerizing display that evolves throughout the season. From warm and inviting golds and reds to cool and tranquil blues and greens, the possibilities are endless. You can even sync these lights with music, allowing you to choreograph a festive light show right in your front yard!
For those who have invested in professional low-voltage lights for year-round landscaping, integrating them into your Christmas light display is a seamless transition. Many manufacturers now offer color-changing options in low-voltage designs, ensuring that your existing setup can easily become part of the holiday magic.
Start by assessing your current low-voltage lighting system and identifying areas where you can introduce color-changing LED elements. Whether it’s outlining your walkway, accentuating architectural features, or framing windows, these versatile lights can be incorporated seamlessly. Mixing and matching warm and cool tones can add depth and dimension to your display, creating a visually stunning panorama.
To take it a step further, consider investing in smart lighting systems that allow you to control your Christmas lights with a smartphone or voice commands. This level of automation not only adds a modern touch to your holiday setup but also enhances the overall convenience of managing your festive landscape lighting.
This year, make your home the talk of the neighborhood with a Christmas light display that combines tradition with innovation, creating memories that will last a lifetime. For more information on low-voltage LED landscape lighting, call our office to discuss your ideas.
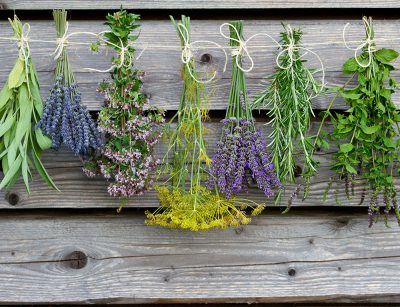
As the chill of winter descends, there’s nothing quite like cozying up with a warming cocktail in hand. To take your winter libations to the next level, consider incorporating seasonal plants, herbs, and mulling spices into your drinks. These additions not only impart unique flavors but also add a touch of elegance to your beverages. Here are some ideas to help you create extraordinary winter cocktails.
Seasonal Plants and Herbs
Rosemary. This fragrant herb adds a delightful piney aroma and flavor to your cocktails. A rosemary-infused simple syrup is perfect for crafting herbal concoctions. Pair it with citrus and gin for a refreshing winter drink.
Thyme. Thyme is another herb that shines in winter cocktails. Muddle a few sprigs with sugar and combine them with bourbon or rye for a warming, herbal Old Fashioned.
Sage. Sage’s earthy and slightly peppery notes make it an excellent choice for wintertime. Try a sage-infused vodka or gin in a martini, or simply garnish your drinks with a fresh sage leaf.
Lavender. Lavender syrup can be used to create elegant and floral cocktails. Mix it with champagne, gin, or vodka for a sophisticated, aromatic sip.
Mint. While typically associated with summer, mint can also add a refreshing twist to winter cocktails. Muddle it with warming spirits like rum or whiskey for a delightful contrast of flavors.
Mulling Spices
Mulling spices are a classic addition to winter beverages, bringing warmth and depth to your drinks. Here’s how you can incorporate them:
Mulled Wine. Simmer red wine with mulling spices, citrus slices, and a touch of honey. The result is a comforting, spiced wine that’s perfect for chilly evenings.
Hot Apple Cider. Transform ordinary apple cider into a cozy treat by adding mulling spices. A cinnamon stick, cloves, and a hint of nutmeg can turn a simple glass of cider into a delightful winter warmer.
Spiked Chai. Make a spiced chai cocktail by infusing your favorite spirit with chai spices. Combine it with cream or milk for a rich, comforting drink.
Hot Toddy. A classic hot toddy is an excellent canvas for mulling spices. Warm whiskey, honey, lemon juice, and mulling spices for a soothing, aromatic sip.
Mulled Beer. For something a bit different, consider mulling beer with spices and a hint of citrus. This unique twist on a winter brew is sure to surprise and delight your taste buds.
By incorporating seasonal plants, herbs, and mulling spices into your winter cocktails, you’ll elevate your drink game and create a memorable experience for your guests. These flavors and aromas will not only warm your body but also infuse your gatherings with a touch of winter magic. So, as the snow falls and the fire crackles, enjoy the art of crafting next-level cocktails that capture the essence of the season.

Late autumn and early winter in Southern California might not bring the same freezing temperatures as other parts of the country, but that doesn’t mean your garden doesn’t need some attention. This transitional period is a great time to prepare your yard for the cooler months and enjoy some outdoor activities. Here are some essential tasks and fun garden activities for Southern California during this time of the year.
Yard Preparation
Clean Up Fallen Leaves. Though SoCal doesn’t experience the same intense foliage drop as other regions, it’s essential to clear away fallen leaves from lawns and garden beds. A layer of leaves can inhibit sunlight and promote mold growth.
Trim and Prune. Late autumn is an ideal time to trim and prune trees and shrubs while they’re dormant. This will help maintain their shape and health while reducing the risk of overgrowth.
Plant Cool-Season Vegetables. Southern California’s mild winters provide an excellent opportunity to grow cool-season vegetables such as lettuce, spinach, kale, and broccoli. Prepare your garden beds and sow the seeds for a fresh harvest.
Mulch and Soil Amendment. Add a layer of mulch to insulate your garden’s soil. Additionally, amend the soil with compost to improve its quality and nutrient content.
Protect Sensitive Plants. If you have sensitive plants that are vulnerable to cooler temperatures, consider covering them with frost cloth or moving them to a more sheltered location.
Garden Activities
Bulb Planting. Late autumn is the perfect time to plant spring-flowering bulbs like tulips, daffodils, and hyacinths. They’ll remain dormant during the winter and burst into vibrant color in spring.
Build Compost Bins. If you haven’t already, consider building compost bins in your garden. Composting can be a year-round activity in SoCal and provides nutrient-rich soil for your garden.
Garden Art Projects. Get creative with garden art projects, such as painting pots, crafting birdhouses, or designing stepping stones. These projects can add a personal touch to your garden and make it a fun and welcoming space.
Wildlife-Friendly Garden. Enhance your garden’s appeal to local wildlife by adding bird feeders, bird baths and planting nectar-rich flowers. It’s a great way to enjoy the natural beauty of the region.
Garden Tours. Explore local botanical gardens and garden tours to get inspiration for your own landscape. Many of these locations have seasonal displays that can spark your creativity.
Late autumn and early winter are unique in Southern California because they offer opportunities to work in the garden year-round. Take advantage of the mild climate to prepare your yard for the cooler months and enjoy garden activities that let you appreciate the beauty of your outdoor space. And as always, remember to call us and discuss your ideas. We can help you redesign your landscape to incorporate the garden of your dreams.

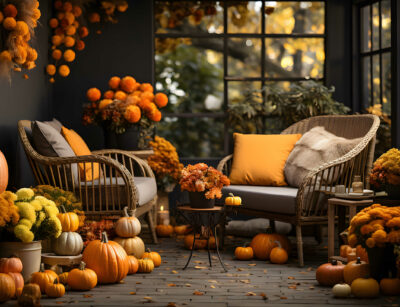
Thanksgiving is a time to gather with loved ones and give thanks for the bountiful harvest of the season. It’s also an opportunity to get creative with your decorations, adding a touch of nature and warmth to your table, home, and yard. This year, why not embrace the beauty of living plants, gourds, and pumpkins for your Thanksgiving decor? Here are some inspiring ideas to help you infuse your celebration with the spirit of the season.
Table Decorations
Pumpkin Centerpiece Choose a variety of pumpkins and gourds in different shapes and sizes. Arrange them as a centerpiece, nestled amidst a bed of fresh greenery, such as eucalyptus, pine branches, or fall leaves. You can even paint or carve some of the pumpkins for an extra creative touch.
Living Plant Accents. Small potted plants like succulents or herbs make fantastic place cardholders. Wrap each pot with a rustic ribbon and attach a handwritten name tag for a personalized touch.
A cornucopia of Blooms. Create a horn of plenty by filling a cornucopia-shaped basket with fresh flowers, seasonal fruits, and small gourds. This iconic symbol of abundance will beautifully adorn your Thanksgiving table.
Home Decorations
Gourd Garland. Craft a garland using dried gourds, pumpkins, and fall leaves. String them along your mantle, banister, or doorways to infuse your home with an autumnal charm.
Wreaths of Welcome. Decorate your front door with a wreath made from pumpkins, gourds, and fall foliage. It’s a delightful way to greet your guests and set the tone for your Thanksgiving celebration.
Living Wall Art. Hang wooden crates or shelves on your walls and fill them with potted plants, succulents, or air plants. This not only adds a touch of greenery to your home but also gives it a cozy, natural feel.
Yard Decorations
Pumpkin Pathway. Line your walkway or garden path with pumpkins and gourds. Illuminate them with tea lights or small LED candles to guide your guests to the front door in a warm and inviting way.
Harvest-Themed Planters. Decorate your outdoor planters with a variety of fall flowers, such as mums, asters, and ornamental kale. Pair them with gourds and pumpkins for a splendid display that embodies the harvest season.
Thanksgiving Tree. Set up a “Thanksgiving tree” in your yard, just as you would for Christmas. Hang notes of gratitude from the branches, and let the tree serve as a reminder of the things you’re thankful for.
Embracing the use of living plants, gourds, and pumpkins in your Thanksgiving decorations not only adds a touch of natural beauty but also reflects the essence of the holiday. It’s an opportunity to get creative, celebrate the harvest, and create a warm and inviting atmosphere for your family and friends. As you gather around the table, within your beautifully decorated home, or while taking a stroll through your yard, you’ll truly feel the spirit of Thanksgiving come to life

When it comes to the world of edible plants, most people think of fruits, vegetables, and herbs. But did you know that there are several unexpected and exotic plants right in your garden that are not only pleasing to the eye but also pleasing to the palate? Let’s take a journey through some of these surprising edible plants that you might not have expected.
Plumeria. Known for their fragrant and vibrant flowers, Plumeria plants are often seen in tropical gardens and as ornamental plants. However, you can eat the flowers! Plumeria flowers have a slightly sweet taste, making them a unique addition to salads, desserts, or even as a garnish. Just be sure to remove the bitter white sap from the petals before consuming.
Water Lily. The elegant water lily floats on the surface of ponds and adds a touch of serenity to your garden. Beyond its aesthetic appeal, water lily leaves and flowers are edible. They have a mild, slightly nutty flavor and can be used in salads, stir-fries, or even deep-fried for a crispy treat.
Canna Lily. Canna lilies are known for their vibrant foliage and striking flowers, but they also have edible parts. Both the young shoots and the rhizomes (underground stems) are edible. The shoots can be cooked like asparagus, and the rhizomes can be boiled, mashed, or roasted, offering a starchy component to your meals.
Bougainvillea. Bougainvillea is renowned for its vibrant and colorful bracts that surround its inconspicuous flowers. While the bracts themselves aren’t edible, the flowers and young leaves can be used in salads or as a garnish. They add a subtle, slightly earthy flavor to your dishes.
Nasturtium. Though not as uncommon as the others on this list, Nasturtium is still a plant many may not know is edible. Both the flowers and leaves have a peppery, slightly spicy taste, making them a unique addition to salads, or you can even pickle the seeds as a substitute for capers.
Hosta. Hosta plants are popular for their lush foliage, but did you know that the young shoots are edible? They have a mild flavor and can be used in various dishes, from stir-fries to soups.
Daylily. Daylilies offer more than just their vibrant blooms. The flower buds and petals are edible, with a sweet, crunchy texture. They can be used in salads, stir-fries, or as a garnish.
These unexpected edible plants can transform your garden into a culinary treasure trove. However, it’s essential to be certain of the edibility and any specific preparation requirements for these plants before consuming them. With the right knowledge, you can turn your garden into a source of unique and delightful culinary experiences. For guidance on incorporating these surprisingly edible plants into your yard, call us for more input on designing the landscape of your dreams.
Fall is the season of bountiful harvests, vibrant colors, and festivities. If you’re looking to embrace the spirit of autumn and make the most of your garden, growing pumpkins, gourds, squash, and decorative fall corn is a fantastic idea. Let’s dive into how you can cultivate these seasonal delights at home and discover creative ways to use the surplus.
Planting. Choose a well-drained area with plenty of sunlight for planting. These plants love warmth and sunlight.Start seeds indoors about 2-4 weeks before the last expected frost date, then transplant them outdoors after the frost has passed.
Soil and fertilization. Ensure the soil is rich, well-draining, and slightly acidic. Incorporate compost or well-rotted manure for better fertility. Fertilize at planting and during the growing season to promote healthy growth.
Watering. Pumpkins, gourds, squash, and corn need consistent moisture, especially during the flowering and fruiting stages. Water deeply when the soil is dry.
Pest control. Monitor for common garden pests like aphids, squash bugs, and powdery mildew. Use organic insecticides or neem oil to protect your plants.
Harvesting. Harvest pumpkins and squash when they have a deep color and a hard rind. Gourds can be collected once they have fully matured and dried on the vine. As for decorative fall corn, harvest it when the husks are dry and the kernels are hardened.
“What do I do with all of these gourds?!”
Pumpkins, squash, decorative gourds and fall corn can surprise the beginner gardener with an overwhelming abundance of fresh produce. Sometimes these crops just really take off and take over your yard! So then you might be wondering what to do with all of it.
Create decorative displays. Arrange the gourds, pumpkins, squash, and fall corn in decorative displays on your porch, entryway, or dining table to add a festive touch to your home.
Make autumn wreaths. Create autumn wreaths by incorporating dried gourds, mini pumpkins, and corn husks. Hang them on your front door to welcome fall.
Craft seasonal centerpieces. Hollow out small pumpkins and gourds to use as natural vases for floral centerpieces. Fill them with autumn blooms for a rustic look.
Consider other home décor. Paint or decorate pumpkins and gourds with your family, turning them into fun and colorful pieces of home decor.
Make homemade bird feeders. Hollow out larger gourds and fill them with birdseed. Hang them in your garden to attract birds and add a charming touch to your outdoor space.
Whip up culinary delights. Utilize surplus pumpkins and squash for delicious fall recipes like soups, pies, bread, or roasted vegetables. Pinterest will give you more ideas than you can use in a lifetime!
Preserve your corn. Preserve decorative fall corn by drying it and using it in future crafting projects or as natural fall decor.
Give them as gifts. Any of the above ideas also make terrific gifts for an autumn-loving friend or neighbor.
Donate to a food bank. Any edible pumpkins or gourds will be much appreciated by your local food bank. Food banks often report that they already have plenty of peanut butter and canned goods, and would love to distribute more healthy fresh produce to their clients.
Embrace the beauty of the season by cultivating your own fall garden. With a little effort and creativity, you can turn your harvest into stunning decorations and delightful culinary treats. Happy gardening and happy harvesting! And as always, we’re here for you if you have questions about creating a garden space within your landscaping.
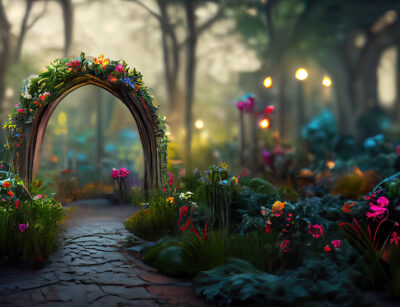
Literature has a beautiful way of transporting us to different worlds, and what better setting than a garden to evoke feelings of wonder, tranquility, and growth? There are several renowned book series that capture the charm of gardens as their backdrop, inviting readers into lush, magical realms. Let’s explore a couple of these enchanting book series and delve into the essence of an ideal outdoor reading space.
The Secret Garden by Frances Hodgson Burnett
Perhaps the epitome of a literary garden, The Secret Garden’s imagery is etched in the hearts of readers. This timeless classic unfolds the tale of Mary Lennox and her discoveries within a hidden, neglected garden. The garden’s transformation parallels the growth and healing of its young caretakers.
The Signature of All Things by Elizabeth Gilbert
Set in the 18th and 19th centuries, this novel follows Alma Whittaker’s life as a botanist. The story takes readers on a journey through various gardens, illustrating Alma’s deep connection with the natural world and her thirst for knowledge.
The Tale of Peter Rabbit by Beatrix Potter
Beatrix Potter’s beloved series, centered around the adventures of Peter Rabbit and his woodland friends, often features lush gardens where these anthropomorphic characters live and play. The gardens are portrayed as enchanting places filled with magic and life.
Creating the Ideal Outdoor Reading Space
Comfortable seating. Choose a comfortable seating arrangement that aligns with your taste and space. Whether it’s a cozy bench, a swinging hammock, or a plush chair, your seating should invite you to linger and lose yourself in the pages of your book.
Shade and shelter. Incorporate shade elements like umbrellas, pergolas, or trees to provide protection from the sun and create a pleasant reading environment. Shelter allows you to read during different weather conditions.
Natural surroundings. A garden reading space should be in harmony with nature. Surround yourself with plants, flowers, and greenery to breathe in the freshness and experience the serenity that a garden offers.
Good lighting. If you enjoy reading outdoors in the evening, ensure adequate lighting. Soft, ambient lighting such as string lights or lanterns can add a magical touch to your outdoor reading nook.
Personal touch. Customize your reading space with personal touches like decorative cushions, a side table for your beverage or snacks, and perhaps a small bookshelf or a basket to hold your favorite reads.
Creating an inviting outdoor reading space allows you to escape into the world of books while immersing yourself in the beauty and tranquility of a garden. Whether you’re embarking on a literary adventure or simply seeking solace in a captivating tale, the backdrop of a garden elevates the reading experience. To elevate your own experience right in your backyard, contact us about landscaping ideas that will help you create the perfect reading nook.

The invigorating thrill of a polar plunge isn’t limited to chilly lakes or frosty oceans; you can bring the exhilarating experience to your home’s outdoor space. Whether it’s a plunge pool, cold tub, or an ice bath, incorporating this icy adventure into your personal retreat requires careful planning. Let’s explore the space and design considerations, and understand the motivation behind taking a dip in freezing water.
Space Considerations
- Size and location; assess the available space in your outdoor area to determine the appropriate size and location for your plunge setup. It should fit comfortably while allowing easy access and privacy.
- Access to cold water; ensure you have a reliable and accessible source of cold water to fill your plunge pool or tub. This could be from a garden hose, outdoor tap, or any other appropriate water source.
Polar Plunge Design Considerations
Plunge pool vs. cold tub. Decide between a plunge pool and a cold tub based on your preferences and available space. Plunge pools are larger and offer more of a swimming experience, while cold tubs are more compact, perfect for a quick plunge.
Material selection. Choose durable, weather-resistant materials like stainless steel, concrete, or high-grade plastics for your plunge pool or tub. These materials can withstand extreme temperatures and ensure longevity.
Insulation and cover. Opt for proper insulation to maintain the water temperature effectively. A good-quality cover will help conserve energy and keep the water clean when not in use.
Safety measures. Implement safety features such as sturdy steps or a ladder for easy entry and exit, non-slip flooring, and sufficient lighting to ensure safety during those chilly dips.
Why Do People Do Polar Plunges?
Health benefits. Taking a plunge in cold water can boost the immune system, improve circulation, and stimulate the production of endorphins. It can also reduce inflammation, making it popular among athletes for post-workout recovery.
Stress relief and mental well-being. Cold water immersion is known to reduce stress levels and anxiety, leaving you with a sense of rejuvenation and mental clarity. The shock of cold water can also trigger the “fight-or-flight” response, releasing adrenaline and making you feel more alert.
Community and tradition. Many communities and individuals partake in polar plunges as a tradition, often associated with charity events or cultural celebrations. It’s a way to bring people together, create memorable experiences, and support a cause.
Incorporating a polar plunge into your outdoor space is an adventurous way to embrace the chill, boost your health, and infuse vitality into your routine. The icy plunge is more than just a dip; it’s a plunge into rejuvenation and a refreshing embrace of the invigorating cold! So, take the plunge and revel in the revitalizing benefits that this chilling adventure brings. And as always, call us to discuss your landscaping ideas so that we can offer professional input and guidance.
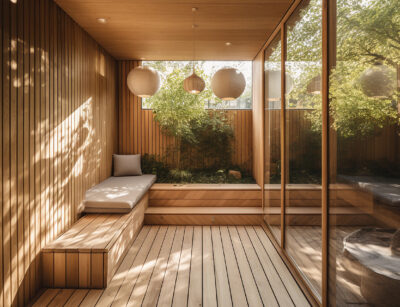
Are you dreaming of a tranquil retreat in the comfort of your home? Imagine a cozy space where you can unwind, relax, and rejuvenate at your convenience. Well, you can turn this dream into a reality by installing a personal sauna, right in the heart of your outdoor space. Let’s explore the key aspects of installing your own sauna and why it’s a fantastic idea!
Space Considerations
First things first—space! When opting for an outdoor sauna, you need to consider the available space in your backyard or garden. Saunas are available in different sizes, depending upon number of users and personal preferences for space and shape, so first determine which type of sauna you want.
The sauna should fit seamlessly into your outdoor environment. Measure the area to ensure the sauna will comfortably fit, allowing for ample space around for accessibility and landscaping.
Design Considerations
- Sauna type; choose the type of sauna you want. Traditional saunas use dry heat generated by rocks or electric heaters, while infrared saunas use infrared heaters to directly warm the body. Your choice should align with your preferences and wellness goals.
- Material selection; the material you choose will impact the aesthetics, durability, and maintenance of your sauna. Common materials include cedar, hemlock, and redwood due to their natural resistance to moisture and insects. Opt for materials that complement your outdoor space.
- Ventilation and insulation; proper ventilation and insulation are essential for a functional and efficient sauna. Good ventilation ensures the circulation of fresh air, while insulation helps maintain a consistent and comfortable temperature inside.
- Interior design; design the interior for comfort and relaxation. Incorporate benches, backrests, and appropriate lighting to create a soothing ambiance. You can also personalize it with your favorite aromatherapy scents and calming music.
Why Install Your Own Sauna
- Wellness and relaxation; having a sauna at home provides you with an opportunity to prioritize your health and well-being. Saunas are known to promote relaxation, alleviate stress, improve circulation, soothe muscles, and aid in detoxification.
- Convenience and privacy; with a personal sauna, you have the luxury of enjoying a spa-like experience at any time that suits you. No need to travel to a public facility; your relaxation oasis is right outside your door. Plus, you have the privacy to unwind without any interruptions.
- Increased property value; installing a sauna can add value to your property. Potential homebuyers often view personal saunas as an attractive feature, especially when integrated well into the outdoor living space.
Incorporating a personal sauna into your outdoor space is more than just an installation—it’s a lifestyle upgrade. It’s about creating a space where you can escape the hustle and bustle of daily life, finding solace and rejuvenation whenever you need it. So, start planning your sauna oasis and indulge in the ultimate relaxation experience, right in your backyard! Give us a call to discuss your vision, and we’ll help you design a relaxing and healing outdoor space.
Your fence serves as a silent sentinel, guarding your property and enhancing its aesthetic appeal. However, fences, like all outdoor structures, require regular maintenance to withstand the test of time and the elements. In this blog, we’ll explore how to maintain different types of fences, including wood, vinyl, painted metal, and cable rail style, and provide insights on when it’s time to remove and replace them.
Wooden Fences: Beauty in Nature
Wooden fences lend a rustic charm to your property, but they are susceptible to weathering and pests. Here’s how to maintain them:
Cleaning: Regularly clean your wooden fence with a mild detergent and water to remove dirt and mildew. Use a power washer for stubborn stains, but be cautious not to damage the wood.
Sealing and Staining: Apply a wood sealer or stain every 2-3 years to protect against moisture and UV rays. Sand any rough spots before sealing.
Repairs: Promptly fix loose boards, nails, or screws to prevent further damage.
Vinyl Fences: Low Maintenance Elegance
Vinyl fences are low-maintenance but still require some care:
Cleaning: Wash with soapy water and a soft brush to remove dirt and mildew. Avoid abrasive cleaners that may scratch the surface.
Repairs: Address any cracks or damage promptly to prevent further deterioration.
Painted Metal Fences: Durability Meets Style
Metal fences, when painted, offer durability and style. Maintenance includes:
Repainting: Over time, the paint may chip or fade. Repaint as needed to maintain the finish.
Rust Prevention: Inspect for rust spots, especially in coastal areas. Remove rust with a wire brush and apply a rust-resistant primer and paint.
Cable Rail Style Fences: Modern Aesthetics
Cable rail style fences are sleek and modern, but they require a different kind of care:
Cleaning: Regularly wipe down cables and posts to remove dirt and grime. A mild detergent solution can be used for stubborn spots.
Tension Inspection: Check cable tension periodically, ensuring they remain secure and properly tensioned.
When to Remove and Replace
Despite your best efforts, there may come a time when fence maintenance is no longer viable, and replacement is the only option. Signs it’s time to remove and replace your fence include:
Extensive Damage: If your fence has sustained significant structural damage, it may be beyond repair. This includes severe rot, warping, or corrosion.
Safety Concerns: If the fence poses a safety hazard, especially if it’s leaning or unstable, it’s time to replace it.
Excessive Maintenance Costs: If the cost of repairs and maintenance becomes prohibitive, investing in a new fence may be more economical in the long run.
Aesthetic Considerations: If you want to update your property’s look or the fence style no longer complements your home, replacing it with a more suitable option is a wise choice.
Maintaining your fence is essential to prolong its lifespan and preserve its functionality and beauty. Different fence materials require specific care, from cleaning to sealing, repainting to cable tension checks. Regular inspections and prompt repairs are key to fence longevity.
However, when extensive damage, safety concerns, high maintenance costs, or changing aesthetics come into play, it’s time to consider the removal and replacement of your fence to ensure your property remains secure, attractive, and well-maintained. Call us if you believe it’s time for a replacement or upgrade, and we will discuss your options in greater detail.

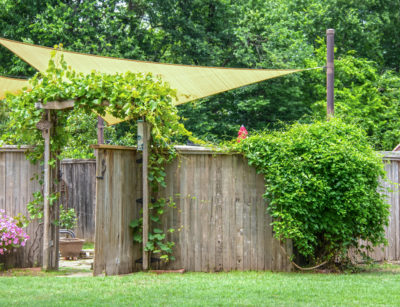
Clinging vines, such as the elegant creeping fig and the classic Boston ivy, can transform a drab wall or fence into a lush green masterpiece. These vines are not only aesthetically pleasing but also provide valuable shade and insulation. In this blog, we’ll guide you through the process of growing and maintaining clinging vines and even offer advice on removal if you’ve inherited them and they’re not to your liking.
Getting Started: Planting and Growing Clinging Vines
- Choose the Right Location: Clinging vines thrive in locations with partial to full sun. Ensure your chosen spot receives adequate sunlight.
- Soil Preparation: Ensure the soil is well-draining and fertile. Adding organic matter like compost can improve soil quality.
- Planting: Depending on the vine’s size, dig a hole large enough to accommodate the root ball. Plant it at the same depth it was in its nursery container.
- Watering: Provide regular, consistent watering to establish the vine. Once established, they are generally drought-tolerant.
- Support Structures: Install trellises, wires, or other support structures for the vines to cling to. Make sure these structures are sturdy and can bear the weight of the mature vine.
Ongoing Maintenance: Nurturing Your Clinging Vines
Pruning Your Clinging Vines
Regular pruning is essential to keep the vines in check. Trim excess growth to maintain the desired shape and prevent them from becoming invasive.
Fertilizing Your Clinging Vines
Fertilize once a year in the spring with a balanced, slow-release fertilizer to provide essential nutrients.
Pest and Disease Control for Clinging Vines
Keep an eye out for pests like aphids or scale insects. Treat infestations promptly with insecticidal soap or neem oil.
Winter Care for Clinging Vines
In colder climates, protect your clinging vines during the winter by mulching around the base and wrapping the vines with burlap or frost cloth.
Unwanted Clinging Vines: Removal Options
Sometimes, you might inherit clinging vines when you buy a house, and they might not align with your preferences. Here’s how to remove them:
- Hand Pruning: Trim the vines at the base near the ground. Be prepared for persistent regrowth, as some vines may re-emerge.
- Chemical Removal: You can use herbicides specifically designed for woody vines, following the manufacturer’s instructions carefully. Be cautious when using chemicals, as they can harm other nearby plants.
- Mechanical Removal: If you’re dealing with a large, established vine, consider using a chainsaw or similar equipment to cut it down. Be cautious and ensure safety during this process.
- Professional Help: If the vine is deeply rooted or poses structural risks to your property, it’s wise to hire a professional landscaper or arborist to safely remove it.
Clinging vines can be a beautiful addition to your landscape if cared for properly. Whether you’re growing them from scratch or inherited them and wish to remove them, understanding the basics of their care and maintenance is essential. With the right approach, you can enjoy the beauty of clinging vines or reclaim your outdoor space according to your preferences. Call us to discuss your ideas, and we can help you include clinging vines in your landscape plan.

In a world where wellness is gaining more importance, there’s a growing appreciation for all things natural, including our beverages. Enter botanical mocktails – delightful and refreshing concoctions that celebrate the vibrant world of plants and herbs. In this blog, we’ll explore the art of crafting botanical mocktails, celebrating flavors and aromas from the garden to your glass.
What are Botanical Mocktails?
Botanical mocktails are non-alcoholic drinks infused with the essence of various herbs, fruits, flowers, and spices. They offer a sensory experience that is both visually and palate-pleasing. With a focus on fresh, natural ingredients, they are the perfect choice for those looking for a healthier, non-alcoholic alternative.
The Beauty of Botanical Ingredients
The magic of botanical mocktails lies in the diversity of ingredients you can use. Here are some examples to get your creative juices flowing:
Lavender: Known for its calming properties, lavender adds a subtle floral note to your mocktail. Try a lavender lemonade for a soothing and refreshing drink.
Mint: Fresh mint leaves add a burst of coolness and can transform a regular iced tea into a revitalizing herbal mocktail.
Rosemary: Infuse your mocktail with rosemary for an earthy, pine-like flavor. It pairs wonderfully with citrus and berries.
Basil: This aromatic herb elevates mocktails with its sweet and slightly peppery taste. A strawberry basil smash is a crowd-pleaser.
Hibiscus: Hibiscus petals lend a vivid red hue and tartness to your drinks. Hibiscus iced tea with a touch of honey is a tangy delight.
Berries: Blueberries, raspberries, and strawberries bring natural sweetness and vibrant colors. Create a berry-infused spritzer or smoothie.
Citrus: Lemon, lime, and orange add zesty brightness. A citrus and thyme cooler is a perfect refresher on a hot day.
DIY Botanical Mocktail Recipes
Lavender Lemonade:
Ingredients: 1 cup of freshly squeezed lemon juice, 1/2 cup of honey or agave nectar, 2-3 sprigs of fresh lavender, and 4 cups of water.
Instructions: Mix lemon juice, honey, and water. Bruise lavender sprigs gently and add them to the mixture. Let it steep in the fridge for at least an hour. Remove lavender before serving.
Minty Green Iced Tea:
Ingredients: 4-5 green tea bags, 1/2 cup fresh mint leaves, 4 cups of water, and honey (optional).
Instructions: Steep green tea bags and mint leaves in hot water for 5 minutes. Let it cool, add honey if desired, and serve over ice.
Rosemary Citrus Fizz:
Ingredients: 1 cup of fresh orange juice, 1/2 cup of fresh lemon juice, 2 sprigs of fresh rosemary, soda water, and ice.
Instructions: Muddle rosemary in a glass, add citrus juices, and top with soda water. Add ice and garnish with a rosemary sprig.
With botanical mocktails, you’re not only treating your taste buds but also your senses and well-being. Experiment with different combinations, discover your favorites, and raise a toast to the beauty of nature. Contact us for more information on a garden installation, if you’d like to also grow your own ingredients!
When it comes to exercise, we often think of hitting the gym or going for a run, but have you considered taking the plunge into pool exercise? Pools offer a unique and refreshing way to stay active, and they’re suitable for people of all ages and abilities. In this blog, we’ll explore the benefits of pool exercise, provide age-specific best practices, share fun activities for kids, and offer exercises tailored to individuals with unique needs like arthritis. Plus, we’ll discuss how to use your existing pool for exercise, even if it isn’t a traditional lap pool.
Why Pool Exercise? Pool exercise offers numerous advantages. The buoyancy of the water reduces impact on joints, making it ideal for people with arthritis or joint pain. It provides resistance, which helps build and tone muscles. Additionally, the water’s cooling effect keeps you comfortable even during intense workouts. Here’s how to make the most of it, regardless of your age or physical condition.
Best Practices by Age
Children: Encourage kids to develop a love for water and exercise early on. Water aerobics, pool games like Marco Polo, or swimming lessons are excellent options. Ensure safety by supervising them at all times.
Adults: For adults, water aerobics, water walking or jogging, and swimming laps are great choices. Aim for at least 150 minutes of moderate-intensity exercise per week, as recommended by health experts.
Seniors: Older adults can benefit significantly from pool exercise to improve balance, flexibility, and joint health. Gentle movements like water yoga or tai chi can be therapeutic. Always consult a healthcare professional before starting any new exercise routine.
Exercises for People with Unique Needs
Arthritis: If you have arthritis, consider water therapy. Warm water helps relax muscles and ease joint stiffness. Try gentle leg lifts, arm circles, or simply walking in chest-deep water. Use foam water weights for added resistance without straining your joints.
Making the Most of Your Existing Pool
Not everyone has access to a traditional lap pool, but you can still utilize your existing pool for exercise:
Water Aerobics: In a shallow pool, perform aerobic exercises like high knees, jumping jacks, or side leg lifts. The water’s resistance intensifies the workout.
Water Walking: In waist-deep water, walk briskly from one end of the pool to the other. To make it more challenging, use water shoes or perform lateral movements.
Resistance Bands: Invest in water-resistant exercise bands. These can be attached to the pool ladder or railing for resistance exercises like bicep curls or leg lifts.
Noodle Workouts: Pool noodles are versatile. Use them for support in water aerobics, as a flotation device, or even for resistance exercises.
Interval Training: Create a circuit routine that combines different exercises. For example, swim laps, then switch to water jogging or treading water for a few minutes before resuming laps.
Family Fun: Make pool exercise a family affair. Play games like water volleyball or organize relay races, ensuring everyone gets their dose of physical activity while having fun.
Remember to stay hydrated and wear sunscreen when exercising in the pool, as you can still get sunburned in the water. Also, start slowly and gradually increase the intensity to avoid overexertion.
Pool exercise is a fantastic way to stay active, regardless of your age or physical condition. It offers a refreshing and low-impact alternative to traditional workouts. There are plenty of ways to dive into fitness and make a splash towards a healthier you. So, jump in and enjoy the benefits of pool exercise today!

Our canine companions bring joy and companionship to our lives, and they deserve a space of their own where they can relax and play in luxury. Creating an opulent outdoor space for your dog goes beyond the traditional doghouse and incorporates elements that prioritize comfort and style. If you have a dog who is a little bit “bougie” – or maybe you are – these design tips are for you!
Fancy Dog Houses. Upgrade your dog’s living quarters with a fancy dog house that offers both style and comfort. Opt for a customized design that complements your outdoor space while providing ample space for your dog to stretch out and relax. Consider adding insulation and climate control features to ensure your pet remains cozy year-round, regardless of the weather.
Expansive Dog Runs. A luxury outdoor space isn’t complete without a spacious and well-designed dog run. A dog run provides your furry friend with room to roam and play freely within a secure and enclosed area. To add a touch of elegance, incorporate decorative fencing, lush landscaping, and comfortable footing to pamper your dog’s paws.
Shaded Spots and Water. Just like humans, dogs need a cool and shaded spot to retreat from the sun’s rays. Install a canopy or a luxurious umbrella to create a designated shaded area in the outdoor space. Ensure easy access to fresh water with an elegant, elevated water station that keeps your dog hydrated and refreshed throughout the day.
Elevated Water Features. Elevate your dog’s drinking experience with a stylish and functional water feature. Consider installing a tiered water fountain that not only adds a touch of opulence to the outdoor space but also provides a continuous supply of fresh, circulating water for your dog to enjoy.
Seamless Access to the Home. Your dog’s luxury outdoor space should offer seamless access to your home, allowing them to come and go as they please. Consider installing a pet-friendly entryway, such as a pet door with smart access technology, that provides your pet with independence and convenience while maintaining security.
Comfortable Outdoor Furniture. Pamper your pup with comfortable outdoor furniture designed explicitly for them. Invest in plush dog beds or loungers that are weather-resistant and easy to clean. Place these cozy spots within the outdoor space, allowing your dog to relax and bask in luxury.
Your dog deserves nothing but the best, and creating a luxury outdoor space for him is a wonderful way to show your love and appreciation. From fancy dog houses and dog runs to shaded spots, elevated water features, and seamless access to the home, each element adds a touch of elegance and comfort to your pet’s outdoor retreat. By incorporating these luxurious features, you’ll not only enhance your dog’s quality of life but also create a harmonious and visually appealing outdoor space that both you and your beloved furry friend can enjoy together.

A poolside retreat is synonymous with relaxation and fun, but safety should always remain a top priority. Whether you’re enjoying a refreshing swim, lounging by the water’s edge, or engaging in water games, being aware of potential risks is essential to prevent common poolside injuries. Remember, even if your own family (particular children) are well-versed in poolside safety, guests might not be. These tips will help you keep everyone safer.
Adult Supervision. Never underestimate the importance of adult supervision, especially when children are around the pool. Assign designated “water watchers” to keep an eye on swimmers at all times. Avoid distractions such as using mobile devices or engaging in lengthy conversations while supervising children near water. Remember, constant and attentive supervision is crucial to preventing accidents.
Secure Pool Barriers. Installing proper pool barriers, such as fences with self-closing gates, is a crucial step in preventing unauthorized access to the pool area. Fencing prevents young children from accidentally wandering into the pool unsupervised. Ensure the fence height and gaps between rails meet local safety regulations to keep the pool secure.
Swim Lessons and Water Safety Education. Enroll children in age-appropriate swim lessons as early as possible. Learning to swim not only builds confidence in the water but also equips them with essential water safety skills. Parents and caregivers should also be familiar with CPR and basic water rescue techniques.
Non-Slip Pool Decking. Ensure that the pool deck is constructed using non-slip materials to minimize slip and fall accidents, which are common around wet surfaces. Regularly inspect the deck for any signs of wear or damage, and promptly address any issues to maintain a safe environment.
Implement Pool Rules. Clearly post pool rules in visible areas around the poolside. These rules may include “No Running,” “No Diving in Shallow Water,” “No Glass Containers,” and “No Horseplay.” Establishing and enforcing these rules help prevent accidents and maintain a safe pool environment.
Lifesaving Equipment. Keep essential lifesaving equipment, such as life jackets, rescue tubes, and reaching poles, within easy reach of the pool area. These items can be invaluable in case of an emergency, enabling quick response and potentially preventing a tragedy.
Sun Safety. In addition to water-related risks, don’t forget to protect yourself and your family from the sun. Apply waterproof sunscreen with a high SPF, wear protective clothing, and provide shaded areas or umbrellas to seek refuge from direct sunlight.
Alcohol Awareness. Limit alcohol consumption around the pool. Alcohol impairs judgment and coordination, increasing the risk of accidents and drowning incidents. Designate a responsible adult as the “designated diver” to ensure everyone’s safety.
By following these essential tips and precautions, you can create a safe and enjoyable poolside environment for everyone to savor. Remember, taking preventive measures is the key to preventing common poolside injuries and creating lasting memories of fun and relaxation this summer.
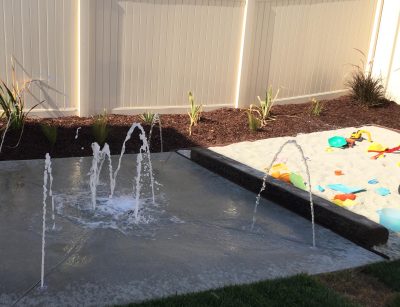
Transforming your backyard into a fun-filled haven for the whole family is every homeowner’s dream. One popular and refreshing trend gaining popularity is installing splash pads at home. These miniature water parks offer a safe and exciting way for kids (and adults!) to cool off and have a blast during the hot summer months. Here’s what you need to know about splash pads.
Design Elements to Consider:
- Safety First: Safety should be the top priority when designing a home splash pad. Consider using slip-resistant materials, rounded edges, and a shallow depth for younger children. Additionally, ensure proper drainage to prevent water accumulation and potential hazards.
- Playful Features: Get creative with the design elements. Incorporate a variety of water features such as gentle spray nozzles, fountains, water buckets, and misters to create an engaging and interactive play area.
- Theme and Aesthetics: Align the splash pad’s theme with your backyard’s overall aesthetics. From a tropical oasis to a pirate adventure, choosing a theme will add a charming touch to the entire area.
- Space and Budget: Assess the available space and set a realistic budget for your splash pad project. Determine the dimensions and shape of the pad that fits well within your yard and ensures optimal utilization of the available area.
Maintenance: Maintaining a home splash pad is relatively straightforward but essential for its longevity and continued enjoyment. Here are some maintenance tips:
Regular Cleaning: Clean the splash pad regularly to prevent the buildup of debris and contaminants. Use a mild detergent and a soft brush to scrub the surface, and rinse thoroughly.
Water Quality: Monitor and maintain the water quality to ensure it remains safe for play. Use a chlorine-free, biodegradable water treatment solution to avoid harsh chemicals.
Inspection: Periodically inspect all components, such as water pumps, filters, and spray nozzles, for any signs of wear and tear. Promptly address any issues to prevent costly repairs in the future.
Lifespan: The lifespan of a home splash pad largely depends on the quality of materials used, maintenance practices, and climate conditions. With proper care, a well-designed splash pad can last anywhere from 10 to 20 years or even longer.
Does a splash pad add value to your home? Installing a splash pad could add value to your home, especially for families with young children or grandchildren.On the other hand, some prospective buyers could view the splash pad as yet another feature requiring maintenance. For those without children, the splash pad probably wouldn’t feel “worth it.” Therefore, the value of a splash pad will depend upon your real estate market and the type of people who will be viewing your home.
A splash pad at home offers endless hours of fun, entertainment, and relief during scorching summers. By carefully considering safety, playful features, aesthetics, space, and budget during the design phase, you can create a splash pad that blends seamlessly with your backyard oasis. So, dive into the world of home splash pads and create a haven of happiness for your loved ones to enjoy for years to come.

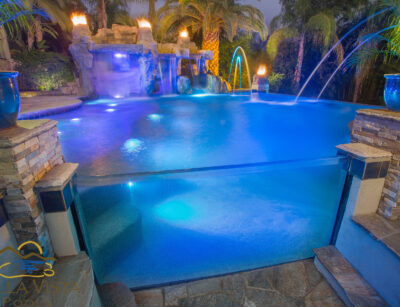
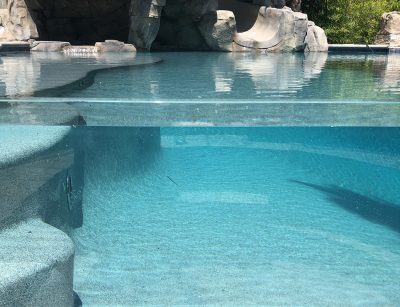
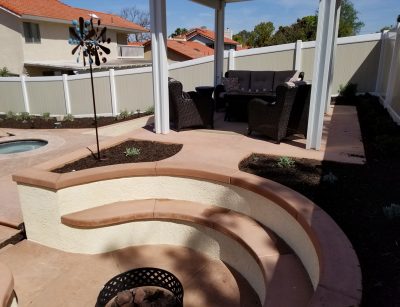
A swimming pool is more than just a place to cool off on a hot day; it’s a symbol of leisure and luxury right in your backyard. To elevate your poolside experience and create a mesmerizing oasis, consider upgrading your swimming pool with cutting-edge features that go beyond the ordinary.
Lighted Deck Jets. Lighted deck jets are an enchanting addition to any pool, creating a magical ambiance as streams of water dance and shimmer in different colors. These jets are installed around the pool’s perimeter, and the LED lights cast a gentle glow on the water’s surface, illuminating the pool area during the evening hours. The combination of soothing water features and soft lighting enhances the overall aesthetics of your pool and provides a delightful experience for both swimmers and spectators.
Swim Lane with Current Generator. Take your swimming experience to the next level with a swim lane featuring a current generator. This innovative feature creates a resistance current, simulating the feeling of swimming against a steady stream. Perfect for fitness enthusiasts, the swim lane offers a challenging workout without the need for a large lap pool. Enjoy the benefits of a full-body workout while feeling like you’re swimming in a vast open sea.
In-Pool Lounges with Reef Steps. In-pool lounges provide a luxurious touch of comfort and relaxation. Imagine soaking up the sun on a comfortable ledge submerged within the pool’s refreshing waters. These in-pool lounges often feature reef steps, allowing you to sit partially submerged with water at waist level, creating the illusion of being on a tranquil beach. In-pool lounges are the perfect spot to unwind, enjoy a good book, or simply savor the calming waters around you.
Fire Bowls. Transform your pool area into a breathtaking spectacle with the addition of fire bowls. Strategically placed fire bowls alongside the pool deck add warmth, drama, and a touch of elegance. The flickering flames create a captivating contrast against the water, making evenings by the pool feel like a magical affair. Additionally, fire bowls extend the usability of your pool area, providing cozy warmth during cooler nights.
Fog System. Create an ethereal atmosphere with a fog system that gently disperses a fine mist over the pool’s surface. The mist creates a dreamy, mystical ambiance that adds a touch of elegance and allure to your pool area. The fog system is particularly enchanting when combined with pool lighting, turning your backyard into a captivating oasis reminiscent of a high-end resort.
Underwater Speakers. Enhance your pool parties and leisure time with underwater speakers that deliver crystal-clear sound below the water’s surface. Whether you’re swimming, relaxing on a float, or hosting a gathering by the pool, underwater speakers provide an immersive audio experience without disturbing the tranquility above the water. Connect your favorite music playlist or audio system and enjoy an unforgettable aquatic sound experience.
Upgrading your swimming pool with these cutting-edge features elevates your backyard into a private oasis that exudes luxury and sophistication. Lighted deck jets, a swim lane with a current generator, in-pool lounges with reef steps, fire bowls, a fog system, and underwater speakers all contribute to a mesmerizing poolside experience that leaves you and your guests awe-inspired. Embrace these modern pool upgrades and transform your swimming pool area into a magical retreat that embodies relaxation, entertainment, and opulence. Dive into luxury and enjoy a pool experience like no other!

We’re fortunate to enjoy relatively mild weather all year long here in Southern California, but spring and summer are particularly well known as flower seasons. If you’re ready to get outdoors and enjoy our lovely natural scenery, these destinations make for terrific day trips.
Anza Borrego State Park. Just a two-hour drive from San Diego, the Anza Borrego State Park features otherworldly desert beauty in the middle of the Colorado Canyon. Take the Borrego Palms Canyon Loop for a three-mile hike through rugged cacti and desert brush. Toward the end of the trail, you’ll reach a palm oasis.
Visit in the spring and enjoy the seasonal waterfall which is quite a sight in the middle of a desert! Due to the high summer temperatures, we recommend visiting Anza Borrego State Park between October and May, but if you do visit during the summer, make sure to take plenty of water.
Santa Monica Mountains Recreation Area. By comparison with many other dusty desert trails in the region, the Solstice Canyon Trail at the Santa Monica Mountains Recreation Area feels almost tropical. Your three-mile hike will take you through a lush canyon, featuring a decent amount of shade, and even past a small waterfall. If you’re looking for a longer day of hiking, the recreation area features several more trails that are all three to four miles in length. Do check the wildfire report before heading to this popular Malibu spot in the summer.
Torrey Pines State Reserve. For a shorter hike that ends at the beach, take the Yucca Point Trail at Torrey Pines State Reserve just north of La Jolla. The reserve features 2,000 acres of desert flora and fauna, in addition to the golden cliffs and ocean views. It’s also the home of the Torrey Pine, one of the rarest trees in the world. The Reserve also features several other trails, for those of you who want additional outdoor adventure.
Joshua Tree National Park. If incredible rock formations appeal to you, the Joshua Tree National Park is right up your alley. For a great workout, take the Ryan Mountain trail which features a 1609-foot elevation change in just 1.5 miles. From the summit, you will view Joshua Trees, rock formations, and the ruins of abandoned mines. Go in the spring to enjoy an abundance of wildflowers along the trail.
Channel Islands National Park. For a more secluded island hike, head over to the Channel Islands National Park and take the Smuggler’s Cove trail. You’ll first take a ferry from Ventura, a great opportunity to spot migrating whales in the winter or bottlenose dolphins at any time of year. The 7.7-mile hike features local vegetation, rocky cliffs, and views of Santa Barbara and Ventura from across the ocean.
And as always, give us a call if you return from your trip feeling inspired. We can help you incorporate native plants and other new features into your existing landscape design.

Those of you who enjoy traveling and viewing gardens might be surprised to learn that you can combine this pastime with an enjoyment of sports. But that’s exactly what you can do when you visit Padres Stadium in San Diego. Aside from serving as the home of our Major League Baseball team, the San Diego Padres, the stadium also boasts some of the best landscaping of any US ballpark.
Designed by Spurlock Landscape Architects as a “garden ballpark,” the Padres Stadium and its surrounding gardens serve as a centerpiece of downtown San Diego. The renovation helped to rejuvenate Park Boulevard and provide continuity between Balboa Park gardens and the Bayfront.
Home Plate Plaza, the main entry to the park, features a waterfall down the facing of one wall, surrounded by beautiful landscaping. The design team created open-air concourses, accented with coral trees and palms. Flowering plants hang from the edges of walkways and trellises.
For those who love a large, grassy lawn, there’s plenty to learn from the landscapers at Padres Stadium. In winter, the field is planted with a rye grass, and then the team transitions to a Bermuda grass in summers. The field must be irrigated, due to the lack of sufficient rain in Southern California, and landscapers apply treatments to remove salt and chemicals that are present in the water. If you want to see for yourself how brilliantly green a lawn can be with the right care, check out the field at Padres Stadium.
But if baseball isn’t your thing, you don’t have to visit on game day. Gallagher Square, adjacent to the main stadium, is free and open to the public on non-game days. Or you can catch a concert in the park, at the new venue, Sycuan Stage. Be sure to bring a picnic blanket and basket or take advantage of the stadium’s nearby food vendors (including beer). Kids will enjoy the playground or pick up a game of baseball in the kids’ diamond.
If you work up an appetite while visiting, head over to the Gaslamp Quarter, a 16-block neighborhood bordering the west side of the park. There you will find plenty of shopping and restaurants to round out your visit.
And if you’re feeling inspired? Give us a call when you get back. We can help you incorporate new elements into your existing landscape design.
For those who frequently entertain at home, or simply want to enjoy a private backyard getaway alone, sunken fire pits are growing in popularity. Combining the retro ambiance of sunken living rooms with the cozy atmosphere of a glowing fire, sunken fire pits make a great addition for those of you who appreciate carefully landscaped, usable outdoor spaces.
Of course, like any other landscaping feature, a sunken fire pit must be carefully constructed so that you reap maximum enjoyment from it.
Smart placement. The primary purpose of a fire pit should not be forgotten when designing the space. While creating a dedicated space does make the activity safer, risk is always involved with backyard fires. Place your sunken fire pit at least ten feet away from any other structure, such as your home, gardening shed, or gazebo.
Choose a type of fire pit. Are you planning to use natural gas, propane, or bioethanol? After making this decision, you can choose from among pre-built fire pits (made of concrete, stone, or metal) or build your own.
Choose a material. If you’ve decided to construct your own fire pit, you might choose from materials such as brick, stone, or concrete. The primary advantages of each will be appearance and price. When adequately constructed, all of these materials are equally safe.
Design your fire pit. You can design your fire pit in any shape that appeals to you, but oval and circular pits can be a bit tricky when using some materials. Consider, also, how seating or other desired features will fit into the shape that you choose.
Check your local laws. Before constructing a sunken fire pit, check your local laws on both fire pit construction and burning. Everything from size to location to the actual construction might be regulated by your city, and it’s better to build according to law than to be fined or forced to remove the fire pit later.
Consider drainage. A sunken fire pit must be carefully designed, with appropriate drainage included. Otherwise, it will quickly morph into an unsightly puddle in your backyard.
Include seating. You can build seating into your space, or simply purchase benches or outdoor furniture to move into the pace. Do remember to choose fire resistant materials when purchasing seating and consider the space requirements before building your fire pit. Seating should be placed close enough to the fire for warmth and enjoyment, but not so close that safety is compromised.
Include fun extras. A fire pit can double as a barbecue pit or outdoor kitchen when you include a cooking surface. Or you can build an oven right into a brick fire pit. These features are best considered during construction, rather than trying to alter the design to add them later.
If a sunken fire pit sounds like something you would enjoy, call us to discuss your ideas. We can help you determine the safest and most attractive way to incorporate this feature into your backyard landscaping.